
Arduino vs Raspberry Pi: Which One Should You Actually Use for Your Project?
17 min
- Arduino vs Raspberry Pi: The Core Difference
- Arduino vs Raspberry Pi Comparison Table
- What Is Arduino?
- What Is Raspberry Pi?
- Arduino vs Raspberry Pi for Beginners
- Raspberry Pi vs Arduino: Choosing the Right Board for Real-World Projects
- Arduino vs Raspberry Pi for Robotics: Which Board Is Better?
- Arduino vs Raspberry Pi for IoT
- Arduino vs Raspberry Pi vs ESP32
- Arduino vs Raspberry Pi: Programming Differences
- Arduino vs Raspberry Pi Cost Comparison
- Common Beginner Mistakes Using Arduino and Raspberry Pi
- FAQs on Raspberry Pi vs Arduino
- Conclusion
Note
Quick Answer:
- Choose Arduino for robotics control, sensors, low-power builds, and direct hardware-level interaction where precise control loops matter.
- Choose Raspberry Pi for AI inference, Linux applications, multimedia, networking, and anything that needs a full operating system.
If you have searched Arduino vs Raspberry Pi, you have probably found a dozen articles listing specs side by side without telling you what actually matters for your build. This guide is different.
Whether you are prototyping a robotics arm, deploying an IoT sensor network, automating your home, or just starting in DIY electronics, the board you choose shapes how your project works, behaves under load, and scales. Arduino and Raspberry Pi are both affordable and beginner-friendly. But they solve completely different problems, and picking the wrong one wastes time and money.
In this guide, you will find real project examples that match the right board to the right task, a full comparison table, dedicated robotics and IoT breakdowns, a clear answer on where they fits in, and a beginner learning path that actually works. By the end, the choice will be obvious.
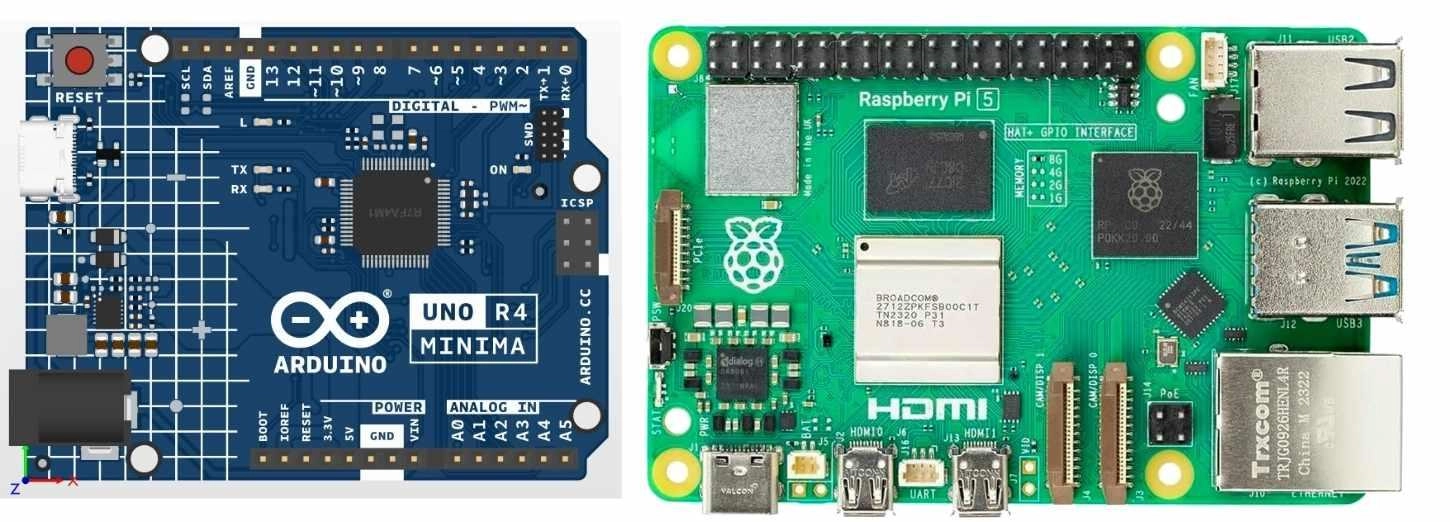
Figure: Arduino Uno R4 microcontroller board and Raspberry Pi 5 single-board computer
Arduino vs Raspberry Pi: The Core Difference
Most comparisons focus on specs like clock speed and RAM. The real distinction is architectural: one is a microcontroller, and the other is a full computer. Understanding this from the start prevents the most common beginner mistakes.
Summary
Arduino = your body's reflex system. Touch a hot stove; your hand pulls back before your brain registers the pain. That is a low-latency, hardware-level response with no software layer in between.
Raspberry Pi = your brain. It thinks, plans, connects to the internet, processes images, and makes complex multi-step decisions. But it needs time to boot and cannot guarantee microsecond-level GPIO responses.
Neither is better. They solve different problems. Many advanced projects use both: Arduino handles fast, direct hardware interaction, while the Pi manages logic, UI, networking, and data logging.
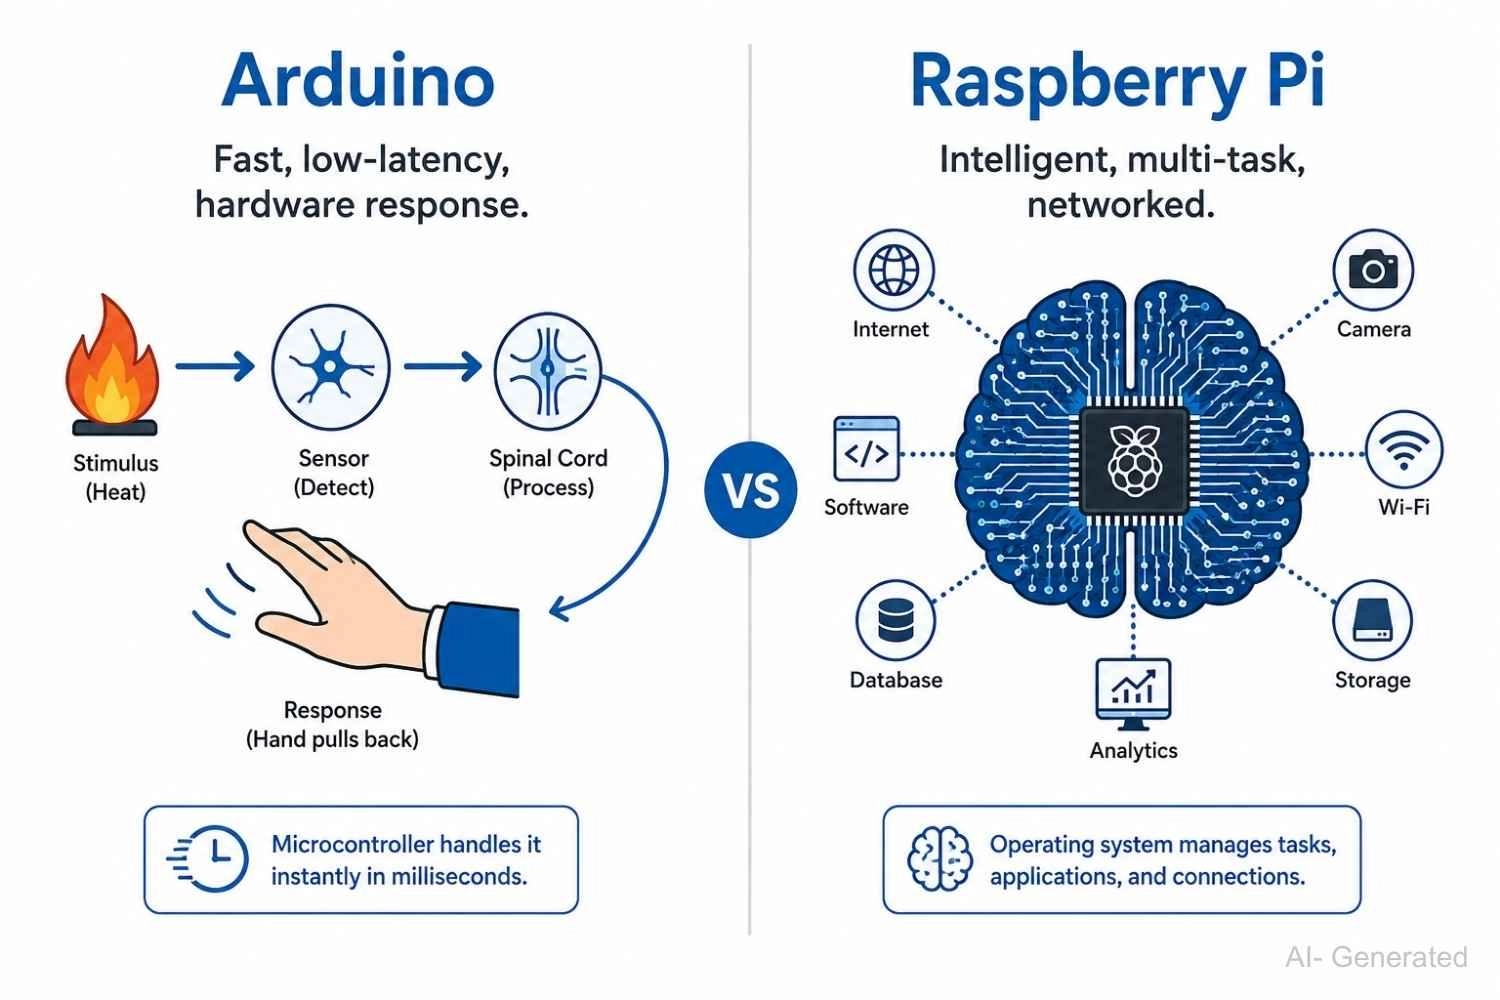
Figure: Arduino as a low-latency hardware response system vs Raspberry Pi as a computing brain for intelligent, networked processing
Arduino vs Raspberry Pi Comparison Table
The table below covers the most critical technical and practical differences. Use it as a quick reference when making your decision.
| Attribute | Arduino Uno R4 | Raspberry Pi 5 (4 GB) |
|---|---|---|
| Type | Microcontroller | Single-board computer (SBC) |
| Processor | Renesas RA4M1 (ARM Cortex-M4, 48 MHz) | BCM2712 (quad-core Cortex-A76, 2.4 GHz) |
| RAM | 32 KB SRAM | 4 GB LPDDR4X |
| Storage | 256 KB on-chip flash | microSD or NVMe via PCIe slot |
| Operating System | None (bare metal) | Linux (Raspberry Pi OS, Ubuntu, and others) |
| Programming Language | C/C++ via Arduino IDE | Python, C++, JavaScript, Rust, and more |
| GPIO I/O Behaviour | Predictable timing, sub-millisecond | OS scheduler can introduce jitter |
| Active Power Draw | ~0.25 W | 5 to 15 W |
| Battery Operation | Practical (months on coin cell) | Impractical without external power management |
| Wi-Fi / Bluetooth | Optional via shield or module | Built-in Wi-Fi 5 and Bluetooth 5.0 |
| Boot Time | Milliseconds (instant) | 20 to 40 seconds to the desktop |
| Price (approx.) | ~$27 | ~$60 |
| Best Suited For | Sensors, actuators, direct hardware control | Compute, networking, Linux software, vision AI |
What Is Arduino?
Arduino is a microcontroller board. It runs a single program in an infinite loop, has no operating system, and boots in milliseconds. It communicates directly with hardware (sensors, motors, relays, LEDs) with tight, predictable timing and no background processes interfering with the output.
Practical examples of what Arduino handles well:
- Reading a temperature sensor every 500ms and triggering a cooling fan relay
- Driving servo motors in a robotic arm with precise PWM signals
- Measuring soil moisture and activating an irrigation pump on a threshold
- Running a keypad door lock that responds to every key press without delay
Arduino's simplicity is its engineering strength. There is no SD card to corrupt, no OS to freeze mid-operation, and no boot sequence. Power it on, and it runs immediately.
For a deeper look at how microcontrollers differ from microprocessors at the architectural level, the microcontroller vs microprocessor guide covers the key distinctions in practical terms.
Technical Note
Arduino is not a microcontroller itself - it is a development board platform. The board hosts a microcontroller chip, and that chip can vary. The classic Uno uses an ATmega328P, the Uno R4 uses a Renesas RA4M1, and the Arduino ecosystem also supports boards built around the ESP32, STM32, and other MCUs. When people say "Arduino" they are usually referring to the platform, the IDE, and the programming model - not a specific chip.
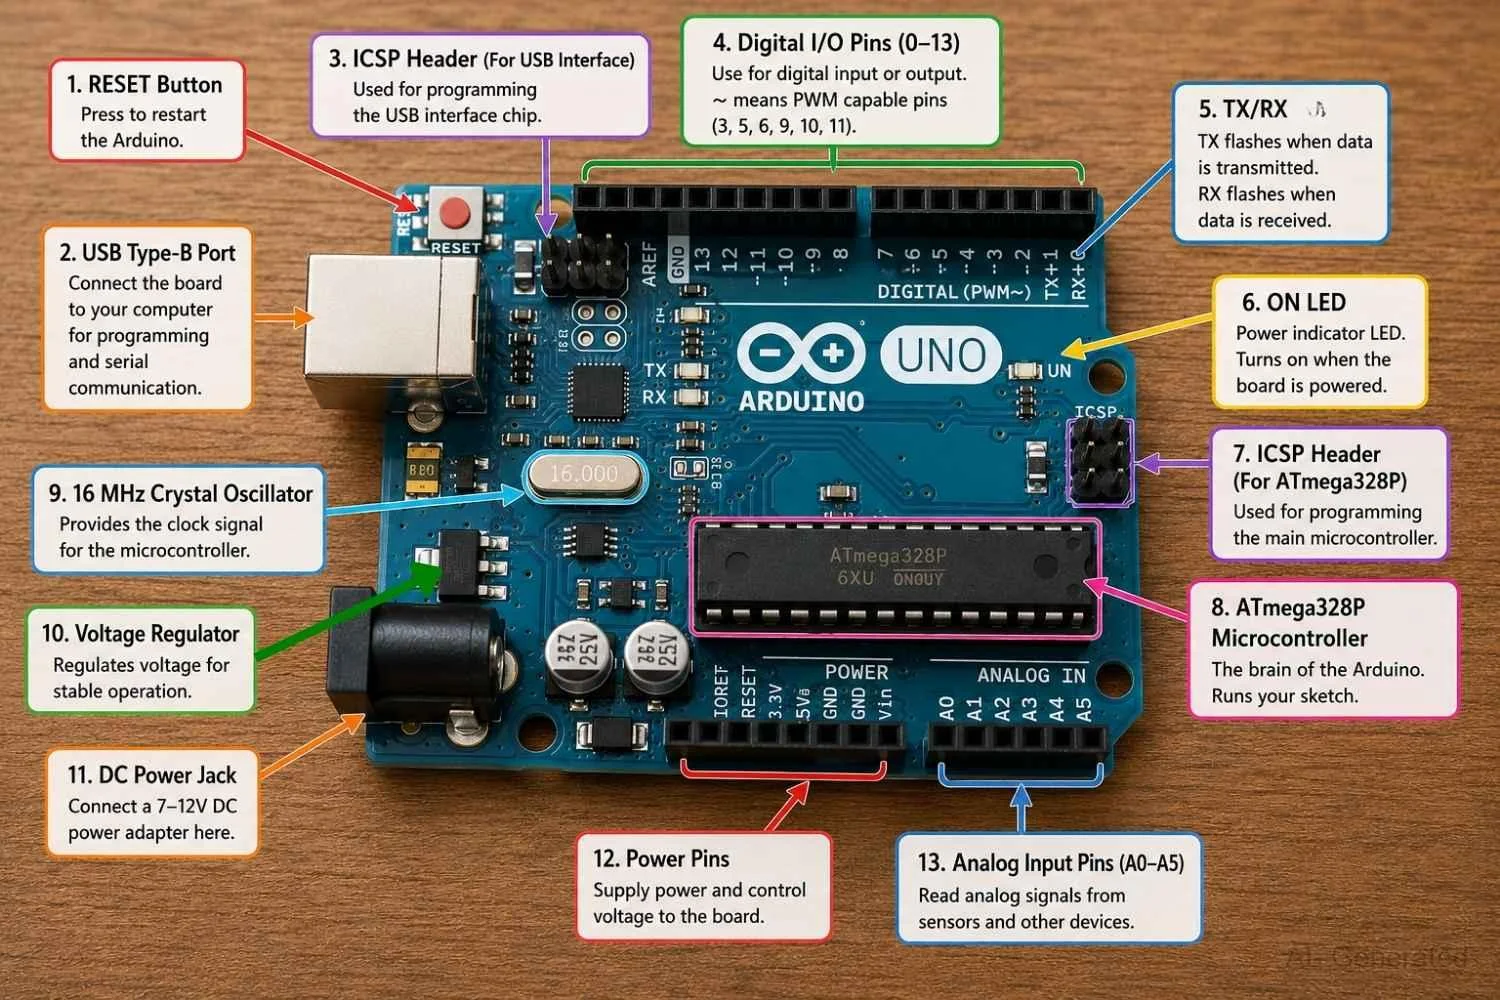
Figure: An Arduino Uno microcontroller board with its detailed components.
What Is Raspberry Pi?
Raspberry Pi is a single-board computer (SBC). It runs a full Linux operating system, handles multitasking, supports USB, HDMI, Ethernet, and Wi-Fi natively, and executes complex programs in Python, JavaScript, C++, Rust, and more.
Practical examples of what Raspberry Pi handles well:
- Running a Home Assistant dashboard managing 50+ smart home devices over MQTT
- Processing live camera frames for object detection using OpenCV and Python
- Hosting a local web server, database, or Docker container stack
- Streaming sensor data to the cloud, running Node-RED automation flows, or serving a local web app
The Raspberry Pi 5, the latest generation, includes a PCIe Gen 2 slot for NVMe SSD storage, a capability no microcontroller board approaches.
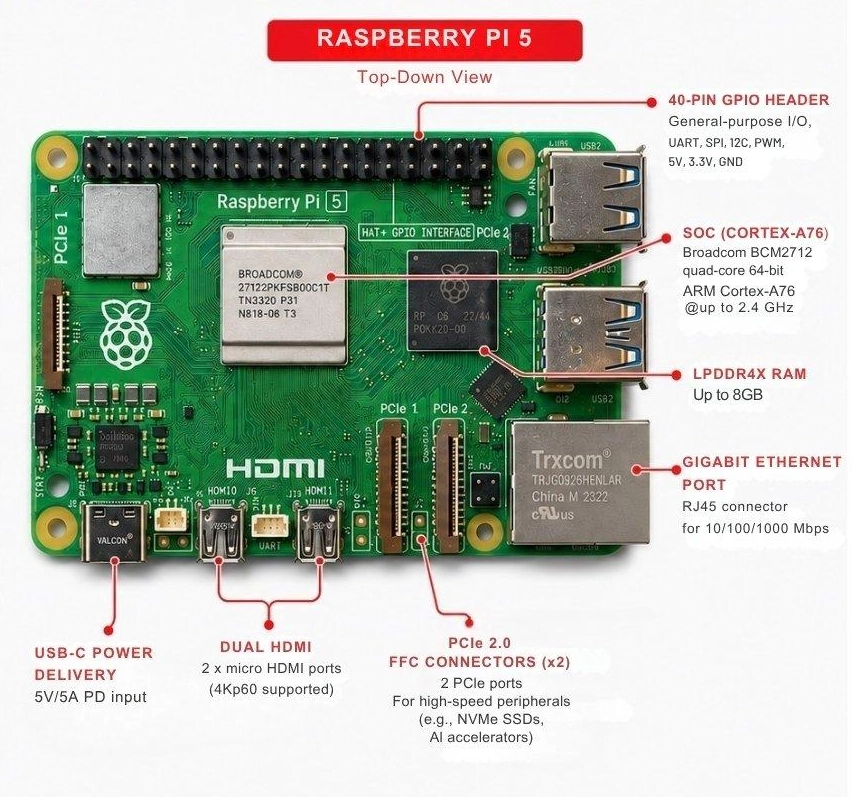
Figure: Raspberry Pi 5 single-board computer showing all its components.
Arduino vs Raspberry Pi for Beginners
Both platforms can be a first hardware project. The question is which type of friction you want to deal with first: hardware-level or OS-level.
Start With Arduino If...
- You want to control physical hardware immediately (LEDs, motors, sensors, relays)
- You have little or no prior programming experience
- Your project is battery-powered or deployed outdoors without a permanent power outlet
- You prefer a simple, beginner-friendly IDE with minimal setup time
- You plan to eventually design a custom PCB, since the Arduino-to-PCB workflow is well-established
Start With Raspberry Pi If...
- You already know Python and want to run scripts on real hardware
- Your project needs internet connectivity, a display, or complex data processing
- You are building something that runs multiple tasks simultaneously (server, dashboard, automation hub)
- You want a full Linux desktop environment for learning software development alongside hardware
Best Learning Path: Arduino to Raspberry Pi
For most beginners, this progression works best:
Arduino > ESP32 > Raspberry Pi
- Arduino teaches hardware interaction, embedded C fundamentals, and how direct GPIO control actually works
- ESP32 adds wireless connectivity (Wi-Fi and Bluetooth LE) while staying in the familiar Arduino IDE
- Raspberry Pi adds Linux depth, compute power, and real software engineering on a solid hardware foundation
Jumping straight to Raspberry Pi without hardware fundamentals often causes confusion around GPIO voltage levels, signal behaviour, and the limits of OS-driven hardware interaction. Building that foundation on Arduino first saves significant downstream frustration.
Raspberry Pi vs Arduino: Choosing the Right Board for Real-World Projects
Specs alone do not make the decision. The project does. Here is a practical breakdown across eight common scenarios.
| Project | Best Board | Why |
|---|---|---|
| Auto-watering garden system | Arduino | Battery-powered, direct sensor reads, no OS needed |
| Smart home hub (MQTT + dashboard) | Raspberry Pi | Needs Linux, multitasking, persistent network connection |
| Self-balancing robot | Arduino | Precise 1 kHz control loop needs a predictable cycle time |
| Object detection camera (OpenCV) | Raspberry Pi | OpenCV runs natively; microcontrollers cannot process image data |
| Retro gaming console (RetroPie) | Raspberry Pi | HDMI output, USB controllers, Linux emulators run natively |
| PWM LED strip controller | Arduino | Hardware PWM timers give glitch-free, precise color output |
| Self-Driving Autonomous Vision Car | Arduino + Raspberry Pi | Arduino for low-level motor control and Raspberry Pi for vision-based AI |
If the final design uses SMD components (common in custom Arduino-derived boards), the surface mount devices reference is a practical starting point for component selection and footprint decisions.
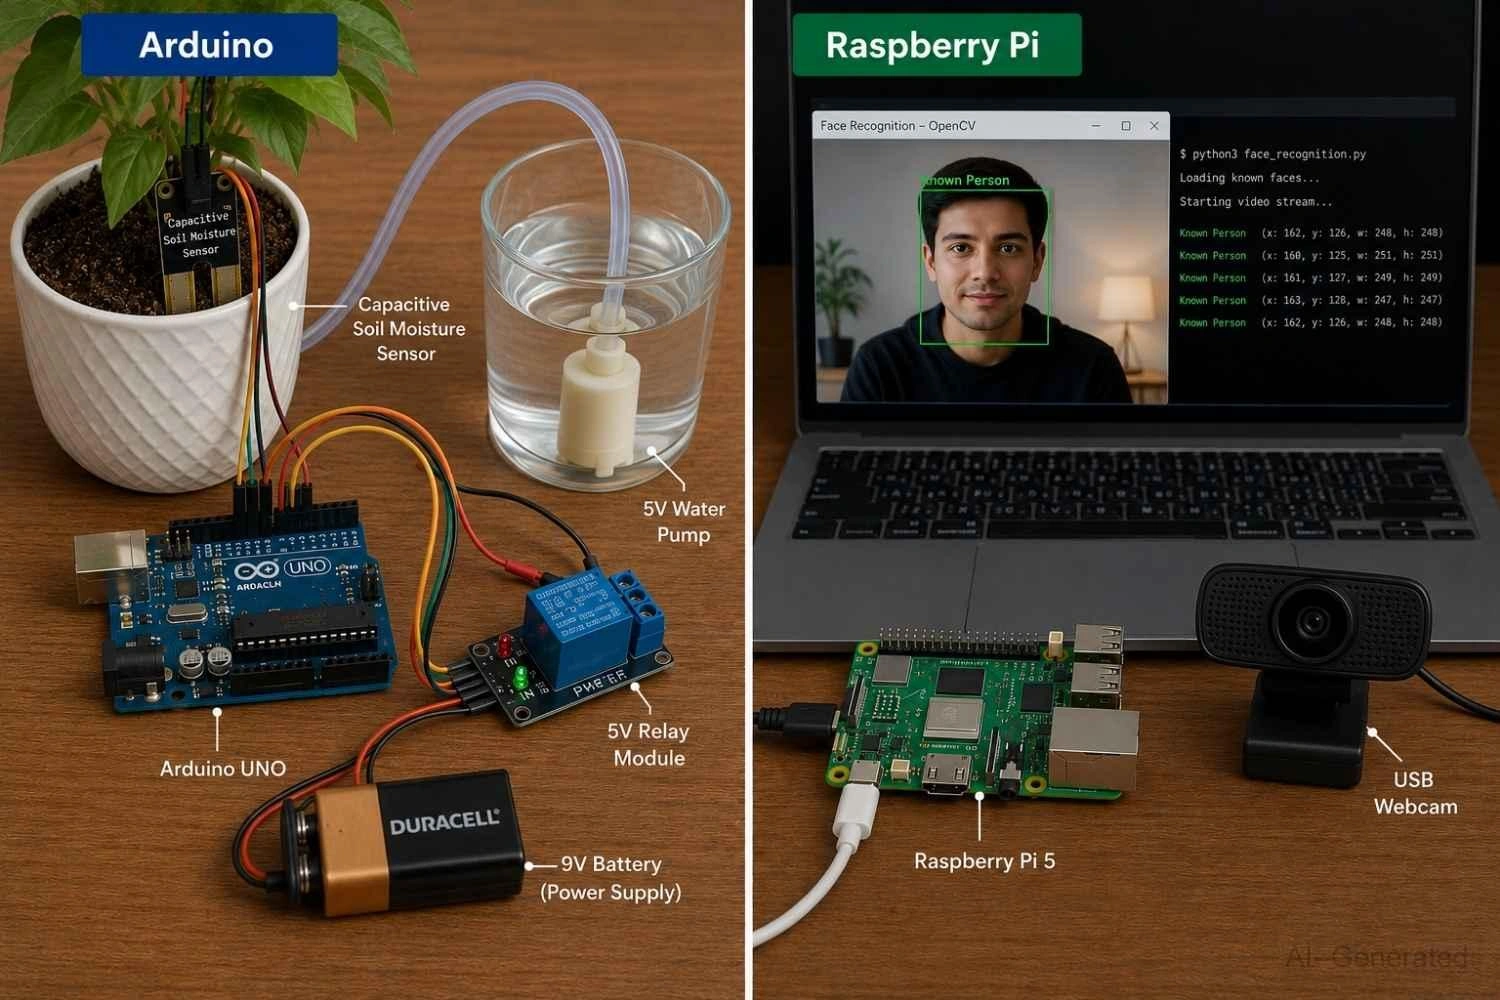
Figure: Comparing two real projects: an Arduino-based auto-watering system and a Raspberry Pi face recognition setup with OpenCV.
Custom PCBs make robotics and embedded systems more compact, stable, and scalable. Many developers use JLCPCB for fast PCB prototyping and PCB assembly when transitioning from breadboards to production-ready hardware.
Save Time & Money by choosing All-in-One PCB fabrication, assembly, and components supplier.
Get Quote Now >
Arduino vs Raspberry Pi for Robotics: Which Board Is Better?
Robotics is where this debate gets the most nuanced, because most serious robots use both boards working together.
Arduino for Low-Level Hardware Control
- Hardware PWM timers drive servo motors and ESCs with microsecond precision
- Interrupt-driven encoder reads enable closed-loop DC motor control
- PID loops running at 500 Hz to 1 kHz with consistent, predictable cycle time
- Direct stepper motor step/direction pulse generation without jitter from background processes
Raspberry Pi for High-Level Intelligence
- Computer vision with OpenCV for lane tracking, obstacle detection, or object classification
- Path planning algorithms and ROS (Robot Operating System) integration
- Wireless telemetry logging, OTA firmware updates, and remote control via Wi-Fi
- Running trained ML models for gesture or voice command recognition
Why Advanced Robots Use Both Raspberry Pi and Arduino Together
In a typical advanced robot, Arduino reads IMU data and closes the motor control loop at 1 kHz. Raspberry Pi runs the path planner, processes camera frames, and sends velocity setpoints to Arduino over UART or I2C. This pairing is used in everything from classroom robots to industrial AMRs.
If you try to run a PID motor control loop on Raspberry Pi, the Linux scheduler interrupts the loop at unpredictable intervals, producing oscillation and servo jitter. Arduino handles it cleanly. That constraint is the main reason high-performance robots pair both boards rather than relying on one.
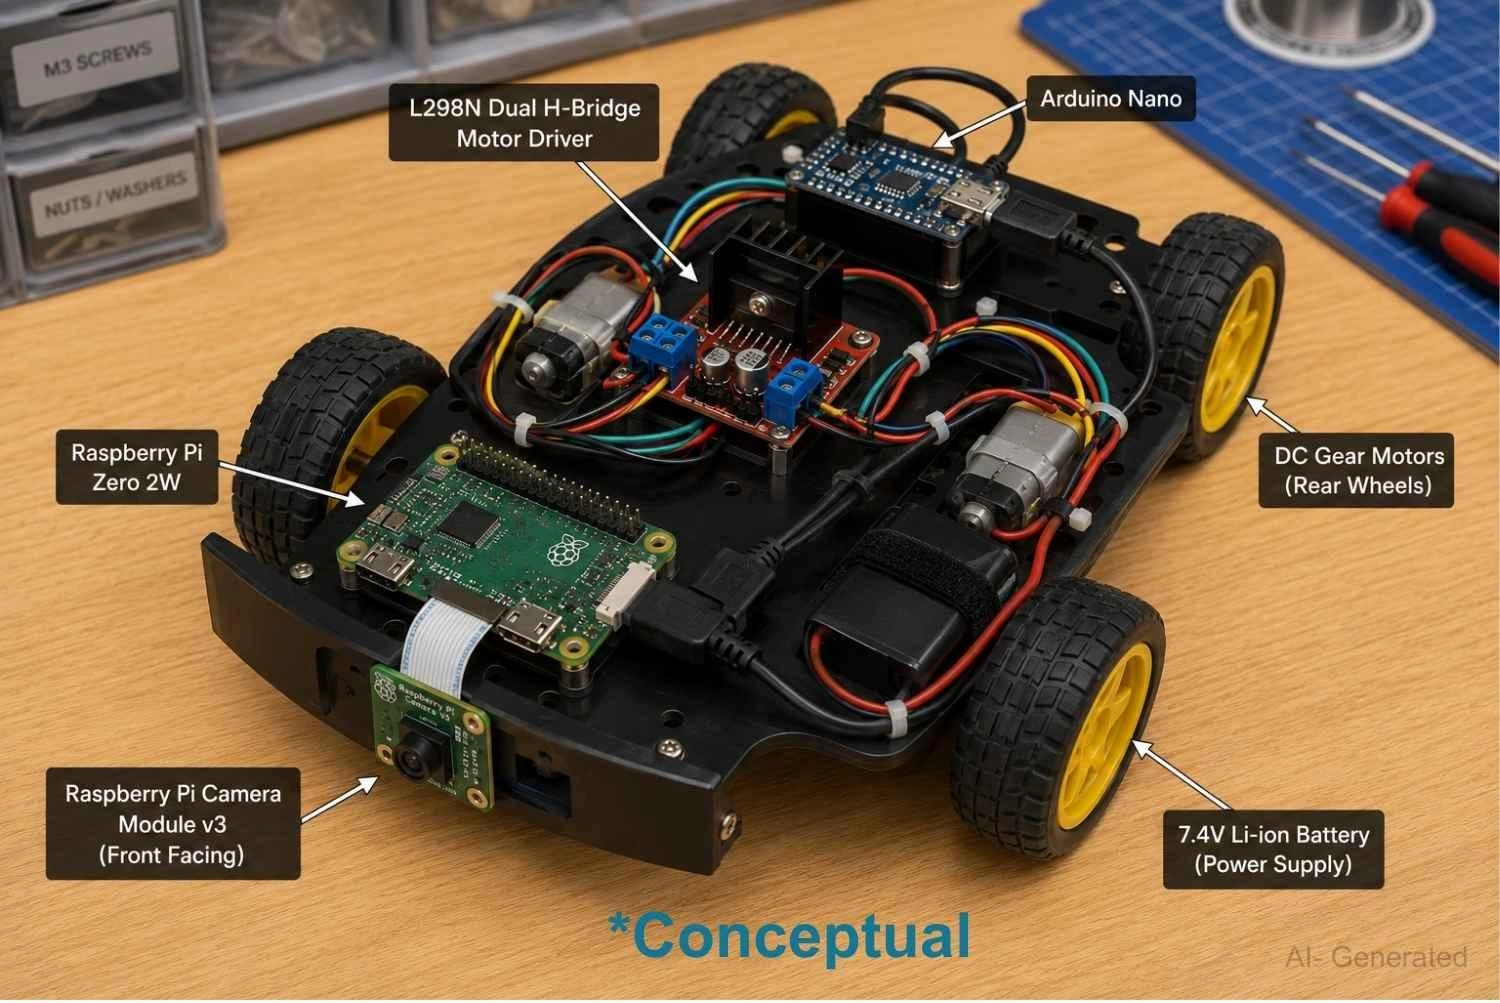
Figure: DIY RC car chassis with an Arduino Nano controlling the L298N motor driver for wheel movement and a Raspberry Pi Zero 2W handling the forward-facing camera module
Arduino vs Raspberry Pi for IoT
For IoT applications, the decision comes down to whether your device is a sensor node or a hub.
Sensor nodes (edge devices that read data and transmit it) need low power, wireless connectivity, and long battery life. Standalone Arduino boards do not include Wi-Fi, and Raspberry Pi consumes too much power for battery deployment. This is where the ESP32 MCU is the practical choice: dual-core 240 MHz processor, built-in Wi-Fi and Bluetooth LE, and deep sleep current under 10 uA.
Hubs and gateways (devices that aggregate data, run dashboards, and connect to cloud services) need Linux, persistent networking, and database storage. Raspberry Pi is the correct tool here.
A practical IoT architecture looks like this:
- ESP32 field nodes collect temperature, humidity, or motion data and publish via MQTT over Wi-Fi
- Raspberry Pi hub runs Mosquitto MQTT broker, Node-RED automation flows, and a Grafana dashboard
- Cloud integration (optional): the Pi forwards aggregated data to AWS IoT Core, Google Cloud, or InfluxDB Cloud
Note
Some Arduino boards may have an ESP32 Chip, which can be used for IoT.
The ESP32 S2 module PCB design guide is a practical reference for designing custom hardware around the ESP32 node role.
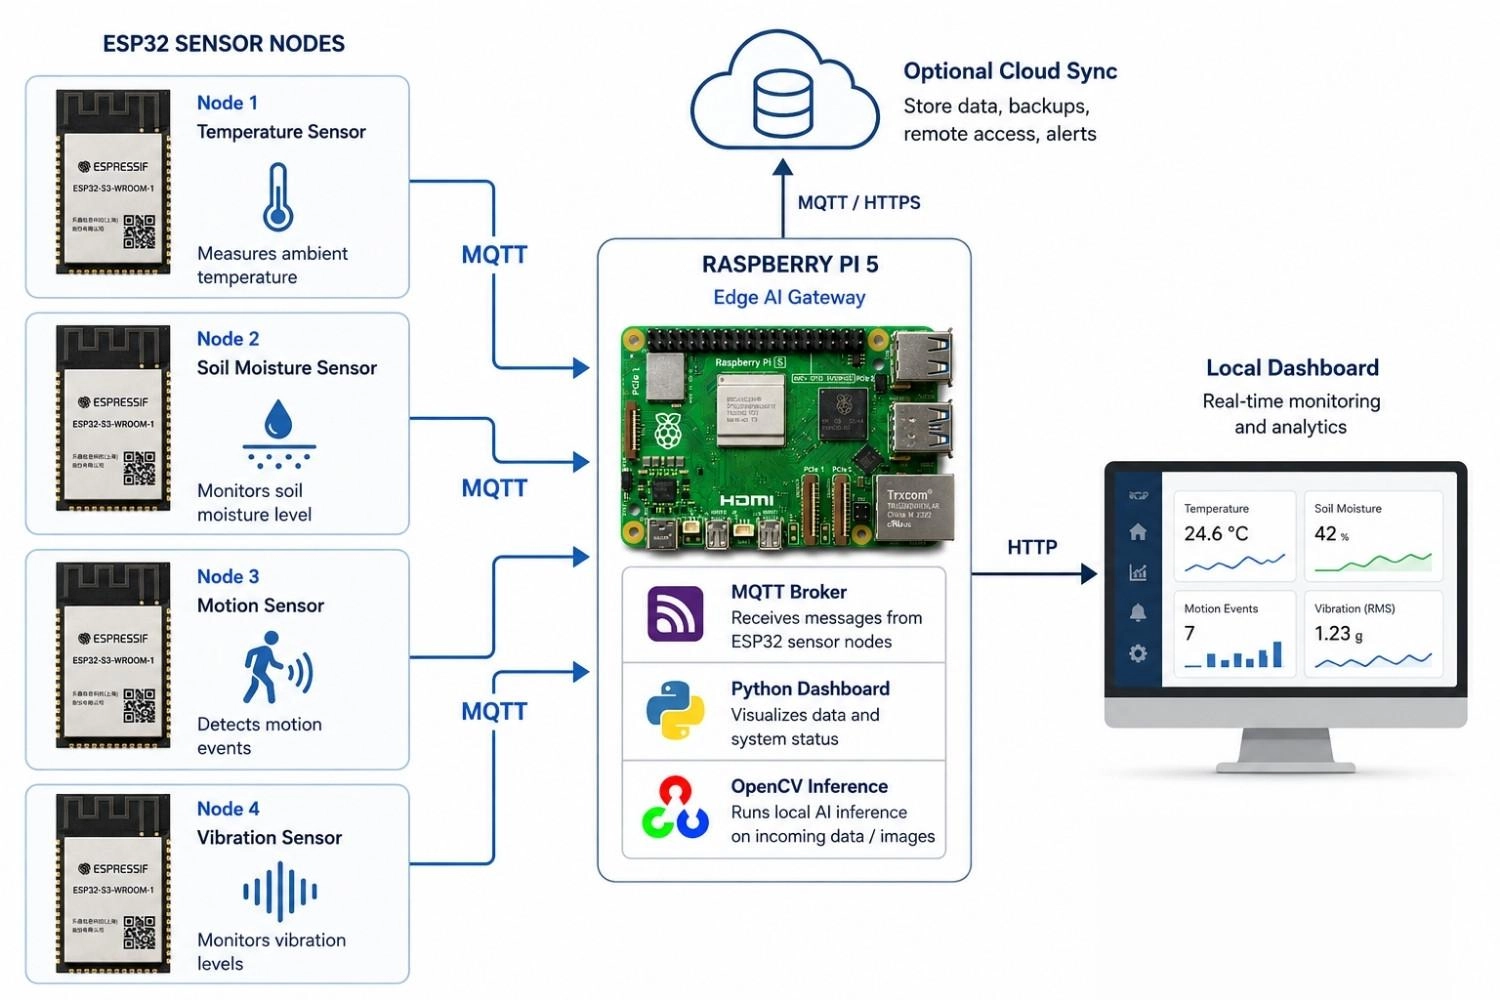
Figure: An IoT network showing three ESP32 sensor nodes transmitting data over Wi-Fi to a central Raspberry Pi MQTT hub connected to a cloud dashboard
Arduino vs Raspberry Pi vs ESP32
ESP32 fills the gap between the other two. More capable than a standard Arduino, far lower power than a Raspberry Pi, with Wi-Fi and Bluetooth built in. For a large class of IoT and wireless projects, it is the better answer than either.
| Feature | Arduino Uno R4 | ESP32 | Raspberry Pi 5 |
|---|---|---|---|
| Wi-Fi | Optional shield | Built-in | Built-in |
| Bluetooth LE | No | Built-in | Built-in |
| GPIO Behaviour | Predictable, low-latency | Predictable, low-latency | OS-dependent latency |
| Runs Linux | No | No | Yes |
| Active Power | ~0.25 W | 0.25 to 0.5 W | 5 to 15 W |
| Deep Sleep | ~20 to 50 uA | ~10 uA | Not applicable |
| Approx. Price | ~$27 | ~$5 to 10 (module) | ~$60 |
| Best For | Hardware control, no wireless | Wireless IoT, battery sensors | Compute, Linux, hub, or gateway |
For a detailed side-by-side look at the two wireless-capable options in this table, the ESP32 vs Arduino and ESP32 vs Raspberry Pi articles cover the trade-offs with use-case examples.
Which Should You Buy First?
- Arduino Uno: for learning hardware fundamentals and embedded control with no wireless requirement
- ESP32: for IoT or wireless sensor builds from day one; programs in the familiar Arduino IDE
- Raspberry Pi: for projects that need Linux, camera processing, or a data hub or gateway
Arduino vs Raspberry Pi: Programming Differences
Arduino Programming
Arduino uses C/C++ in the Arduino IDE. A sketch has two functions: setup() runs once at boot; loop() runs continuously. Most beginners are controlling hardware within 15 minutes of opening the IDE.
- Language: C/C++ (simplified subset, no manual memory management required for basic projects)
- IDE: Arduino IDE 2.x or PlatformIO (both free and beginner-friendly)
- Libraries: large community ecosystem covering sensors, displays, motor drivers, and communication protocols
- Limitation: no multitasking, no file system beyond EEPROM, SRAM capped at 32 KB on Uno R4
Raspberry Pi Programming
Raspberry Pi supports any language with a Linux runtime. Python is the dominant choice for GPIO projects, with mature libraries (gpiozero, RPi.GPIO, pigpio). Advanced users run C++, Node.js, Rust, or Go without restriction.
- Language: Python (primary), C++, JavaScript, Rust, Go (developer's choice)
- GPIO libraries: gpiozero for beginners, RPi.GPIO for standard use, pigpio for precision timing
- Execution model: scripts, systemd services, cron jobs, Docker containers, or multi-process pipelines
- Limitation: GPIO output is OS-dependent and not suitable for hard timing-critical tasks
Summary: If you already know Python, Raspberry Pi feels natural immediately. If you are new to programming, Arduino's structured C sketch format is the lower-friction starting point.
Arduino vs Raspberry Pi Cost Comparison
Board price is only part of the total cost. Here is what you actually need to budget for a working system on each platform.
| Item | Arduino Uno R4 | ESP32 Dev Board | Raspberry Pi 5 (4 GB) |
|---|---|---|---|
| Board | ~$27 | ~$8 to 12 | ~$60 |
| Power supply | USB 5V (~$5) | USB 5V (~$5) | USB-C 5V/3A (~$12) |
| Storage | Built-in flash | Built-in flash | microSD ~$8 to 15 |
| Case or enclosure | Optional (~$5) | Optional (~$5) | Recommended (~$10) |
| Typical starter kit | $35 to 50 | $15 to 25 | $85 to 110 |
Raspberry Pi's total system cost runs two to three times Arduino's for equivalent simple functionality. For a battery-powered sensor or actuator project, choosing Pi over Arduino can mean spending $60 to 100 extra on capabilities that will go entirely unused.
Common Beginner Mistakes Using Arduino and Raspberry Pi
These are the mistakes that show up repeatedly in forums, Discord servers, and support threads.
1. Using Raspberry Pi to blink an LED. A $60 Linux computer running a full 30-second boot cycle to toggle one GPIO pin. Arduino does this for under $10 with no boot time at all.
2. Expecting Arduino to run Python or Linux. Arduino Uno R4 has 32 KB of RAM. Linux requires roughly 256 MB minimum to boot. This is not a limitation to work around; it is a fundamental architectural difference.
3. Ignoring Pi's power requirements. Raspberry Pi 5 needs a stable 5V/3A supply. Underpowering it causes random crashes, file system corruption, and in the worst case, a corrupted microSD card.
4. Connecting Arduino 5V GPIO directly to Raspberry Pi GPIO. Arduino Uno outputs 5V logic levels. Raspberry Pi GPIO pins are 3.3V tolerant. A direct 5V connection will permanently damage the Pi's GPIO. Always use a logic level shifter.
5. Choosing Raspberry Pi for battery-powered outdoor sensors. Pi 5 draws 5 to 15 W continuously. A 10,000 mAh power bank lasts roughly 6 to 8 hours. An ESP32 in deep sleep on the same battery lasts months.
6. Running a PID control loop on Raspberry Pi. The Linux scheduler interrupts the loop at unpredictable intervals, causing motor oscillation and servo jitter. Any timing-critical control loop belongs on a microcontroller.
FAQs on Raspberry Pi vs Arduino
Q: Is Raspberry Pi better than Arduino?
They are not comparable on a better/worse scale; they solve different problems. Raspberry Pi is better for computing, networking, and Linux applications. Arduino is better for low-power hardware interaction, direct GPIO control, and predictable output timing. Asking which is better is like asking whether a laptop is better than a microwave.
Q: Can Raspberry Pi replace Arduino?
Rarely, in practice. While Raspberry Pi can toggle GPIO pins, output timing depends on what the Linux scheduler is doing at that moment. For precise PWM, interrupt-driven sensor reads, PID control loops, or any project running on batteries long-term, Arduino is the correct tool. Forcing Pi into those roles typically produces unstable, unreliable behaviour.
Q: Which is easier for beginners, Arduino or Raspberry Pi?
Arduino. The Arduino IDE has a gentle learning curve, the C sketch format is highly structured, and most beginners reach working hardware within 15 minutes. Raspberry Pi requires Linux familiarity, package management, and an understanding of the OS environment, which is a significantly higher barrier for someone starting from scratch.
Q: Is ESP32 better than Arduino Uno?
For IoT and wireless projects, yes. ESP32 provides built-in Wi-Fi and Bluetooth LE, a dual-core 240 MHz processor, and deep sleep current under 10 uA, all for roughly $5 to 10 per module. For pure hardware control with no wireless requirement, Arduino Uno's simplicity is often the better choice. ESP32 programs in the Arduino IDE, so the transition is minimal.
Q: Which board is best for robotics?
Most serious robotics projects use both. Arduino (or STM32) handles the low-level control loop (motor drivers, encoders, PWM for servos) where predictable timing is non-negotiable. Raspberry Pi handles high-level intelligence such as computer vision, path planning, and ROS integration. Relying only on Pi for motor control typically causes instability because of OS scheduling unpredictability.
Q: Can Arduino run AI?
Basic on-device machine learning, yes. Arduino Nano 33 BLE Sense runs TinyML models via TensorFlow Lite for Microcontrollers, enabling keyword spotting and simple gesture classification. Full AI inference (image recognition, NLP, large model inference) requires a Raspberry Pi, a dedicated accelerator, or cloud processing. Arduino AI is strictly limited to small, heavily optimized models under roughly 256 KB.
Q: Why does Raspberry Pi use so much more power than Arduino?
Raspberry Pi 5 runs a full OS on a quad-core ARM Cortex-A76 processor at 2.4 GHz, with 4 GB LPDDR4X RAM, a USB 3.0 controller, dual HDMI, PCIe, and multiple active peripheral buses all drawing current continuously. Arduino's microcontroller executes instructions at 48 MHz with no OS, no background processes, and no active bus traffic, which accounts for the 20 to 60 times difference in typical power draw.
Q: Can Arduino and Raspberry Pi work together?
Yes, and this is the standard architecture for advanced projects. Arduino handles direct hardware interaction while Raspberry Pi manages high-level logic, user interfaces, networking, and data logging. They communicate over serial UART, I2C, SPI, or USB. A greenhouse controller, for example, might run Arduino for sensor polling and relay switching while Pi logs data to a database, shows a live dashboard, and sends alerts over Wi-Fi.
Conclusion
Arduino and Raspberry Pi are not competing products. They are complementary tools built for different engineering problems. Arduino wins on low-power operation, direct hardware control, and simplicity. Raspberry Pi wins on compute, networking, and Linux software depth.
For most projects, the decision is straightforward: if your project interacts with hardware in a timing-sensitive way or runs on a battery, reach for Arduino. If it needs a display, internet connectivity, or runs computationally complex software, reach for Raspberry Pi. If it needs wireless connectivity with low power consumption, ESP32 is often the better answer than either.
Popular Articles
• SMD Capacitor Sizes: Complete Size Chart and Selection Tips for PCB Design and Assembly
• SMD Diode Code Lookup: Full List, Marking Guide & Identification [2026 Guide]
• SMD Resistor Package Sizes: Complete Size Chart, Footprints & How to Choose
• SMD Capacitor Codes: Identification, Markings, and Polarity
• How to Solder SMD Components Like a Pro [2026 Updated]
Keep Learning
What Is the ESP32? A Complete Guide to Features, Architecture, Modules, Programming, and Applications
From Wi-Fi-enabled temperature sensors and wearable health monitors to industrial gateways and AI-powered cameras, the ESP32 microcontroller has become one of the world's most widely adopted wireless embedded platforms. Combining a powerful processor with integrated Wi-Fi and Bluetooth, it lets engineers build connected devices without separate networking hardware. This guide covers ESP32 specifications, architecture, the full family of variants, development boards, programming tools, and real-world E......
How to Choose the Right STM32 Microcontroller: Compare Series, Cortex-M Cores, and Key Features
STMicroelectronics ships thousands of STM32 MCU part numbers across more than a dozen series, and that variety is exactly what makes STM32 microcontroller selection difficult. Pick the wrong family, and you pay for it later: oversized BOM cost, wasted power budget, or a board respin when a peripheral turns out to be missing. This STM32 microcontroller selection guide breaks the decision into a five-step framework built on practical engineering criteria, not datasheet marketing copy, so you can match a......
SMD Transistor Code Lookup: Identify Markings, Pinout & Multimeter Test Guide
Repairing a circuit board often brings a familiar frustration: staring at a tiny, three-legged black component with an obscure two- or three-letter code. Whether troubleshooting a bare prototype or a mass-produced PCBA, knowing how to quickly decode these surface-mount device (SMD) markings is an essential skill for any electronics engineer or repair technician. In this comprehensive guide, you will learn: 1. How to decode SMD transistor marking codes 2. How to identify BJT vs MOSFET types 3. How to f......
SMD Capacitor Sizes: Complete Size Chart and Selection Tips for PCB Design and Assembly
In the world of modern electronics, surface mount devices (SMDs) have revolutionized board design, allowing for smaller, faster, and more efficient printed circuit boards. When designing a PCB, selecting the correct SMD capacitor sizes is one of the most critical decisions an engineer must make to ensure both electrical reliability and manufacturability. In this article, you will find practical, authoritative guidance on: Comprehensive SMD capacitor size charts for quick reference. How to read imperia......
SMD Diode Code Lookup: Full List, Marking Guide & Identification [2026 Guide]
In modern electronics, surface-mount diodes are used everywhere - from power input protection circuits to high-speed signal routing. Because these components are extremely small, manufacturers cannot print full part numbers on their bodies. Instead, they use short marking codes such as A2, M7, SS14, or SL, which often confuse beginners during PCB repair, reverse engineering, or component replacement. This guide explains how to decode SMD diode codes, identify polarity, test components using a multimet......
Thin Film vs. Thick Film Resistors: Key Differences & Selection Guide
Key Takeaways Default to thick film resistors for most designs. They are cost-effective, robust, and ideal for pull-ups, LED current-limiting, digital circuits, and surge-prone applications. Choose thin-film resistors whenever a resistor defines an analog quantity, such as a voltage divider, reference network, gain-setting circuit, or current-sensing signal chain. Their tight tolerance and low TCR help maintain measurement accuracy over temperature and time. Most PCB designs use thick film or thin fil......