How Laser Drilling Delivers Precision and Density in Advanced PCB Manufacturing
10 min
- The Growing Importance of Laser Drilling in Modern PCB Production
- Key Advantages of Laser Drilling for High-Performance PCBs
- Design Considerations for Successful Laser Drilling
- Professional Manufacturing Processes for Laser Drilling
- JLCPCB's Expertise in Laser Drilling Technology
- FAQ about Laser Drilling
- conclusion
Key Takeaways
Laser Drilling has become the cornerstone technology for precision and high-density PCB manufacturing, enabling microvias as small as 25-75μm — far beyond the 150μm limit of mechanical drilling. By delivering superior accuracy, contactless processing, excellent signal integrity, and reliable blind/stacked vias, it empowers advanced HDI board designs essential for modern electronics. From optimal stackup selection to professional plating and DFM practices, mastering laser drilling is key to achieving higher routing density, thinner boards, and better performance in today’s compact, high-speed devices.
Ever wondered how thousands of connections are fit on a printed circuit board thinner than a credit card in your smartphone? If so, you have laser drilling to thank for it, and it's a process that has transformed the production of high-density printed circuit boards. With smaller component packages and increasing pin counts, mechanical drilling is limited to hole sizes greater than 150 microns. That's where laser drilling comes to the rescue, allowing microvias down to 25-75 microns with incredible accuracy and no stress on the board. In this article, we will discuss what laser drilling is, how it differs from traditional drilling, design rules, and how laser drilling enables large-scale production of complex HDI boards.
The Growing Importance of Laser Drilling in Modern PCB Production
What Laser Drilling Is and How It Differs from Mechanical Drilling
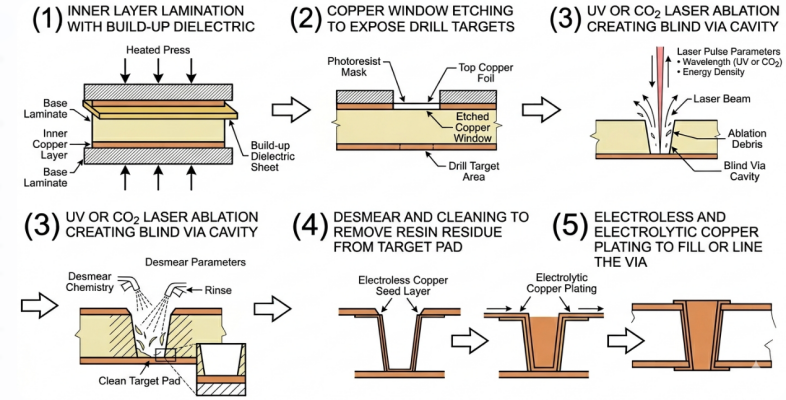
What is laser drilling? It's a non-contact process that involves removing material from a PCB substrate using a high-energy beam of light. This produces holes of a precise diameter without actually contacting the PCB. They can be either CO2 lasers (9.4 to 10.6 microns) or UV lasers (355 nm, also known as Nd: YAG lasers).
Conventional drilling is done with a rotating carbide bit. It's good for through-holes, but the smallest bit is around 150 microns (6 mils). Smaller bits are weak, prone to wear, and cause burring.
| Parameter | Mechanical Drilling | CO2 Laser | UV Laser |
|---|---|---|---|
| Min Hole Diameter | 150µmm (6 mils) | 75 um (3 mils) | 25 um (1 mil) |
| Drilling Speed | 300-600 hits/min | 500-2,000 pulses/sec | 5,000-30,000 pulses/sec |
| Material Contact | Yes (physical) | No (thermal ablation) | No (photo-chemical) |
| Hole Quality | Can have burrs, smear | Clean, slight taper | Very clean, minimal taper |
| Tool Wear | Drill bits wear out | No tool wear | No tool wear |
| Typical Use | Through-hole vias | Blind microvias | Ultra-fine microvias |
Why It Has Become Essential for High-Density and HDI Boards
Consider the latest smart watches, 5G antennas, or sensors for advanced driver assistance systems (ADAS). These devices require High-Density Interconnect (HDI) PCBs with multiple layers of microvias, blind vias, and stacked vias. The sectional design standard for HDI boards - IPC-2226 - defines six variations of HDI structure,s and all include laser-drilled microvias. You cannot achieve the via densities required for today's BGA breakout (0.4 mm or 0.5 mm pitch) without laser drilling in PCBs. As the trend in chiplet technologies continues to increase pin counts, this technology is even more important.
Key Advantages of Laser Drilling for High-Performance PCBs
Achieving Microvias with Superior Accuracy and Smaller Diameters
Today's UV laser drill systems offer accuracy of plus or minus 10 microns in position and plus or minus 15 microns in diameter. This precision is important when drilling thousands of microvias in a panel.
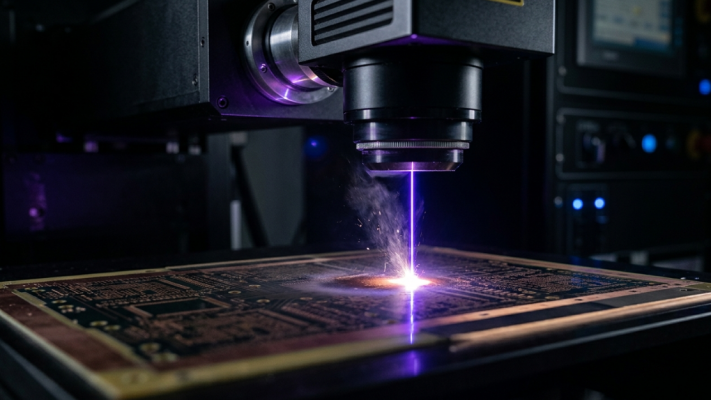
Here are the benefits of laser drilling:
- Smaller hole sizes: Microvias from 75 um to 25 um to increase routing density and BGA breakout
- Contactless process: No tool wear, vibration, or warpage
- No tool wear: No loss of laser power from hole 1 to hole 1,000,000
- Stopped on copper: Lasers stop on a copper layer, enabling blind vias
- Less debris: UV lasers deliver photochemical ablation with a low heat-affected zone
One key difference: CO2 lasers ablate dielectric but reflect from copper, needing an opening in copper. UV lasers ablate copper and dielectric, allowing direct drilling without pre-processing, but have a lower ablation rate per pulse.
Improved Signal Integrity and Reduced Layer Count
Here is one that designers tend to forget because laser-drilled microvias enhance electrical performance. A 100 um diameter x 75 um depth microvia has far less parasitic capacitance and inductance than a through-hole via that passes from one side of the board to the other. For signals at multi-gigabit speeds such as PCIe Gen4/5, DDR5, or USB4, through-hole via stubs form resonators that cause signal integrity problems. Microvias avoid this issue as they only pass through the required layers. The benefits include:
- Reduced via stub inductance, which leads to impedance discontinuities
- Lower parasitic capacitance with the smaller barrel and pad diameter
- Improved return path continuity using microvias next to signal vias
- Lower crosstalk from smaller anti-pad openings in planes
With increased routing densities, you may be able to reduce a 10-layer stackup to 8 layers. This translates into cost reduction, thinner board, and shorter interconnections.
Design Considerations for Successful Laser Drilling
Via Size, Aspect Ratio, and Placement Guidelines
There are rules for laser drilling. The most important one is the aspect ratio (via depth: diameter). The industry recommended maximum for laser-drilled microvias is 1:1. The depth of a 100 um diameter microvia should not be greater than 100 um.
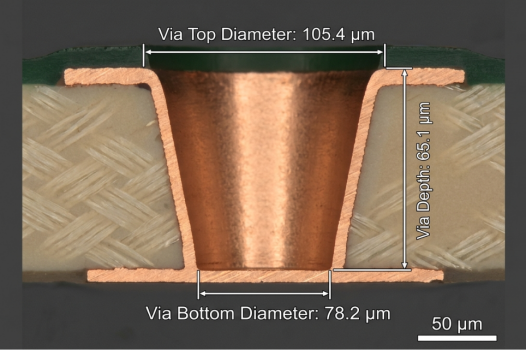
Follow these design guidelines:
1.Minimum via diameter: 75-100 um (CO2 laser), 50-75 um (UV laser)
2.Capture pad diameter: Via diameter plus 100 um minimum (50 um annular ring each side)
3.Via spacing: 150 μm edge-to-edge minimum between microvias
4.Stacked vs staggered: Stacked microvias need copper-filled vias; staggered are less critical
5.Keep-out from board edge: 300 um minimum from microvia to board edge
Integration with Stackup and Material Selection
Stackup and materials impact laser drilling. Microvias are interconnections between layers, so the depth of microvias depends on the thickness of the dielectric. Normal prepreg thickness of 75 to 100 um is optimal. Thicknesses greater than 125 um increase the aspect ratio and reduce plating quality. Glass styles are more important than they may seem. CO2 lasers work poorly with heavy weave glass (7628) because the glass scatters the laser beam. Lighter weaves make cleaner holes.
| Material Property | Impact on Laser Drilling | Recommendation |
|---|---|---|
| Prepreg Glass Style | Heavy glass scatters the laser beam | Use 1080 or 2116, avoid 7628 |
| Dielectric Thickness | Determines via depth and aspect ratio | Keep at 75-100 um |
| Resin Content | Higher resin drills cleaner with CO2 | Choose high-resin prepregs |
| Copper Foil Weight | Thicker copper needs more UV pulses | Use 0.5 oz for microvia layers |
Professional Manufacturing Processes for Laser Drilling
Precision Laser Parameters and Process Control
For every quality microvia, there is an optimized construction laser drill. Key parameters include:
- Pulse energy (millijoules): Higher means hotter; lower means debris
- Pulse repetition rate: 100s of Hz (CO2) to 10s of kHz (UV) for speed
- Pulse duration: Nanosecond pulses typical; picosecond for very fine structures
- Pulses per hole: 5 to 20 pulses are common; more for deeper holes
- Spot size and focus: Galvo mirrors with micron precision
Today's systems use vision to register to fiducial marks, with overlay accuracy of plus or minus 15 to 20 microns. Fabricators also use test coupons for each lot to measure top and bottom diameter analysis, then move to panels.
Post-Drilling Plating and Quality Verification
The hole is drilled, now what? The traditional post-drilling process is:
1.Desmear / plasma cleaning: Cleans the resin smear from the copper pad with permanganate or plasma etch
2.Electroless copper plating: Grows a 0.5-1.0 um layer on the via walls
3.Electrolytic copper plating: Plates up to 20-25 um minimum thickness (IPC-6012)
4.Via filling (if necessary): Conductive or non-conductive paste, followed by grinding
5.Cap plating: Top layer of copper for a planar and solderable surface
Inspection involves microsectioning to check plating thickness, via shape, and defects. X-rays measure voids. According to IPC-6012, a Class 3 microvia should have at least 12 um copper plating on the wall with no voids between the target pad.
JLCPCB's Expertise in Laser Drilling Technology
Advanced Laser Systems for High-Accuracy Microvias
In high-volume laser drilling, the quality of the equipment and process is critical. JLCPCB uses cutting-edge CO2 and UV lasers to drill microvias as small as 75 um with high consistency in mass production. Their equipment includes vision alignment, real-time power monitoring, and recipe programming.
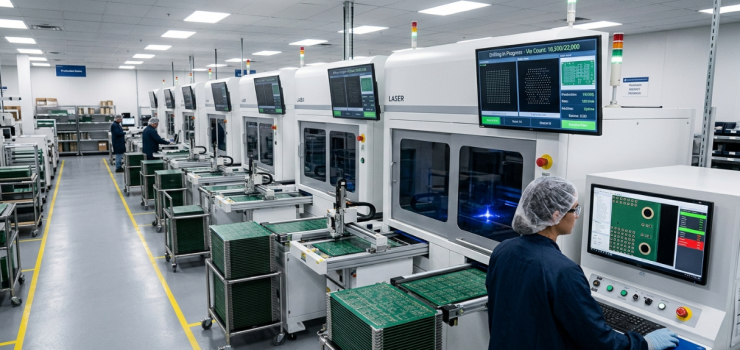
The most beneficial feature of JLCPCB's laser drilling process is the Design for Manufacturability (DFM) check. Their engineers review Gerber files for laser drilling problems (pad registration, aspect ratios, via spacing, and material compatibility) before manufacturing.
Proven Reliability in Delivering Complex Boards
JLCPCB conducts microsection, electrical, and AOI inspections of laser-drilled panels to ensure each microvia meets IPC-6012 standards. Their experience with multi-layer designs for IoT, wearables, and RF shows they have process stability. If you're ready to implement pcb design principles, JLCPCB's laser drilling, DFM, and pricing make it an attractive manufacturer. JLCPCB offers production from prototypes to production in quantities as low as 1-2 days, SMT assembly, and as low as $2 for PCBs.
FAQ about Laser Drilling
Q: What is laser drilling, and how does it differ from mechanical drilling?
Laser drilling uses a focused beam of light (CO2 or UV) to ablate PCB material without physical contact, achieving holes as small as 25 to 75 microns. Mechanical drilling uses a carbide bit and is limited to around 150 microns minimum diameter.
Q: What types of lasers are used for PCB drilling?
CO2 lasers (9.4-10.6 um wavelength) for dielectric removal and UV lasers (355 nm) for both copper and dielectric ablation. CO2 is the workhorse for standard microvias, while UV handles ultra-fine features and direct copper drilling.
Q: What is the maximum aspect ratio for laser-drilled microvias?
The industry standard is 1:1 (depth-to-diameter). A 100 um microvia should not exceed 100 um depth. Staying at or below 1:1 ensures reliable plating and long-term joint integrity.
Q: Can laser-drilled microvias be stacked?
Yes, but the lower microvia must be copper-filled and planarized before drilling the next one on top. Staggered microvias are easier to manufacture and a good alternative when space allows.
Q: Does laser drilling work with all PCB materials?
It works with FR4, high-Tg FR4, polyimide, and low-loss laminates like Megtron and Rogers. Different materials need different laser parameters. Heavy glass styles like 7628 are more challenging for CO2 lasers; always confirm capability with your fabricator.
conclusion
Laser drilling has redefined PCB boundaries, enabling microvias as small as 25–75 microns that mechanical bits simply cannot reach. This non-contact process not only maximizes routing density but also enhances signal integrity for high-speed designs by minimizing parasitic effects and eliminating via stubs. JLCPCB leverages advanced CO2 and UV laser systems to deliver this extreme precision with high consistency in mass production. Combined with their expert Design for Manufacturability (DFM) review, they ensure your high-density layouts are optimized for reliability and performance.Keep Learning
Optimizing High-Voltage Circuit Safety with PCB Dielectric Strength
Key Takeaways Non-linear Scaling: Dielectric strength drops as thickness increases. Safety vs Signals: Dielectric strength ensures safety, while Dk controls signal speed. Material Selection: High-voltage safety depends on Tg, CTI, and moisture resistance. Spacing Rules: Clearance prevents air arcs, while creepage prevents surface tracking. Assembly Testing: Hi-pot testing requires finished assemblies, not bare boards. Dielectric strength is the number engineers quote to prove a board is safe at mains ......
How Copper Foil Shapes PCB Performance and Manufacturing Quality
Key Takeaways Weight: 1 oz copper ≈ 35 µm thickness; higher weight increases current capacity. Types: ED for standard rigid boards, RA for dynamic flex circuits. DFM & Loss: Smoother foil lowers RF loss; thicker foil requires wider trace spacing. The part of a PCB that actually carries the electrical signal is the copper foil. The strength comes from the glass weave, the resin is used to keep the layers together, and the solder mask is used to provide protection and separation of exposed copper. But w......
A Complete Guide to Copper Clad Laminate (CCL) in PCB Manufacturing
Key Takeaways CCL is the base material: a cured resin-reinforcement sheet with copper foil bonded to one or both sides. Three parts control performance: Resin affects heat and loss, reinforcement controls stability, and copper foil affects conductor behavior. Choose by the main design stress: Heat, frequency, and cost usually determine the best laminate family. Slash sheets define the material: IPC-4101 uses numbered slash sheets to specify rigid PCB base materials. Tg alone is not enough: Td and time......
Buried Vias in Advanced PCBs: Enabling Higher Density, Better Signal Integrity, and Compact Designs
Key Takeaways Hidden Routing: Buried vias connect only inner layers, keeping outer surfaces clear for dense components and traces. Better Signal Integrity: They eliminate via stubs, reducing parasitics and signal loss in high-speed designs. Higher Density: Essential for HDI boards, dense BGAs, and small form factors like wearables. Higher Cost: Sequential lamination and extra drilling steps make them ~3×-4× more expensive than standard through-holes. Ever wondered how a modern smartphone mainboard can......
Unlocking Higher Density and Better Performance with Blind Vias in HDI PCBs
Key Takeaway Higher Density: Connects surface to inner layers without penetrating the whole board, freeing routing channels under fine-pitch BGAs. Improved Signal Integrity: Reduces via stub length to minimize impedance discontinuities in high-speed designs. Aspect Ratio Rule: Keep the depth-to-diameter ratio near 0.75:1 (max 1:1) for reliable laser drilling and void-free plating. Thermal Efficiency: Supports via-in-pad setups for better heat dissipation and compact component placement. Ever wonder ho......
How to Select Tg of PCB ?
What is the Tg of PCB? In PCB manufacturing, "Tg" stands for Glass Transition Temperature. It is the temperature at which the PCB substrate material transitions from a rigid, glassy state to a soft, rubbery state. PCBs are flame-retardant (UL94 V-0) and do not burn easily; instead, they soften above Tg. The Critical Correlation Between Tg and Z-Axis CTE (Coefficient of Thermal Expansion) When the temperature exceeds the Tg point, the PCB substrate material (such as standard FR-4) undergoes a physical ......