SMT Stencil Storage & Life: How to Store Stencils and Extend Their Lifespan
15 min
- Quick Answer: How Should You Store an SMT Stencil?
- Do SMT Stencils Expire? Stencil Life vs. Solder-Paste Shelf Life
- What Determines an SMT Stencil’s Life?
- How to Store an SMT Stencil (Step by Step)
- Framed vs. Frameless: Storage & Handling Differences
- How Stencil Build Quality Affects How Long It Lasts
- Signs Your Stencil Is Worn Out (and When to Replace It)
- Common Storage & Life Problems (and How to Fix Them)
- FAQ about SMT Stencil Storage & Life
- Conclusion: SMT Stencil Storage Is Where Stencil Life Is Won
Key Takeaways
Store it clean and dry: Remove all paste and flux, then dry both faces and the apertures completely before a stencil goes back on the shelf.
Support it, never stack it loose: Keep a stencil flat with full support or upright in a rack, in a clean, dry, stable-temperature area away from dust and sunlight.
Stencils do not expire like paste: Life is set by cleanliness, handling, moisture, material, coatings, and frame or mesh condition, not by a shelf-life date.
Replace when geometry changes: Cleaning helps residue-related defects, but a warped foil, enlarged apertures, or lost mesh tension means the stencil is worn out.
A solder paste stencil is a precision tool. Its apertures are cut to micron tolerances, and every print depends on that geometry staying exactly as it left the laser. Yet many stencils are retired early for reasons that have little to do with normal wear. Poor SMT stencil storage can warp the foil, trap moisture against the steel, and allow paste to harden inside the openings. Stencil life, in other words, can be lost on the shelf rather than on the printer.
This guide covers how to store a stencil correctly and what actually determines its usable life. It also shows how to recognize the point where cleaning no longer helps and replacement is the honest answer.
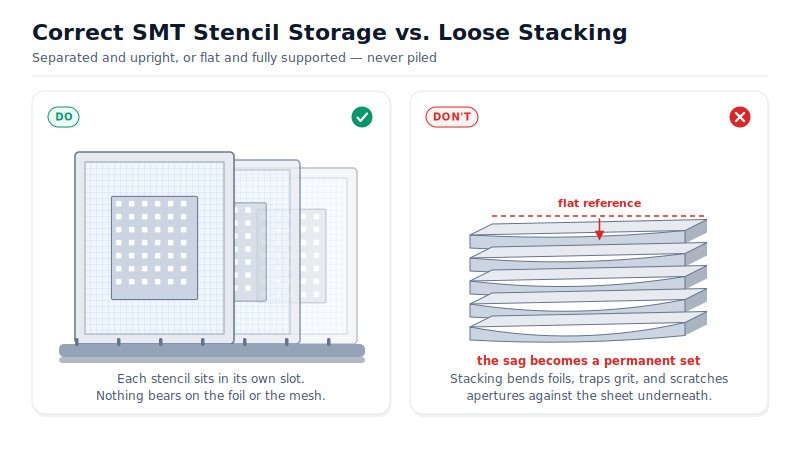
Figure 1: Each stencil carried on its own; a loose pile lets every foil take a permanent set.
Quick Answer: How Should You Store an SMT Stencil?
Clean all solder paste and flux off the stencil, then dry both faces and the apertures completely. Store it flat and fully supported, or upright in a rack — never stacked loose — in a clean, dry, room-temperature area away from dust and sunlight. With proper storage, a stainless-steel stencil can remain usable for years, provided its foil, apertures, frame, and mesh remain in good condition.
Do SMT Stencils Expire? Stencil Life vs. Solder-Paste Shelf Life
Solder paste and stencils get filed under the same “consumables” heading, and that causes confusion.
Solder paste genuinely expires. It is a chemically active material with a shelf life measured in months, and it ships cold with a “use by” date on the label. Indium Corporation’s published guidance describes −20 °C to 10 °C as common refrigerated storage. It also notes that some pastes must not be frozen, and asks users to run lots first-in, first-out.
A stencil has no equivalent chemical shelf life. A clean, dry stainless-steel stencil does not normally deteriorate simply because it has been stored for a certain period. A stencil pulled from storage after three years may still print to spec, provided it was stored properly and no physical damage, contamination, or deformation occurred.
So stencil life is not a fixed expiration date. It is the period over which a stencil continues to deliver clean, accurate prints before its apertures, flatness, or frame tension fall outside acceptable quality limits. That endpoint is driven primarily by physical condition, contamination, handling, and process use rather than storage time alone.
What Determines an SMT Stencil’s Life?
Two things set the outcome: how the stencil was built, and how it is treated between prints.
Cleanliness. Dried paste and flux left in the apertures is one of the biggest factors affecting stencil performance and life. Residue narrows the opening, so deposit volume can fall and the effective area ratio can drop below the design value. IPC-7525 identifies area ratio as an important factor in paste release, and a value of about 0.66 or higher is a commonly used design target. A partly blocked aperture can push a previously compliant design below that target. Hardened residue also resists cleaning, which can tempt operators into scraping.
Handling. Fingerprints, flexing the foil, and dropping a frame all leave marks. Dents, creases, and scratched aperture walls never fully recover. A foil that has been folded once will not sit flat against a board again.
Moisture. Trapped solvent or condensation held against the steel invites staining and pitting, especially where cleaning chemistry dried in place.
Material and build. 304 HTA is 304 stainless, cold-rolled to full hard, then tension-annealed at low temperature. That process is designed to relieve internal stress without significantly softening the foil. Plain cold-rolled 304 retains more residual stress, and laser cutting can release that stress unevenly, contributing to the characteristic “potato-chip” warp.
Coatings. Nano-coating and electropolishing both lower paste adhesion. Apertures stay cleaner between prints and need less aggressive cleaning, which extends usable life indirectly.
Frame and mesh. On a framed stencil, the mesh holds the foil in tension. Slack or torn mesh ends that stencil’s life even when the foil itself is perfect.
Stencil Life Drivers
| Effect on Stencil Life | What to Do | |
|---|---|---|
| Residue in apertures | Narrows openings, cuts deposit volume, hardens over time | Clean straight after the last print; never store a dirty stencil |
| Physical handling | Dents, creases, and scratched walls that never recover | Handle by the frame or edges; never fold or stack foils |
| Moisture / humidity | Staining and pitting on the foil; residue bonds harder | Dry both faces fully; add desiccant in humid storage |
| Material & coating | Sets baseline corrosion resistance and paste release | Specify 304 HTA stainless; consider a nano-coating |
| Mesh / frame tension | Slack or torn mesh ends life regardless of foil condition | Store upright; keep pressure and impact off the mesh |
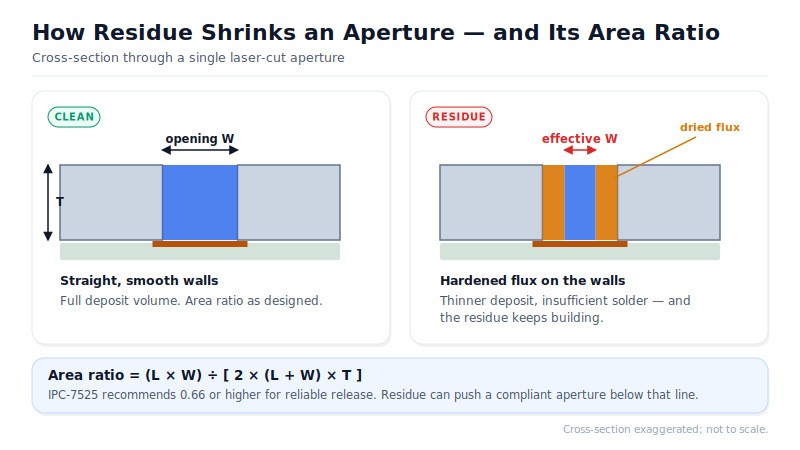
Figure 2: Hardened flux narrows the opening, so the effective area ratio falls below the design value.
How to Store an SMT Stencil (Step by Step)
Clean before storing
Remove solder paste and flux promptly after the last board is printed. Wet residue is generally easier to remove, while dried residue may require soaking and can clog fine apertures. Our SMT stencil cleaning guide covers the cleaning process and recommended frequency.
Dry completely
Solvent or water left in an aperture can contribute to oxidation or leave a residue ring as it dries. Dry both faces and the apertures with lint-free wipes or clean, dry compressed air before the stencil goes into storage.
Protect the foil
Cover the active area so nothing can drag across it. On frameless foils, keep the sheet flat and supported across its whole area, because an unsupported overhang is where creases start.
Store upright or flat-supported
Use a dedicated rack, cabinet, or sleeve. Do not stack stencils loosely on top of each other. Loose stacking can deform foils, press debris against the print area, and damage aperture walls.
Control the environment
Keep the storage area clean, dry, and at a stable room temperature, away from direct sunlight, dust, and vibration. In humid climates, add desiccant packs and check them on a schedule.
Label and log
Mark each stencil with its part number, revision, and last-clean date. A simple log helps ensure that the correct, in-spec stencil is selected for the next production run rather than a superseded revision.
Short-term vs. long-term storage. Between runs on the same day, a routine wipe and protected storage may be sufficient when the stencil will be reused shortly. For overnight storage or a build that may not repeat for months, use the full clean-dry-protect routine.
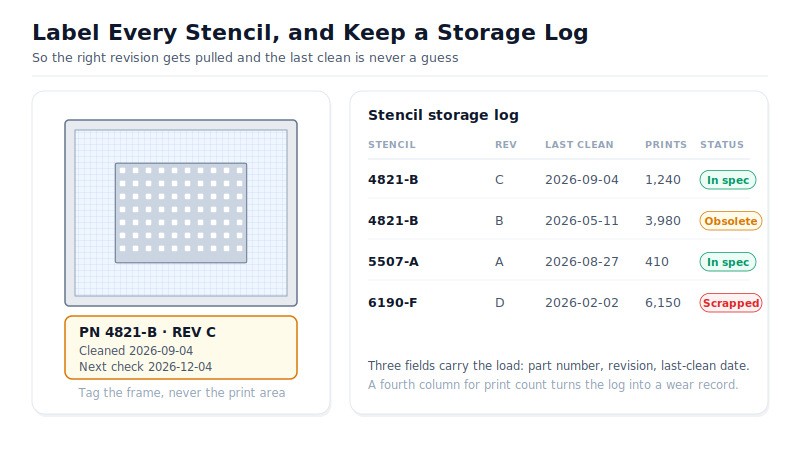
Figure 3: Part number, revision, and last-clean date keep the wrong stencil off the printer.
Framed vs. Frameless: Storage & Handling Differences
A framed stencil holds its foil taut in a mesh-and-frame assembly. Store these upright in slotted racks so nothing rests on the mesh. A key risk is loss of mesh tension or mesh damage, so keep pressure and impact away from the mesh border.
Frameless foils present the opposite problem. They are thin, flexible, and easy to crease. Store them flat with full support underneath, or in a foil holder or template frame that carries the sheet evenly. Bending, denting, and creasing are the risks.
For the construction differences behind the two formats, see our guide to types of solder stencils.
Storage by Stencil Type
| Stencil Type | Best Storage Method | Main Risk to Avoid |
|---|---|---|
| Framed / tensioned | Upright in a slotted rack, mesh unloaded and untouched | Pressure or impact on the mesh, which kills tension |
| Frameless (foil) | Flat with full support, or in a foil holder or template frame | Bending, creasing, or denting an unsupported sheet |
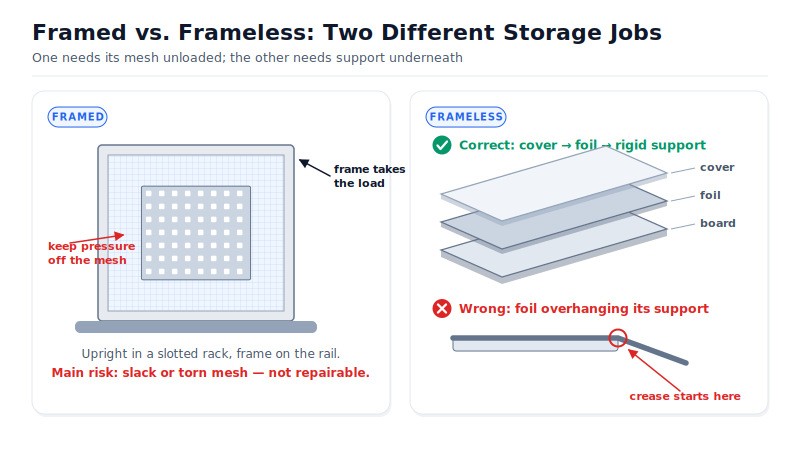
Figure 4: Framed stencils need the mesh unloaded; frameless foils need support underneath.
How Stencil Build Quality Affects How Long It Lasts
Storage protects a stencil. Build quality decides how much there is to protect in the first place. Three levers do most of the work.
Material. 304 HTA stainless — tension-annealed, not “high-tension” or “high-temperature” — provides good corrosion resistance and dimensional stability during repeated printing. Lower-quality foil may be more susceptible to deformation or staining.
Cut quality. Consistent laser cutting helps produce smooth, well-defined aperture walls. Smooth walls can improve paste release and reduce the amount of residue that adheres to the aperture walls, potentially reducing the need for aggressive cleaning. Rough or irregular walls can retain more flux and paste residue, which may contribute to aperture blockage over time.
Coatings. Electropolishing is an anodic process that dissolves the micro-burrs and slag the laser leaves on the walls. Nano-coating then adds a nanometre-thick fluorosilicone layer by vacuum deposition, which repels both water-based and oil-based flux. Together they mean less residue per print and gentler cleaning. The mechanisms are covered in our articles on nano-coated stencils and how electropolishing works in a PCB stencil.
When selecting a replacement stencil, check the stainless-steel grade, laser-cutting tolerance, and available surface treatments. For example, JLCPCB offers stencils made from 304 HTA stainless with a stated cutting tolerance of ±0.003 mm (±0.12 mil). Framed and frameless formats are available, with optional nano-coating and electropolishing. Thickness and material selection are covered in our guide to choosing a solder paste stencil.
Signs Your Stencil Is Worn Out (and When to Replace It)
Five common signs indicate that a stencil may be approaching the end of its working life:
- Foil that no longer sits flat — visible waviness, a bowed center, or a corner that lifts away from the board.
- Mesh that is slack or torn, or loose at the bond line, on a framed stencil.
- Apertures that look enlarged, rounded at the corners, or ragged under magnification.
- Deep scratches across the print area, especially where they cross rows of apertures.
- Print defects that survive a proper clean — bridging, insufficient deposits, or inconsistent volumes from the same board positions.
The decision rule is simple. If the defects disappear after proper cleaning, the stencil may still be suitable for continued use. If the geometry itself has changed — such as enlarged apertures, a foil that will not lie flat, or lost mesh tension — replacement is generally required. Cleaning cannot restore permanently changed geometry.
Two standards frame the judgement. IPC-7527 describes what an acceptable paste deposit looks like — bridging, smearing, misregistration, insufficient volume — which is the exact vocabulary of a worn stencil. Downstream, IPC-A-610 governs whether the finished joints pass, and IPC J-STD-001 sets the process requirements behind them. When prints fail at either stage and cleaning does not help, the stencil is the variable to change. For the cleaning procedure itself, and for choosing between approaches, see the cleaning guide and our comparison of manual vs. automatic stencil cleaning. This section is about diagnosis, not method.
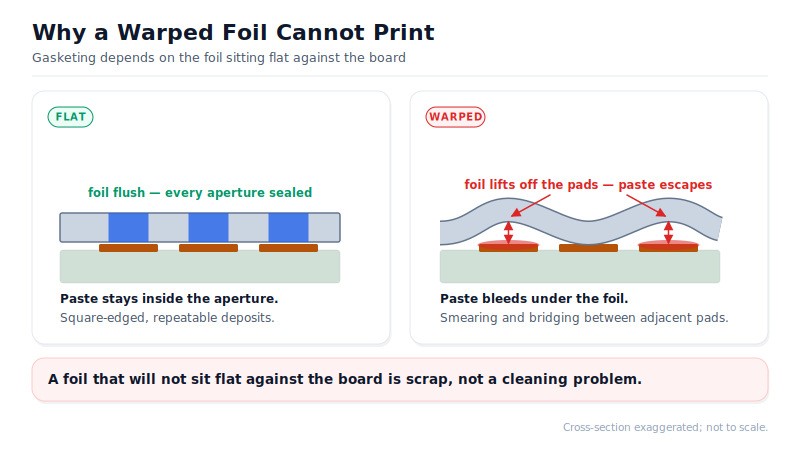
Figure 5: Once the foil stops sitting flat, paste bleeds under it and cleaning cannot help.
Common Storage & Life Problems (and How to Fix Them)
| Problem | How to Fix |
|---|---|
| Dried paste stuck in the apertures after storage | Clean immediately after each run and again before storage. For residue that has already hardened, follow the soak or ultrasonic method in the cleaning guide rather than scraping, which damages aperture walls. |
| Rust-like spots or oxidation on the foil | 304 stainless steel has good corrosion resistance under normal conditions, so visible spots may indicate trapped moisture, contamination, or exposure to corrosive residues. Chloride-bearing residues and fingerprints can contribute to pitting, particularly under warm, humid conditions. Dry fully before storage, keep desiccant in the cabinet, and wipe with IPA. If the apertures are pitted, scrap it. |
| Warped or bent foil | This comes from stacking or unsupported storage. Move to flat-supported or upright racking. A foil that will not sit flat against the board can no longer gasket properly and must be replaced. |
| A framed stencil that keeps losing registration | Slack or torn mesh tension is the usual cause, and it is not repairable. Scrap and reorder. Preventing it is a storage job: keep pressure and impact off the mesh. |
| No way to tell which stored stencil is current | Label every stencil with part number, revision, and last-clean date, then keep a simple storage log. Mark superseded revisions clearly and store them away from live tooling. |
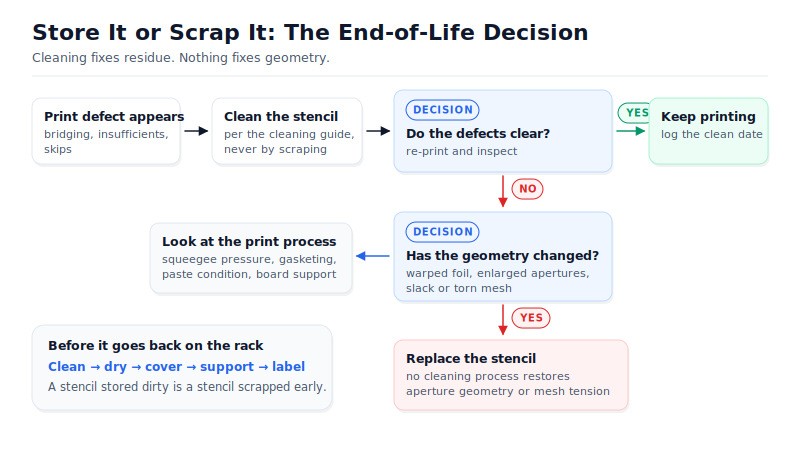
Figure 6: Clean first, then judge whether the geometry itself has moved.
FAQ about SMT Stencil Storage & Life
Q: Does SMT Stencil Storage Temperature Matter?
Stable room temperature matters more than any specific number. Steel expands and contracts with temperature changes, and a stencil moved between a cold store and a warm production area can develop condensation. Keep the storage area at a stable, moderate room temperature with controlled humidity, and avoid large temperature swings. Avoid unheated storerooms, exterior walls, and areas near reflow oven exhaust. Cold storage is generally unnecessary and can introduce condensation risk.
Q: Can You Reuse an SMT Stencil After a Year on the Shelf?
Yes, provided it was cleaned and dried before it went into storage. Inspect the foil under a raking light for waviness. Check mesh tension by hand on a framed stencil, and look through the smallest apertures for haze or residue. Then run one test print onto scrap laminate and inspect the deposits before committing a real assembly. Long storage is not the risk; poor storage is.
Q: How Should You Ship or Transport a Stencil?
Ship a stencil the way you store it: clean, dry, and fully supported. Framed stencils travel best in a rigid carton sized to the frame, with nothing bearing on the mesh. Frameless foils need a stiff backing board on both faces plus edge protection, since a single crease in transit ends the foil. Add a desiccant pack for long sea freight.
Q: Do Nano-Coated Stencils Need Different Storage?
No — the basic storage requirements are largely the same, but handling requires additional care. Nano-coatings are thin surface treatments, and abrasive scrubbing or incompatible cleaning chemicals can damage or reduce the effectiveness of the coating over time. Store coated stencils clean, dry, and supported like any other. Keep them away from abrasives, and use only the cleaning chemistry the coating supplier approves. Coatings wear gradually rather than failing outright, so watch release quality over time.
Q: Should You Keep a Stencil After the Board Revision Changes?
Only if that revision might come back into production. An obsolete stencil is a live hazard on the shop floor: it fits the fixture, looks correct, and prints the wrong pattern. If you keep it, mark it obsolete and store it away from current tooling. If the revision is dead, scrap it and free the rack slot. Rack space is worth more than a stencil you will never print again.
Q: How Many Prints Should a Stencil Last?
There is no universal number, and any figure quoted as one is a guess. Real-world service life runs from a few hundred prints on a roughly handled prototype foil to many thousands on a well-kept production stencil. Aperture size, paste chemistry, cleaning frequency, and handling discipline drive the spread. Fine-pitch stencils show wear soonest, because small deposits are least forgiving. Judge by print quality, not a counter.
Conclusion: SMT Stencil Storage Is Where Stencil Life Is Won
Clean, dry, support, control the environment. Those four rules cover most of what separates a stencil that lasts years from one scrapped after a handful of builds. Build quality sets the ceiling — stainless grade, laser tolerance, surface treatment — but daily care decides how close you get to it.
When the wear signals do appear and cleaning stops fixing them, replace the stencil instead of fighting it. I would rather see you print good boards on a fresh, in-spec stencil than chase defects on a tired one.
Keep Learning
SMT Stencil Storage & Life: How to Store Stencils and Extend Their Lifespan
Key Takeaways Store it clean and dry: Remove all paste and flux, then dry both faces and the apertures completely before a stencil goes back on the shelf. Support it, never stack it loose: Keep a stencil flat with full support or upright in a rack, in a clean, dry, stable-temperature area away from dust and sunlight. Stencils do not expire like paste: Life is set by cleanliness, handling, moisture, material, coatings, and frame or mesh condition, not by a shelf-life date. Replace when geometry changes......
Stencil Cleaning Methods: Manual vs Automatic
For precise and reliable solder paste pattern application on the PCB pads in Surface Mount Technology (SMT) printed circuit board assembly, stencils are utilized. To keep the print quality high and avoid mistakes, it's important to clean the cutouts often. Although automatic stencil cleaners are frequently used in manufacturing, hand cleaning is recommended when assembling prototype PCBs or in smaller quantities. Because it determines the process's yield and return on investment, stencil cleaning is a......
SMT Stencil Cleaning Guide: Process, Frequency, and Tips
Key Takeaways about SMT Stencil Cleaning SMT stencil cleaning removes solder paste residue from aperture walls and the stencil underside, keeping paste transfer efficiency between 80% and 100%. Industry analysis attributes over 60% of SMT defects to the paste-print step — most of which trace back to a stencil cleaning lapse. Two stages matter: under-screen cleaning (between cycles, typically every 5–10 prints) and off-line cleaning (after production completes). IPA handles standard flux residue; dedic......