PoP Package (Package on Package) Explained: Architecture, Assembly, and SMT Challenges
10 min
- What Is a PoP Package (Package on Package)?
- Why Use Package on Package (PoP)? Key Advantages in High-Density Electronics
- PoP Package Structure: Logic and Memory Stack Explained
- PoP Package Architecture Types: Standard PoP vs TMV PoP
- Critical SMT Assembly Challenges of PoP Package
- How Advanced SMT Processes Mitigate PoP Assembly Risks
- Design for Assembly (DFA) Guidelines for PoP Packages
- FAQ about PoP Package
- Conclusion: PoP Package
In the race for miniaturization, fitting more processing power into smaller footprints is the ultimate challenge for PCB designers.
Package on Package (PoP) technology answers this by integrating logic and memory vertically, becoming the standard for modern mobile processors. However, this 3D architecture demands advanced SMT assembly capabilities beyond standard fabrication. JLCPCB specializes in the high-precision manufacturing required to master these complex stacks.
This guide covers how PoP packaging works, its key advantages, common assembly challenges, and critical design considerations — helping you quickly decide when a PoP package is the right choice for your application.
What Is a PoP Package (Package on Package)?
Package on Package (PoP) is a vertical circuit integration method where two or more separately tested packages are stacked on top of one another. Unlike System in Package (SiP), which often combines multiple dies inside a single enclosure, PoP typically involves stacking a memory package directly on top of a logic package (CPU or Application Processor).
Why Use Package on Package (PoP)? Key Advantages in High-Density Electronics
Why go through the trouble of stacking BGAs? The benefits of high-speed digital design are undeniable.
1Signal Integrity Advantages of PoP Packages
In high-speed DDR memory interfaces, trace length is the enemy. Long traces introduce inductance, capacitance, and signal reflection. By stacking the memory directly on the CPU, the signal path is reduced from centimeters to millimeters. This creates a cleaner electrical environment, allowing for the faster clock speeds found in LPDDR4 and LPDDR5 technologies.
2Known Good Die (KGD) Benefits in PoP Assembly
This is a critical commercial advantage. In System in Package (SiP) solutions, multiple dies are molded together. If one die is bad, the whole expensive module is scrapped. In PoP technology, the Logic and Memory packages are tested, packaged, and burned-in separately. We only stack a "Known Good" memory package onto a "Known Good" logic package, significantly increasing final yield.
3Supply Chain and Memory Sourcing Flexibility in PoP Packages
Because the memory is distinct from the logic, OEMs can source memory from different vendors (Samsung, Micron, Hynix) without redesigning the logic chip or the motherboard, provided the top-interface standard remains compatible.
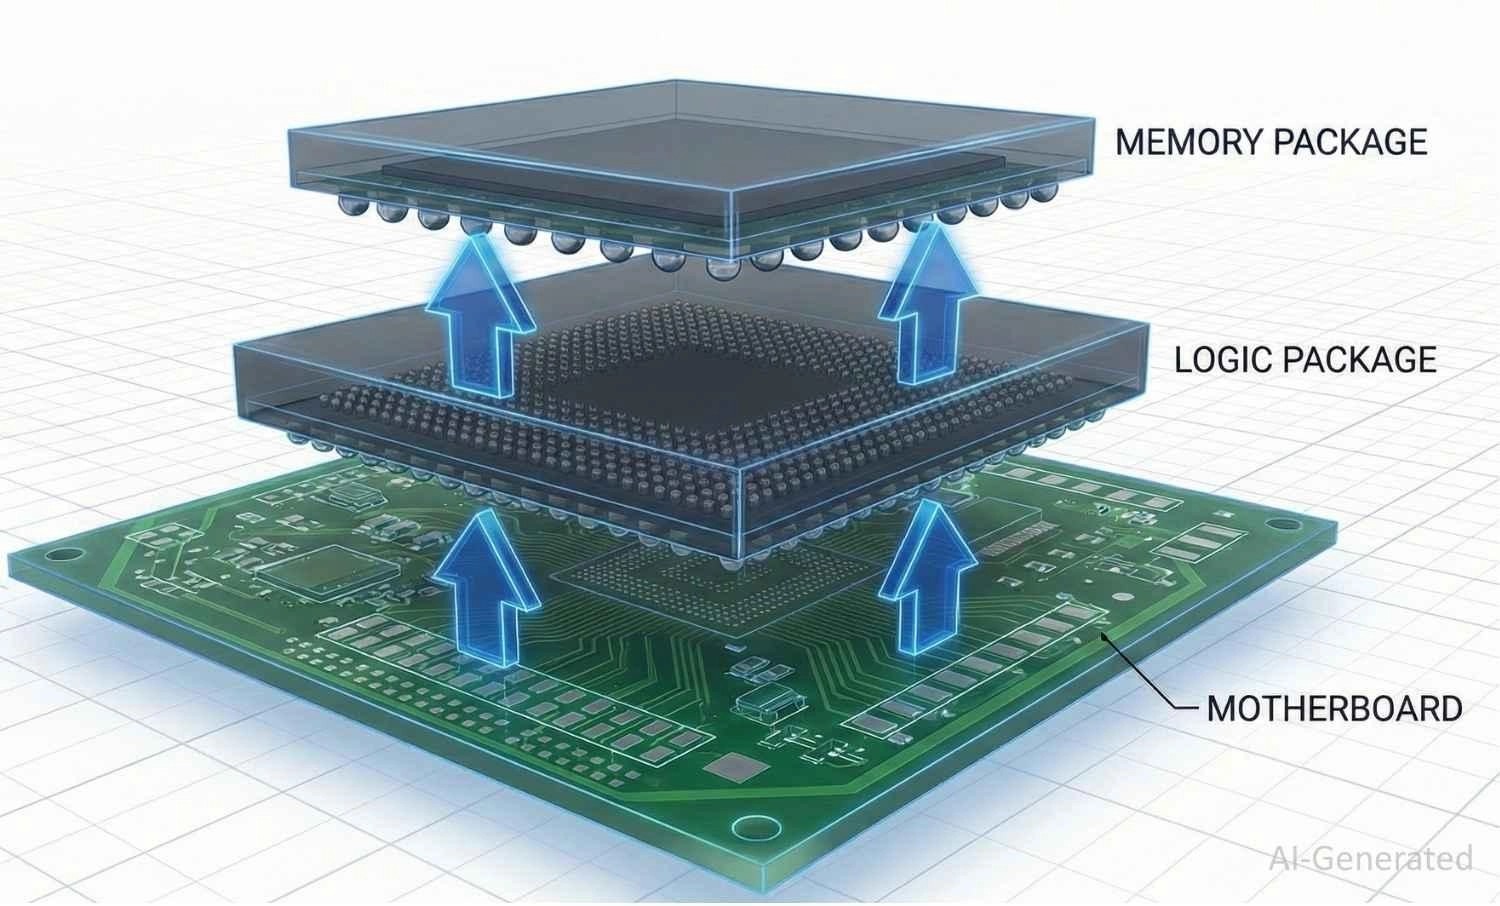
PoP Package Structure: Logic and Memory Stack Explained
To understand the SMT challenges, we must first understand the physical structure:
- The Bottom Package (Logic): This contains the application processor. It features a high-density BGA on the bottom to connect to the main motherboard and landing pads on the top surface to accept the memory package.
- The Top Package (Memory): Usually houses DRAM or Flash memory. It connects to the landing pads of the logic package via a secondary set of solder balls.
- The Interface: The signals travel vertically through the stack, drastically shortening the distance between the processor and memory.
PoP Package Architecture Types: Standard PoP vs TMV PoP
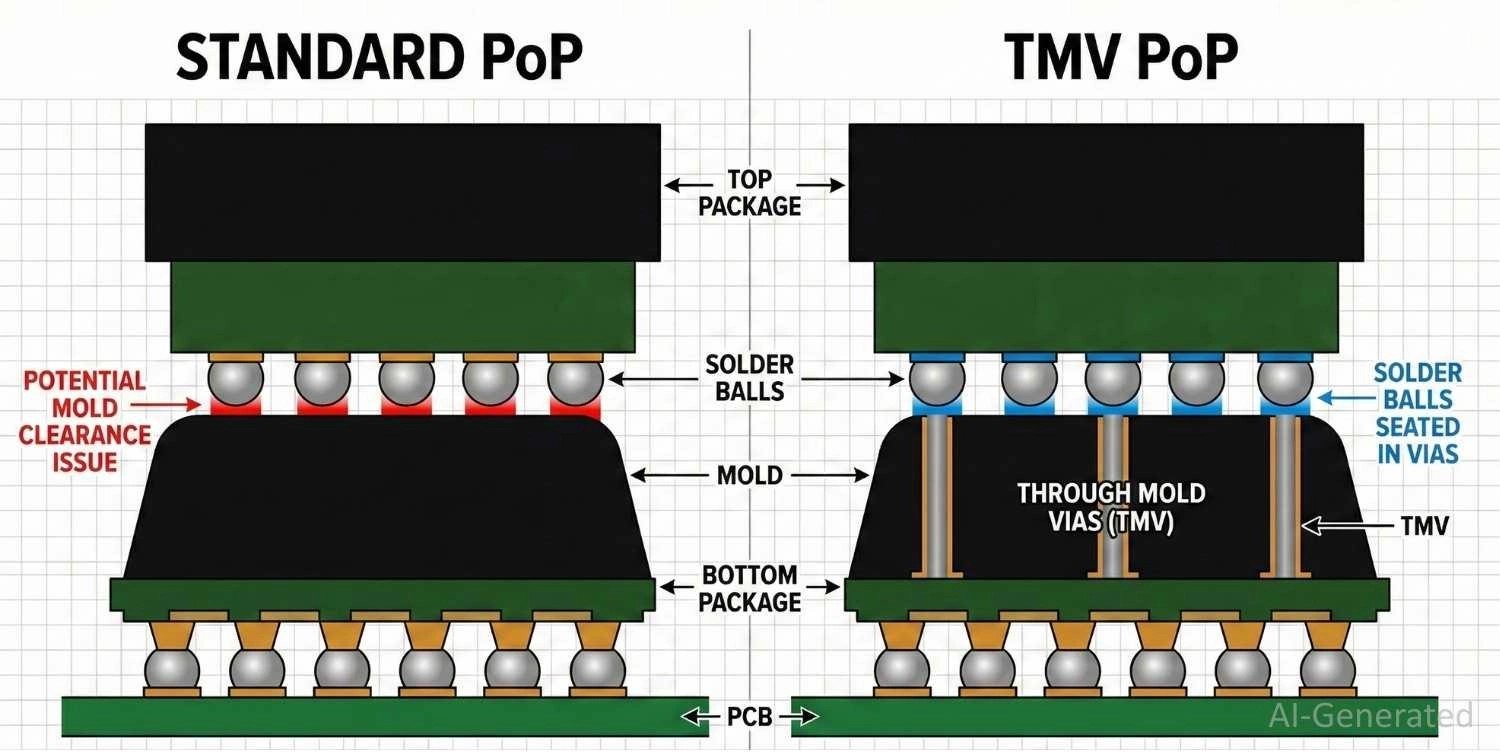
As pin counts increased and devices became thinner, the "Standard" PoP architecture faced limitations. This led to the evolution of Through Mold Via (TMV) technology.
Standard PoP Package (Peripheral Ball Stacking)
In the traditional approach, the top memory package sits directly on the mold cap of the bottom logic package. The electrical connection is made via solder balls located on the periphery of the bottom package.
Limitation: The bottom package must be significantly larger than the top package to accommodate the peripheral solder balls. This limits the die size you can fit inside the bottom package. As pitches shrank below 0.5mm, this method became prone to shorting.
Through Mold Via (TMV) PoP Package
To solve the pitch and warpage issues, the industry moved to TMV.
Mechanism: Instead of placing balls on the edge, vias are created (ablated or molded) through the encapsulation (mold) of the bottom package.
Technical Advantage: This allows the solder balls of the top package to sit partially inside the mold of the bottom package. It provides a more stable mechanical structure and allows for a larger logic die within the same package footprint. TMV is essential for modern, high-density PoP packages.
Critical SMT Assembly Challenges of PoP Package
While PoP solves design problems, it introduces significant challenges for SMT assembly. This is where the difference between a standard assembler and an advanced shop like JLCPCB becomes apparent.
PoP Package Warpage ("Banana Effect") and Coplanarity Issues
The enemy of PoP assembly is warpage. We are dealing with materials — silicon die, organic substrate, and molding compound — that all have different Coefficients of Thermal Expansion (CTE).
The Failure Mode: During the reflow oven cycle, as the heat increases, the package expands. The bottom package may warp concave ("smile") or convex ("frown"). If the warpage exceeds the coplanarity tolerance of the solder balls (typically <80 microns), connections will fail.
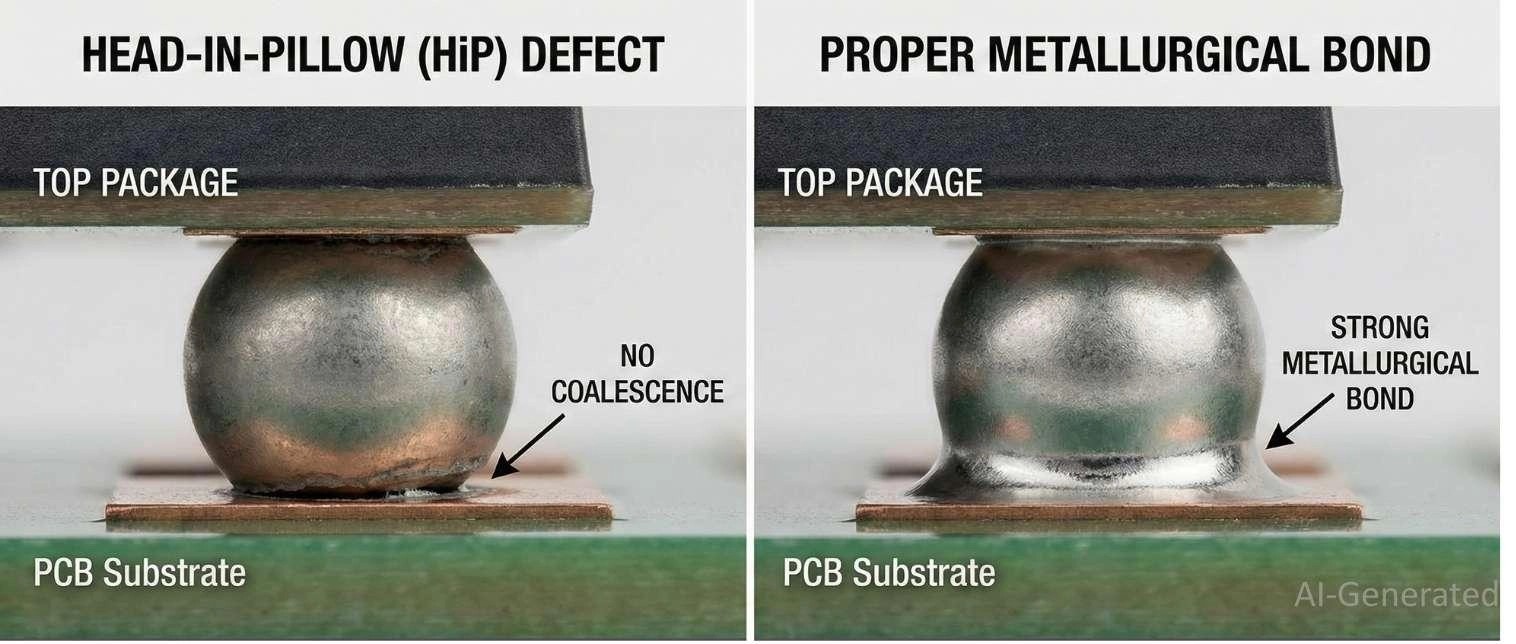
Head-in-Pillow (HiP): This occurs when the solder ball melts, but the package has warped away from the pad. The ball creates a shape resembling a head resting on a pillow, making mechanical contact but no metallurgical bond. This creates an intermittent failure that is incredibly difficult to debug.
Reflow Profile Challenges in PoP Package Assembly
Soldering a PoP stack requires a precise thermal profile.
The Challenge: You must apply enough heat to melt the solder joints of the top package (which is elevated and insulated) without overheating the bottom package or the PCB components underneath.
The Solution: This requires reflow ovens with distinct heating zones and strict nitrogen control to prevent oxidation during these extended thermal cycles.
Underfill Requirements and Mechanical Reliability of PoP Packages
Mobile devices are frequently dropped. The solder joints in a PoP stack are rigid and brittle. To pass drop tests, capillary underfill is often injected between the component and the PCB (and sometimes between the two packages). This epoxy distributes mechanical stress, preventing the solder joints from cracking.
How Advanced SMT Processes Mitigate PoP Assembly Risks
Designing a complex PoP board? Don't let assembly defects derail your prototype. At JLCPCB SMT, we utilize advanced nitrogen reflow profiling and 3D Automated Optical Inspection (AOI) to mitigate defects like Head-in-Pillow.
Note
For PCB designers and hardware engineers, the following DFA guidelines are critical to ensure PoP assembly yield and reliability.
Design for Assembly (DFA) Guidelines for PoP Packages
To ensure your PoP package runs smoothly through the JLCPCB PCBA lines, consider these design rules:
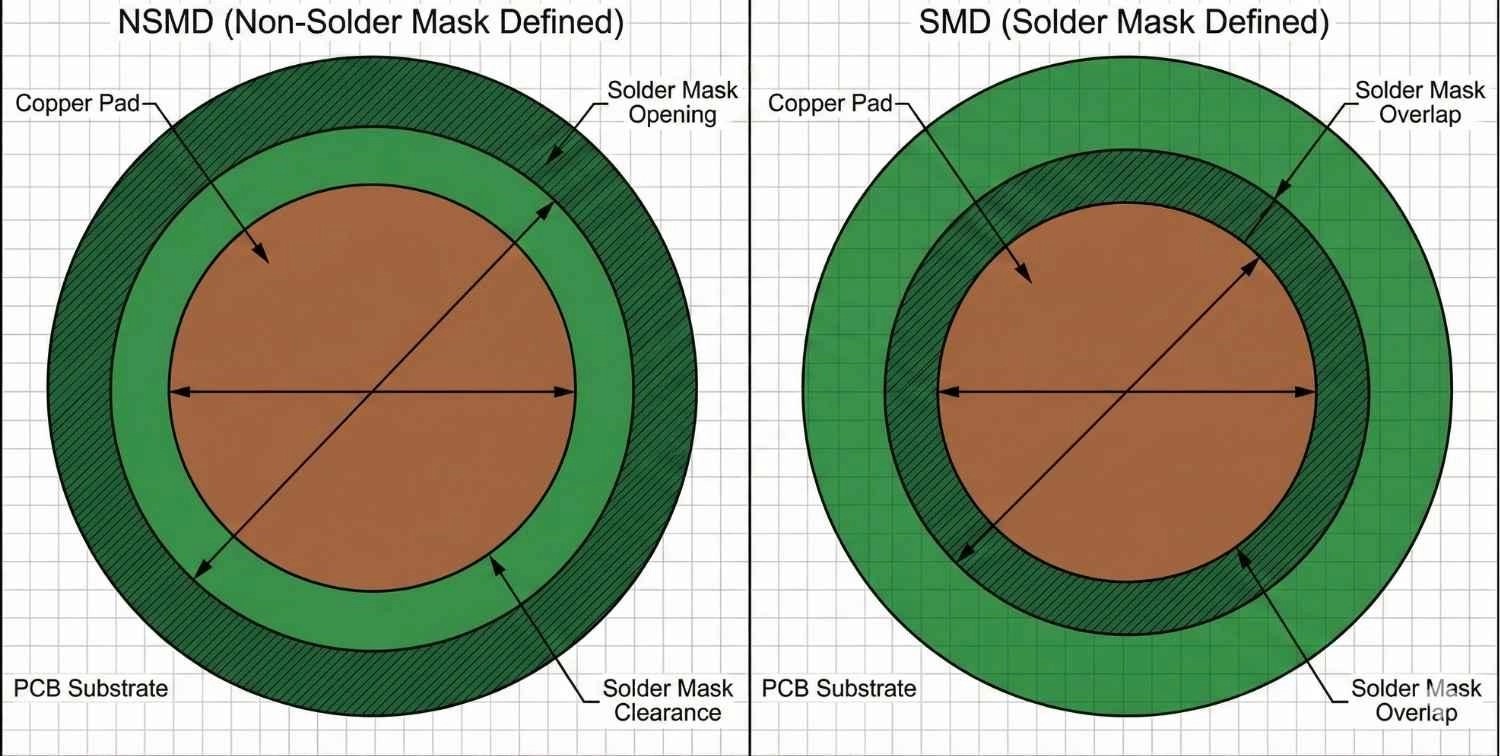
1PoP Package Pad Design: NSMD is Preferred
For BGA landing pads, Non-Solder Mask Defined (NSMD) pads are generally preferred over Solder Mask Defined (SMD) pads. NSMD pads provide a larger surface area for the solder ball to grip (anchoring on the sides of the copper pad), which improves fatigue life and reduces stress concentration.
2Stencil Aperture Design for PoP SMT Assembly
The volume of solder paste deposited is critical.
Too much paste: Causes bridging between the fine-pitch balls.
Too little paste: Causes open joints or "starved" connections. High-quality, laser-cut, electropolished stencils are mandatory for PoP assembly to ensure consistent release of solder paste.
3Placement Accuracy and Force Control in PoP Assembly
PoP requires high-end Pick and Place machines. The placement force must be controlled carefully. Too much force can crack the thin silicon die inside the bottom package; too little force might result in the component shifting before reflow.
| PoP (Package on Package) | SiP (System in Package) | SoC (System on Chip) | |
|---|---|---|---|
| Integration | Vertical (Package level) | Horizontal/Vertical (Module) | Silicon (Die level) |
| Flexibility | High (Mix & Match Memory) | Medium | Low (Fixed) |
| Primary Challenge | Warpage & Reflow Height | RF Interference & Shielding | Design Cost & Yield |
| Repairability | Moderate (Top package reworkable) | Low (Replace module) | None (Replace chip) |
FAQ about PoP Package
What happens if PoP is assembled without underfill?
Underfill is not always required from the electrical point of view, but it is more or less obligatory for mobile devices to meet drop-test reliability standards. In line with this, mechanical protection is used for brittle solder joints. The stationary industrial applications might cope with corner bonding or edge bonding, but full underfill gives the best mechanical protection for the fragile solder joints.
What happens if the bottom package fails in a PoP stack?
It is extremely hard and tricky to rework a stack of PoP. The usual procedure is that when the top memory package fails, it can be taken off and replaced with the help of a professional BGA rework station. When, however, there is a failure of the bottom logic package, the usual practice is to do the whole removal of the stack, including the reballing or replacement, because the heat cycles may cause the degradation of the PCB pads.
What is the difference between PoP and 2.5D packaging?
PoP uses standard organic substrates and solder balls to stack packages vertically (3D). 2.5D technology utilizes a silicon interposer to place dies side by side with extremely fine TSV (Through-Silicon Via) connections. PoP is more cost-effective for mobile consumer electronics, while 2.5D is reserved for ultra-high-performance computing (HPC) due to high manufacturing costs.
Does PoP packaging cause thermal issues?
Yes, thermal coupling is indeed an issue. The upper memory die can serve as a thermal insulator, retaining the heat from the logic processor that is below it. To counter this problem, engineers must devise thermal paths that are the most effective by utilizing thermal vias in the bottom substrate or placing heat spreaders on top of the memory package to transfer heat away from the stack.
Why is PoP assembly sensitive to moisture?
PoP packages are extremely thin and susceptible to moisture absorption. If moisture is trapped inside the package encapsulation during the rapid heating of reflow, it expands into steam, causing "popcorning" (delamination) or internal cracking. Unlike standard components, PoP requires strict baking and dry-pack handling (typically MSL 3 or higher) before assembly to prevent catastrophic failure.
Conclusion: PoP Package
Package on Package (PoP) technology is one of the main aspects of modern high-density electronics, as it provides an excellent trade-off between performance, size, and supply chain flexibility. Nevertheless, it is not a technology that is easy to deal with. It requires strict adherence to thermal management, warpage control, and DFA practices, all the way from the start to the end of the manufacturing process.
On the one hand, for engineers, the success of a PoP design depends mainly on the capability of the manufacturer. On the other hand, when it comes to quality, there is no compromise allowed from precise impedance control on the bare board through to the delicate reflow profile management during assembly.
For complex PoP designs, assembly capability is often the deciding factor between success and failure. Are you prepared to realize your high-density designs? If you are using standard BGAs or looking into advanced stacking, JLCPCB provides the industrial-grade manufacturing with the rigor that your projects deserve.
Get Instant Quotes for High-Precision PCBA: Upload your Gerber files today and experience the speed and quality of JLCPCB.
Popular Articles
• SMD Resistor Package Sizes: Complete Size Chart, Footprints & How to Choose
• How to Solder SMD Components Like a Pro [2026 Updated]
• SMD Resistor Codes: How to Read 3-Digit, 4-Digit, and EIA-96 Markings
• SMD Capacitor Codes: Identification, Markings, and Polarity
• SMD Capacitor Sizes: Complete Size Chart and Selection Tips for PCB Design and Assembly
Keep Learning
SOIC Package: A Complete Guide to Specifications, Types, Uses, and SMT Assembly
As designs transition from legacy through-hole components to high-density Surface Mount Technology (SMT), the Small Outline Integrated Circuit (SOIC) remains the industry standard for operational amplifiers, flash memory, sensors, and microcontrollers. It reflects a well-balanced engineering design, offering a practical compromise between the miniaturisation demanded by modern consumer electronics and the ruggedness required for industrial applications. In this guide, you will learn: SOIC package dime......
What Is a 100nF Capacitor and How Do You Choose the Right One
Key Takeaways Value: A 100nF capacitor has a nominal capacitance of 0.1 µF, or 100,000 pF, and all three names describe the same part value. Marking: Many through-hole ceramic and film capacitors use the three-digit code 104, while most SMD MLCCs are unmarked. Main use: Its most common function is local decoupling at an IC power pin, where it supplies fast transient current and shunts high-frequency noise to ground. Default choice: For general decoupling, an X7R or X5R MLCC is a common starting point;......
SMD Resistor Package Sizes: Complete Size Chart, Footprints & How to Choose
Surface Mount Device (SMD) resistors are fundamental to modern electronics, and selecting the correct package size is a crucial engineering decision that impacts a PCB’s electrical performance, thermal reliability, and manufacturing cost. In this article, you will find practical, authoritative guidance on: The complete SMD resistor size chart (01005 to 2512) with exact dimensions and power ratings. Recommended PCB footprints and guidelines for reflow reliability. Critical trade-offs concerning power d......
PCB Connector Types Explained: Categories, Comparison, Applications and How to Choose the Right One
PCB connectors are essential components for connecting circuit boards with external devices, cables, or other PCBs. Choosing the right connector type affects signal reliability, mechanical stability, and overall product performance. Factors such as current rating, frequency requirements, pitch size, and mounting method should be considered during selection. In this guide, you will learn: The major types of PCB connectors and their applications. How different connector types compare. How to select the ......
What Is a System on a Chip (SoC)? A Complete Guide for PCB Designers
Nearly every electronic device you interact with today, from smartphones and IoT sensors to industrial controllers and AI edge systems, is powered by a System on a Chip (SoC). By integrating processors, memory controllers, communication interfaces, and specialized accelerators onto a single piece of silicon, SoCs deliver the performance, power efficiency, and compact form factors modern electronics demand. Whether you're selecting a processor for an embedded Linux design, evaluating an AI-capable plat......
Capacitors in PCB Design_ A Complete Guide to All Types
Capacitors are indispensable components in PCB (Printed Circuit Board) design, providing functionality from energy storage and noise filtering to voltage regulation. Whether you're designing a simple circuit or a complex multi-layer board, understanding the different types of capacitors and their applications is crucial. The basic structure of a capacitor consists of two metal plates separated by a layer of dielectric. Capacitors can be of fixed or variable type. The ability of the capacitor to hold e......