
How to Apply Solder Flux When Hand Soldering Components
7 min
- Step-by-Step: How to Use Solder Flux When Hand Soldering Components
- Common Hand Soldering Flux Mistakes (and How to Avoid Them)
- How Solder Flux Is Controlled in Professional SMT Assembly
- Conclusion
- FAQ About Using Solder Flux
Solder flux plays a critical role in creating reliable solder joints, yet it is one of the most misunderstood materials in hand soldering. Using too little flux leads to poor wetting and cold joints, while using too much—or using it incorrectly—creates residue, fumes, and rework issues.
This guide explains how to use solder flux correctly when hand soldering components, focusing on practical, repeatable techniques rather than theory alone. You’ll learn where to apply flux, how much is enough, when to apply it during the soldering process, and how flux behavior changes under heat.
Whether you are assembling prototypes, repairing PCBs, or improving joint consistency, this step-by-step guide will help you achieve clean, mechanically sound, and electrically reliable solder joints.
Before getting into the step-by-step process, let’s answer the most common practical questions asked when using solder flux by hand.
Q1: Where to Apply Flux (Pad, Lead, or Both?)
Ideally, apply a thin film to both the pad and the component lead. Flux prepares the surface by removing oxides and lowering surface tension. Applying it to both surfaces ensures that when the solder melts, it flows seamlessly between them, forming a strong intermetallic bond.
Q2: How Much Flux Should You Use? (Visual Reference)
You do not need a puddle. For a standard 0805 component or a through-hole leg, a small amount - roughly the size of a grain of rice or a thin coating - is sufficient. Too much flux creates a mess and requires excessive cleaning, while too little leads to rapid oxidation and cold joints.
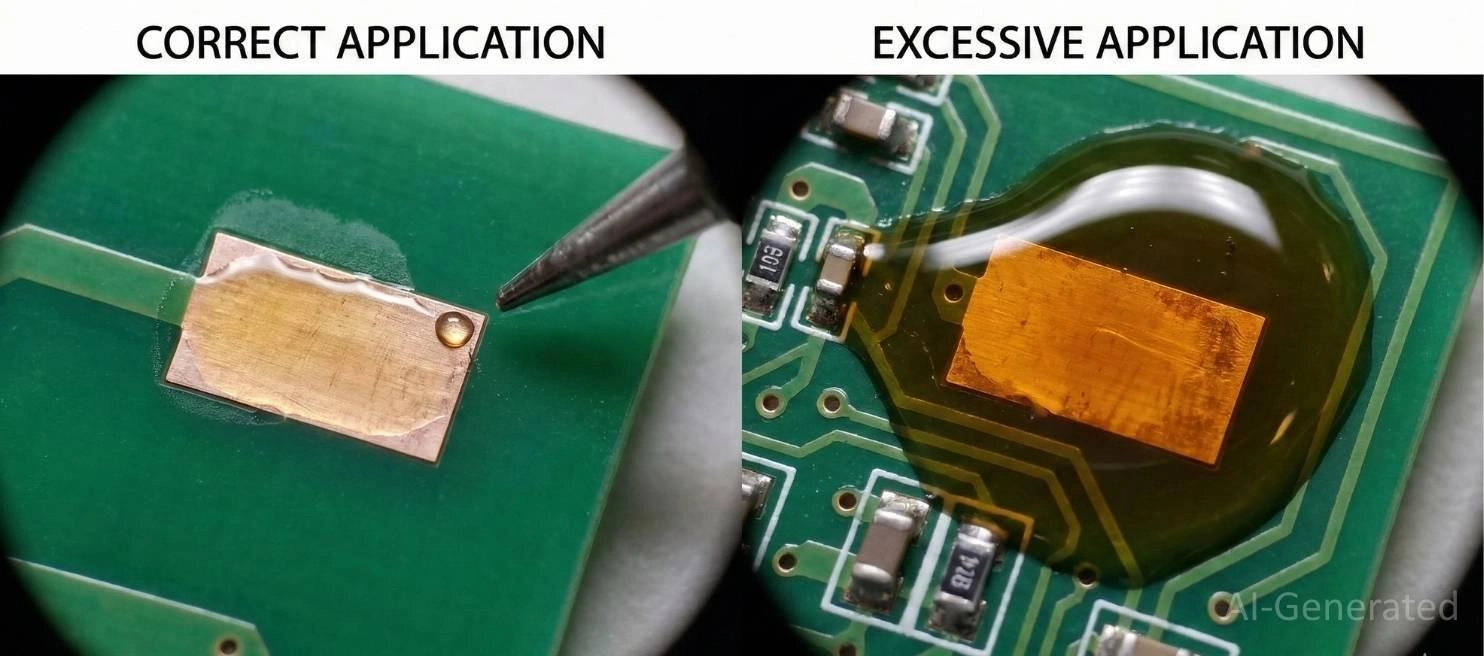
Figure: Showing correct vs. excessive solder flux application on a PCB pad.
Q3: When to Apply Flux - Before or During Soldering?
Always apply flux before the heat source touches the joint. Flux needs to be present as the metal heats up to prevent rapid oxidation and to clean existing oxides before the solder melts. Adding flux after the solder has melted is usually too late to ensure proper wetting.
Q4: Should I Choose Flux Pen or Liquid Flux for Hand Soldering?
● Flux Pen: Best for precision and general maintenance. It allows controlled application to specific pads without flooding the board.
● Liquid Flux (Bottle/Brush): Better for larger areas or heavily oxidized vintage boards, but harder to control.
Step-by-Step: How to Use Solder Flux When Hand Soldering Components
1. Surface Decontamination: Flux is a chemical reducer, not a degreaser. Before applying flux, clean the PCB pad and component lead with 99% Isopropyl Alcohol (IPA). This removes organic contaminants (oils, fingerprints) that can act as a barrier to the flux's chemical reaction.
2. Strategic Deposition: Apply a thin, uniform film of flux to both the pad land and the component termination. For through-hole parts, ensure flux enters the plated barrel. The goal is to coat the metal surfaces where the Intermetallic Compound (IMC) will form. Avoid flooding the area, as excess flux can boil and displace small components.
3. Thermal Activation & Heat Bridge: Place the soldering iron tip so it contacts both the pad and the lead simultaneously. You may hear a brief "sizzle" - this is the flux solvent evaporating. As the temperature rises (150°C–200°C), the flux activators engage, stripping away oxidation layers. Critical: Do not dwell here for more than 1-2 seconds, or the flux will exhaust (carbonize) and lose its wetting properties.
4. Solder Introduction: Feed the solder wire directly into the joint interface, not onto the iron tip. The activated flux will lower the surface tension of the liquid solder, causing it to wick instantly across the pad and up the lead.
5. Reflow & Solidification: Once the solder creates a concave meniscus (fillet), remove the wire, then the iron. Allow the joint to cool undisturbed to prevent a "disturbed joint" fracture.
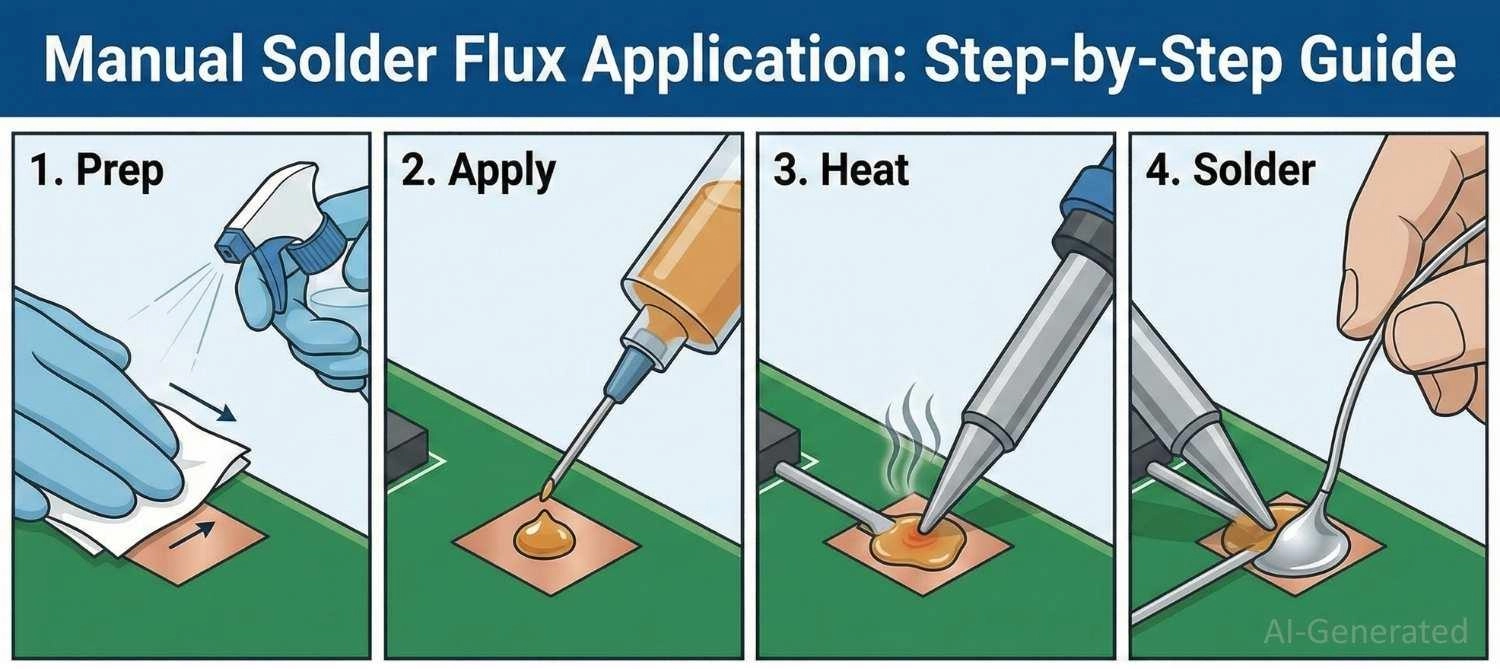
Figure: Step-by-step visual guide on how to apply solder flux manually for PCB rework.
Common Hand Soldering Flux Mistakes (and How to Avoid Them)
1. Burning the Flux: Holding the iron on the flux for seconds before adding solder causes it to char and lose efficacy.
Fix: Feed solder immediately after heating.
2. Ignoring Fumes: Flux smoke contains colophony and acids.
Fix: Always use a fume extractor.
3. Using Plumbing Flux: Never use acid-core plumbing flux; it will corrode your PCB traces.
Fix: Ensure your flux is "Electronic Grade" or "Rosin Core."
How Solder Flux Is Controlled in Professional SMT Assembly
While the principles of oxide removal are the same, the method of application in mass production is entirely different. You cannot manually syringe flux onto 1,000 boards with 500 components each. It is slow, inconsistent, and prone to error.
From Manual to Mass Production: The JLCPCB Advantage
You have learned how to use flux manually for repairs and prototypes. However, when you are ready to scale, relying on manual skills becomes a liability. This is where SMT (Surface Mount Technology) Services provide value.
JLCPCB PCB Assembly utilizes strictly controlled automated processes to ensure flux is applied perfectly for millions of joints daily:
● Volumetric Stencil Printing: Instead of syringes, flux is carried within the solder paste. High-precision stencils ensure the exact volume is deposited.
● Controlled Reflow Profiling: 10-zone ovens match the thermal profile to the flux's activation window, preventing the "exhaustion" and "charring" issues common in manual soldering.
● 3D SPI Inspection: Automated optical machines measure paste volume to guarantee no joint is dry before the component is even placed.

Conclusion
Using solder flux correctly is about proper timing, placement, and heat control—not using more flux. Clean surfaces, apply a controlled amount of electronic-grade flux, heat the joint efficiently, and feed solder into the joint itself to ensure proper wetting and joint strength.
While these principles apply to hand soldering, professional SMT assembly achieves the same results through automated flux control, precise reflow profiling, and inspection systems. Mastering flux behavior at the bench level is the foundation for producing reliable solder joints at any scale.
FAQ About Using Solder Flux
Q: Can I use Vaseline as soldering flux?
No. Vaseline (petroleum jelly) is a grease, not a chemical reducing agent. It will not remove oxides or help wetting; it will simply burn and leave a carbonized mess on your board. Only use proper "Rosin" or "Synthetic" flux.
Q: Can I apply flux with my finger?
No. Your fingers carry oils and salts that contaminate the PCB. Additionally, flux chemicals can be skin irritants or sensitizers. Always use a pen, syringe, or brush.
Q: What happens if you use too much flux?
It creates a sticky mess that attracts dust and can make inspection difficult. In some cases, excess flux can boil and displace small components (tombstoning) or flow into switches and connectors, ruining them.
Q: Should I put flux on before or after soldering?
Before. Flux must be present as the metal heats up to clean oxides and prevent new ones from forming. Adding it after the solder melts is too late.
Q: Can I use plumbing flux for PCB electronics?
No. Plumbing flux contains either Zinc Chloride or Ammonium Chloride (Acid Core), and these substances are extremely corrosive. They attack the copper traces and the leads of the components as well. Be sure that your flux is marked as "Rosin Core" or "Electronic Grade."
Q: Does solder flux expire?
Yes. Operations in soldering, like flow and curing, are affected by the changing viscosity of flux, which occurs because of the evaporation of the solvents (vehicles). Solder balling is often the result of using expired flux because the activation of the chemicals is not in sync with the thermal profile anymore. The usual shelf life is 1-2 years if proper storage conditions are maintained.
Q: Can I mix No-Clean and Water-Soluble flux?
Do not mix flux chemistries. The residues can react to form insoluble white crystals that are difficult to clean and potentially conductive. If switching flux types during rework, fully clean the board with IPA or an ultrasonic bath first.
Q: Is the smoke from flux dangerous?
The smoke generated is vaporized colophony (rosin) and acid activators. It is a known respiratory sensitizer and can cause "Colophony Asthma." Always use a fume extractor or work in a ventilated area.
Popular Articles
• Common PCB Assembly Methods and Soldering Techniques Explained
• What Is BGA Void? Causes, IPC Limits, and Solutions
• SMD Soldering Tools You Need: Complete Guide from Beginner to Pro
• Reflow Soldering: Everything You Need to Know
• SMT Assembly Process Explained and Equipment Used: A Step-by-Step Guide to PCBA Manufacturing
Keep Learning
Common PCB Assembly Methods and Soldering Techniques Explained
Whether you're designing your first prototype or scaling up to production, understanding PCB assembly methods and soldering techniques is crucial to achieving reliable, high-performance circuit boards. Modern PCBA primarily relies on Surface Mount Technology (SMT) and Through-Hole Technology (THT)—each offering unique advantages for component density, durability, and manufacturability. In this guide, we'll break down the major PCB assembly methods, key soldering techniques such as reflow and wave sold......
12 Professional Soldering Tips and Tricks Every Beginner Should Know
Soldering is not merely "gluing" metal; it is a metallurgical process that creates an intermetallic compound (IMC). This molecular bond ensures the electrical and mechanical integrity of your device. A poor joint might pass a quick visual check but will inevitably fail under vibration or thermal stress, leading to "ghost" bugs and hardware failures. These soldering tips and tricks focus on practical, repeatable techniques used in professional electronics soldering—from correct heat transfer and flux u......
Solder Melting Point Guide: Chart, Alloy Types, and Reflow Considerations
In the precise world of electronics manufacturing, a difference of just a few degrees can mean the distinction between a perfect, reliable solder joint and a catastrophic "cold" joint failure. While many hobbyists view soldering simply as "melting metal to stick things together," professional PCB assembly requires a nuanced understanding of thermodynamics. The solder melting point is not simply a single value listed in a datasheet; it is a decisive limit that determines the choice of components, the s......
The Ultimate Guide to Solder Flux: Everything You Should Know Before Soldering PCB
Soldering is needed to make almost all electronic devices. Adding solder alone won't make a joint that is strong, clean, and sound from a metallurgical point of view. Solder flux is a very important part of the process that comes in here. If you want to do your job better and make it more reliable, you need to know a lot about soldering flux, whether you're an engineer, a professional technician, or just a hobbyist. This article goes into a lot of detail about solder flux, including what it is, how it......
Flex PCB Assembly Guide: Process, Challenges, and Solutions
Flexible Printed Circuit Boards (Flex PCBs) are the foundational technology enabling the compact, innovative design of modern electronics. Because of their ability to bend and fold, they power devices from smart wearables to compact medical instruments where traditional rigid printed circuit boards (Rigid PCBs) can't be used. Achieving a functional electronic circuit from the raw plastic film demands special expertise, with flexible PCB assembly (FPCA) representing the crucial final step in this trans......
SMD Rework Guide: Tools, Temperatures, and Techniques That Prevent PCB Damage
From replacing a burned regulator to correcting wrong component values or removing solder bridges on fine-pitch ICs, SMD rework is an essential skill in electronics manufacturing and prototyping. It allows engineers to repair assembly defects, implement design changes, and recover valuable PCBs without the cost and delay of building new boards. In this guide, you will learn: What SMD rework is Common rework scenarios Tools and temperatures Safe removal and installation Package-specific techniques Real......