
Surface Mount Stencil: A Practical Guide for SMT Printing and Solder Paste Application
6 min
- What Is a Surface Mount Stencil in SMT Assembly
- Design and Manufacturing Considerations for Surface Mount Stencils
- Surface Mount Stencil Use Guidelines
It starts with a slim piece of metal, slipped in early during assembly. Before any part lands in place, before heat ever touches the board, that layer shapes the flow. Where the paste spreads comes down to its design. How thick it is, how it's cut - those details decide what sticks and what washes away. For engineers looking for reliable stencils, JLCPCB provides high-precision SMT stencils that integrate seamlessly with PCB production workflows.
Down goes solder paste, slipping through narrow cuts in a thin steel sheet, hitting exact spots on circuit board pads underneath. When the cutouts sit crooked or rough, extra goop creeps into wrong zones. A hair off target brings trouble fast - wires jumping across leads, shaky bonds, gaps with no link at all once printed.
Stencils need to be spot on when putting together circuit boards. Without laser cutting, squeezing out tiny amounts of solder paste wouldn’t work well - especially now that parts are shrinking and packed closer together.
What Is a Surface Mount Stencil in SMT Assembly
Definition And Basic Function
A thin piece of metal rests flat on the circuit board when applying solder paste - most often made from stainless steel. Where each gap appears on the sheet, a matching contact point lies below on the board underneath.
A thin blade glides over the board, forcing solder paste through cutouts onto waiting pads. When the metal sheet rises, the goo remains stuck exactly where it needs to be. Each deposit holds firm while parts are set above them. Then heat turns everything solid without shifting positions.
Laser Surface Mount Stencils
Laser cutting handles most stencil work these days. When gaps shrink and lead patterns get tricky, older techniques fall short - precision slips. Odd pad forms push limits beyond what those methods consistently offer.
Starting off with precision, laser-cut stencils create openings that are crisp and exact. Their smooth interior edges help solder paste let go without sticking. Unusual board layouts benefit from uniquely shaped cutouts made possible through focused light beams. JLCPCB’s laser-cut stencils offer consistent aperture quality, making them suitable for complex SMT layouts.
Role in SMT Printing Quality
Starting right begins with the stencil when it comes to a solid SMT print. Top-tier paste or high-end machines won’t fix damage from frayed stencils or badly shaped openings. Precision matters most where contact meets surface.
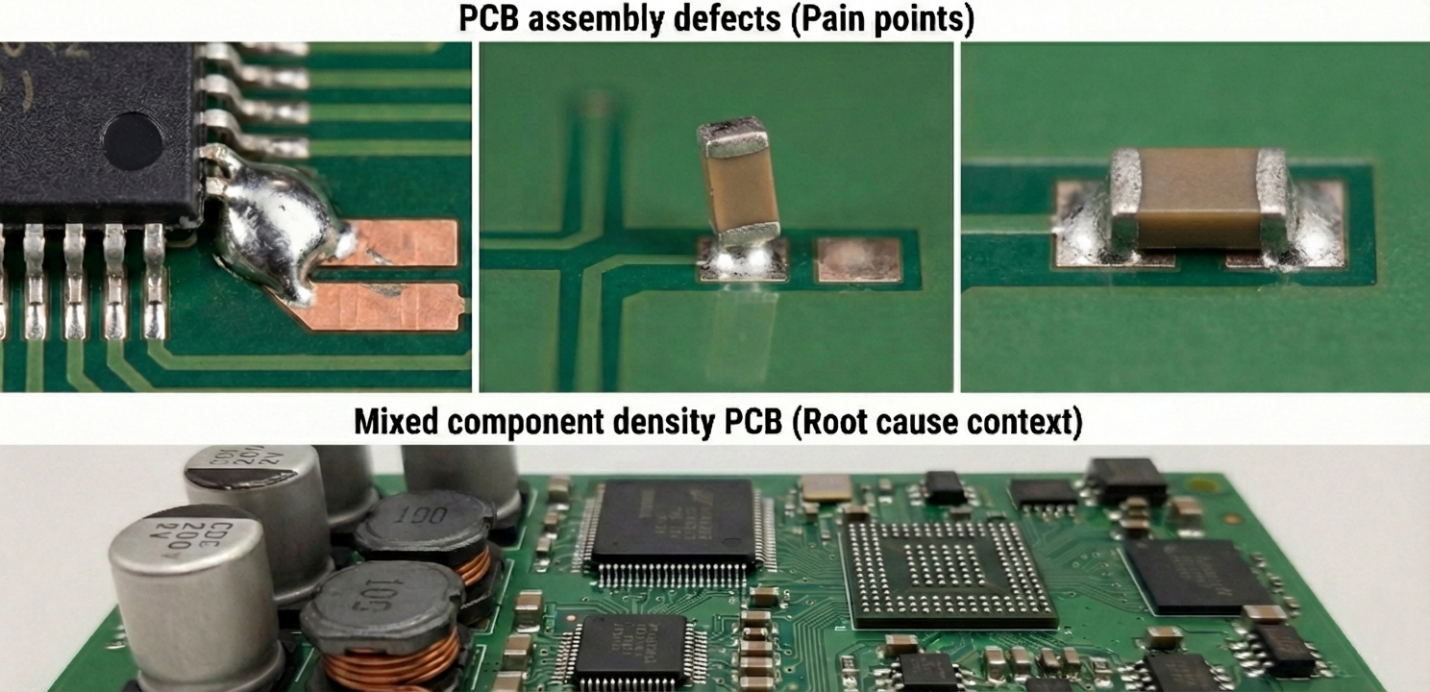
Sometimes stencils cause issues like solder bridges. Components standing upright instead of lying flat show up now and then. Uneven amounts of solder appear across pads more often than you’d think. Poor connections tend to follow, showing weakness or failing early.
Things settle down once the openings line up right, letting paste flow smooth. Misaligned holes mess up everything after, spreading trouble step by step.
Design and Manufacturing Considerations for Surface Mount Stencils
Choosing Aperture Size and Material Thickness
Starting narrow, the opening size decides paste volume on every contact point. Because edges matter, both outline and depth affect what sticks during printing. Ending uneven.
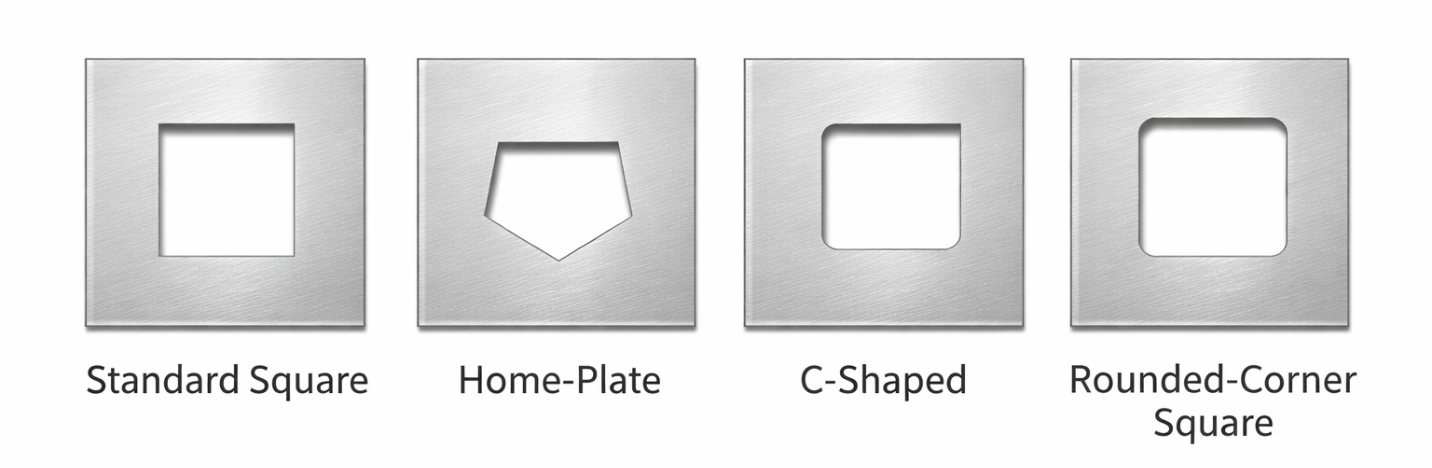
Falling mostly within a range of 0.10 mm to 0.15 mm, SMT stencils come in varying thicknesses. Thin versions handle tight-spaced parts well; bulkier ones deliver extra material where broad contact areas demand it. Sometimes, rather than swap out the whole stencil, specialists tweak hole dimensions or shape to get results.
Fewer details come straight from makers, yet designs such as QFN and SOT usually stick to openings that time has proven reliable. Instead of fresh rules each round, old habits guide most stencils in daily use.
Materials Used in Surface Mount Stencils
Flatness sticks around longer with stainless steel - it's what goes into most stencils mounted on surfaces. Shape holds firm even after many prints pass through. Wear hardly shows up thanks to tough resistance built into the metal. Clean paste release happens only if the sheet keeps its form.
Paste sticks less inside tiny openings when certain stencils get special surface tweaks like electro-polishing or ultra-thin coatings. Efficiency climbs because more material moves through where it should. Fewer wipe cycles are needed over time thanks to these finishes. Long jobs stay steady without drifting off target.
Selecting a Manufacturer for SMT Stencils
Few stencil makers hit the exact mark every time. When gaps narrow to microns, even slight shifts can tip outcomes. Precision slips here and there, making a difference where it counts.
A solid choice for SMT stencils brings laser-cut accuracy, holds strict size control, gets done quickly, works smoothly with common printing machines.
One company handling circuit boards and stencils cuts out waiting time between steps. With everything - from layout to laser-cut tools - managed together, production flows without long breaks in the middle.
Surface Mount Stencil Use Guidelines
Smt Solder Paste Printing Process
Precision begins the moment hands touch tools, not just when plans are drawn. A shift in grip or a hurried adjustment - mistakes appear before you even notice them.
Steady print speed keeps things reliable. When the stencil lines up right with the PCB, outcomes stay repeatable. Squeegee pressure matters - too much or too little changes everything. The kind of solder paste used needs to fit how the apertures are shaped. Instead of forcing steps together, letting each part match its role makes consistency possible.
How Stencils Change Common Problems
Paste printing is where a lot of SMT problems first show up. Oversized apertures often lead to bridging. Poor paste release results in too little solder joining parts. Smearing happens if the stencil gets blocked. Clogged openings mess up the pattern.
Fixing the stencil layout or making cleaning steps better usually works quicker than swapping pastes or adjusting printer controls. Most times, small tweaks in prep beat changes to materials or machines.

Cleaning and Maintaining SMT Stencils
Paste left behind slows stencil action. Over months, cleaning now then prevents shaky prints.
Storing stencils flat keeps them safe. A quick wipe between prints slows wear. Damage hides in tiny holes - check often. Approved cleaners work better than guesswork. Protection matters just as much as care during use.
One slip in making the stencil ruins every step after. Even a tiny bend shifts where material sits, harming joints later on.
A solid SMT print begins with a stencil cut exactly by laser. The form of each opening counts just as much as its placement, while regular care preserves sharp performance. Using trusted suppliers like JLCPCB ensures that each stencil meets high-quality standards, supporting both test runs and large-volume SMT production.
When handling first test runs or large-volume output, aligning the stencil to the task helps block flaws ahead of time.
Right from the first move, a surface mount stencil shapes how everything else unfolds in SMT assembly. Chosen wisely, it works behind the scenes without fuss or noise. One careful pick early on ripples through every stage ahead.

Keep Learning
SMT Stencil Cleaning Guide: Process, Frequency, and Tips
Key Takeaways about SMT Stencil Cleaning SMT stencil cleaning removes solder paste residue from aperture walls and the stencil underside, keeping paste transfer efficiency between 80% and 100%. Industry analysis attributes over 60% of SMT defects to the paste-print step — most of which trace back to a stencil cleaning lapse. Two stages matter: under-screen cleaning (between cycles, typically every 5–10 prints) and off-line cleaning (after production completes). IPA handles standard flux residue; dedic......
Top 5 Circuit Board Stencil Mistakes & How to Fix Them for Higher SMT Yield
Usually, the circuit board stencil is responsible for roughly 60% to 70% of all SMT defects. That number surprises people. It shouldn't. The stencil controls paste volume, deposit geometry, and positional accuracy all at once. When it gets wrong, everything downstream pays for it. The shift in thinking that separates good engineers from great ones is simple: stop seeing the PCB stencil as a metal sheet with holes in it. It is a precision fluid delivery system. Every aperture wall, every micron of foil......
How to Apply SMD Glue Using SMT Stencils (Design, Thickness & Troubleshooting Guide)
The reality of modern PCB assembly is that "mixed-technology" is still very much the norm. When a board hits the wave soldering machine, bottom-side SMD components face a high-velocity river of molten metal. Without a solid mechanical bond, they’ll simply wash away into the solder pot. That’s where the precision application of SMD glue becomes the difference between a successful run and a bin full of scrap. Quick Answer: How to Apply SMD Glue in SMT If you need to configure your SMT stencil for adhesi......
The Essential Guide to SMT Stencils in PCB Assembly
Introduction In the dynamic world of electronics manufacturing, Surface Mount Technology (SMT) plays a crucial role in achieving efficiency and precision in printed circuit board (PCB) assembly. Central to the SMT process is the SMT stencil, an indispensable tool for the accurate application of solder paste. This ensures solid electrical connections between components and PCBs. This guide delves into the specifics of SMT stencils, examining their types, materials, manufacturing methods, advantages, ch......
Nano-Coatings in PCB Manufacturing: How They Outperform Traditional Stencils
Nano coating is a thin hydrophobic (water repellent) and oleophobic (oil repellent) treatment used on the undersides and edges of solder paste stencils. With this the surface becomes non-stick which reduces the number of cleaning cycles required for the solder paste printing process. Upon application, the less than 5 nanometer coating bonds with the stencil foil at the microscopic level, which does not change the size and shape of the stencil. Nano coating is an industry proven process which shows imm......
How to Choose an SMT Stencil
What is an SMT stencil? SMT Stencil is a thin metal sheet used in the soldering process for SMT (Surface Mount Technology) and it plays an essential role in the SMT soldering process. Smt Stencil allows the direct placement of solder paste onto the SMD pads of PCB, which can help prevent errors and defects during the reflow soldering process. This results in a precise amount of tin coverage once the work is completed. Types of SMT Stencils Depending on the application of solder paste, there are three ......