What Is Tombstoning? A Practical Guide to Causes, Reflow Risks, Prevention, and Rework
17 min
- PCB Tombstoning Causes and Fixes: Quick Reference
- What Is Tombstoning?
- Why Does Tombstoning Happen?
- What Causes PCB Tombstoning?
- How Pad Design Causes Tombstoning
- How to Prevent PCB Tombstoning
- How JLCPCB Prevents Tombstoning in PCB Assembly
- Which Components Are Most Prone to Tombstoning? 0201, 0402, and 0603
- How to Rework a Tombstoned Component
- IPC-A-610 Acceptability Criteria for Tombstoning
- How to Detect PCB Tombstoning: AOI, X-Ray, and Visual Inspection
- PCB Tombstoning vs. Other SMT Defects
- Conclusion
- FAQs about Tombstoning

Key Takeaways
- Definition: Tombstoning occurs when a small two-terminal component lifts off one pad during reflow and stands upright, leaving one end without a proper solder connection.
- Root Cause: Unequal solder wetting forces act on the two terminals, often due to differences in pad temperature, solder-paste volume, pad geometry, or thermal mass.
- Highest Risk: Small passive components, such as 0201 and 0402 resistors and capacitors, are especially susceptible because their low mass and small terminations make them more sensitive to imbalanced solder wetting forces.
- Best Prevention: Use balanced pad geometry and solder-paste volumes, and optimize the reflow profile to minimize temperature differences between the two terminals.
PCB tombstoning can turn a successful reflow cycle into a costly rework problem. You pull a panel from the oven and may find a row of 0402 resistors has lifted onto one end, leaving open circuits even though the solder-paste inspection passed minutes earlier. The cause may be paste volume, pad geometry, stencil design, component placement, or thermal imbalance.
In this guide, you will learn:
- How unequal solder wetting forces cause a component to lift
- Which pad, thermal, and stencil design issues increase the risk
- How stencil design, component placement, and reflow settings prevent tombstoning
- How to rework a tombstoned part correctly
- How IPC criteria are used to assess tombstoned components
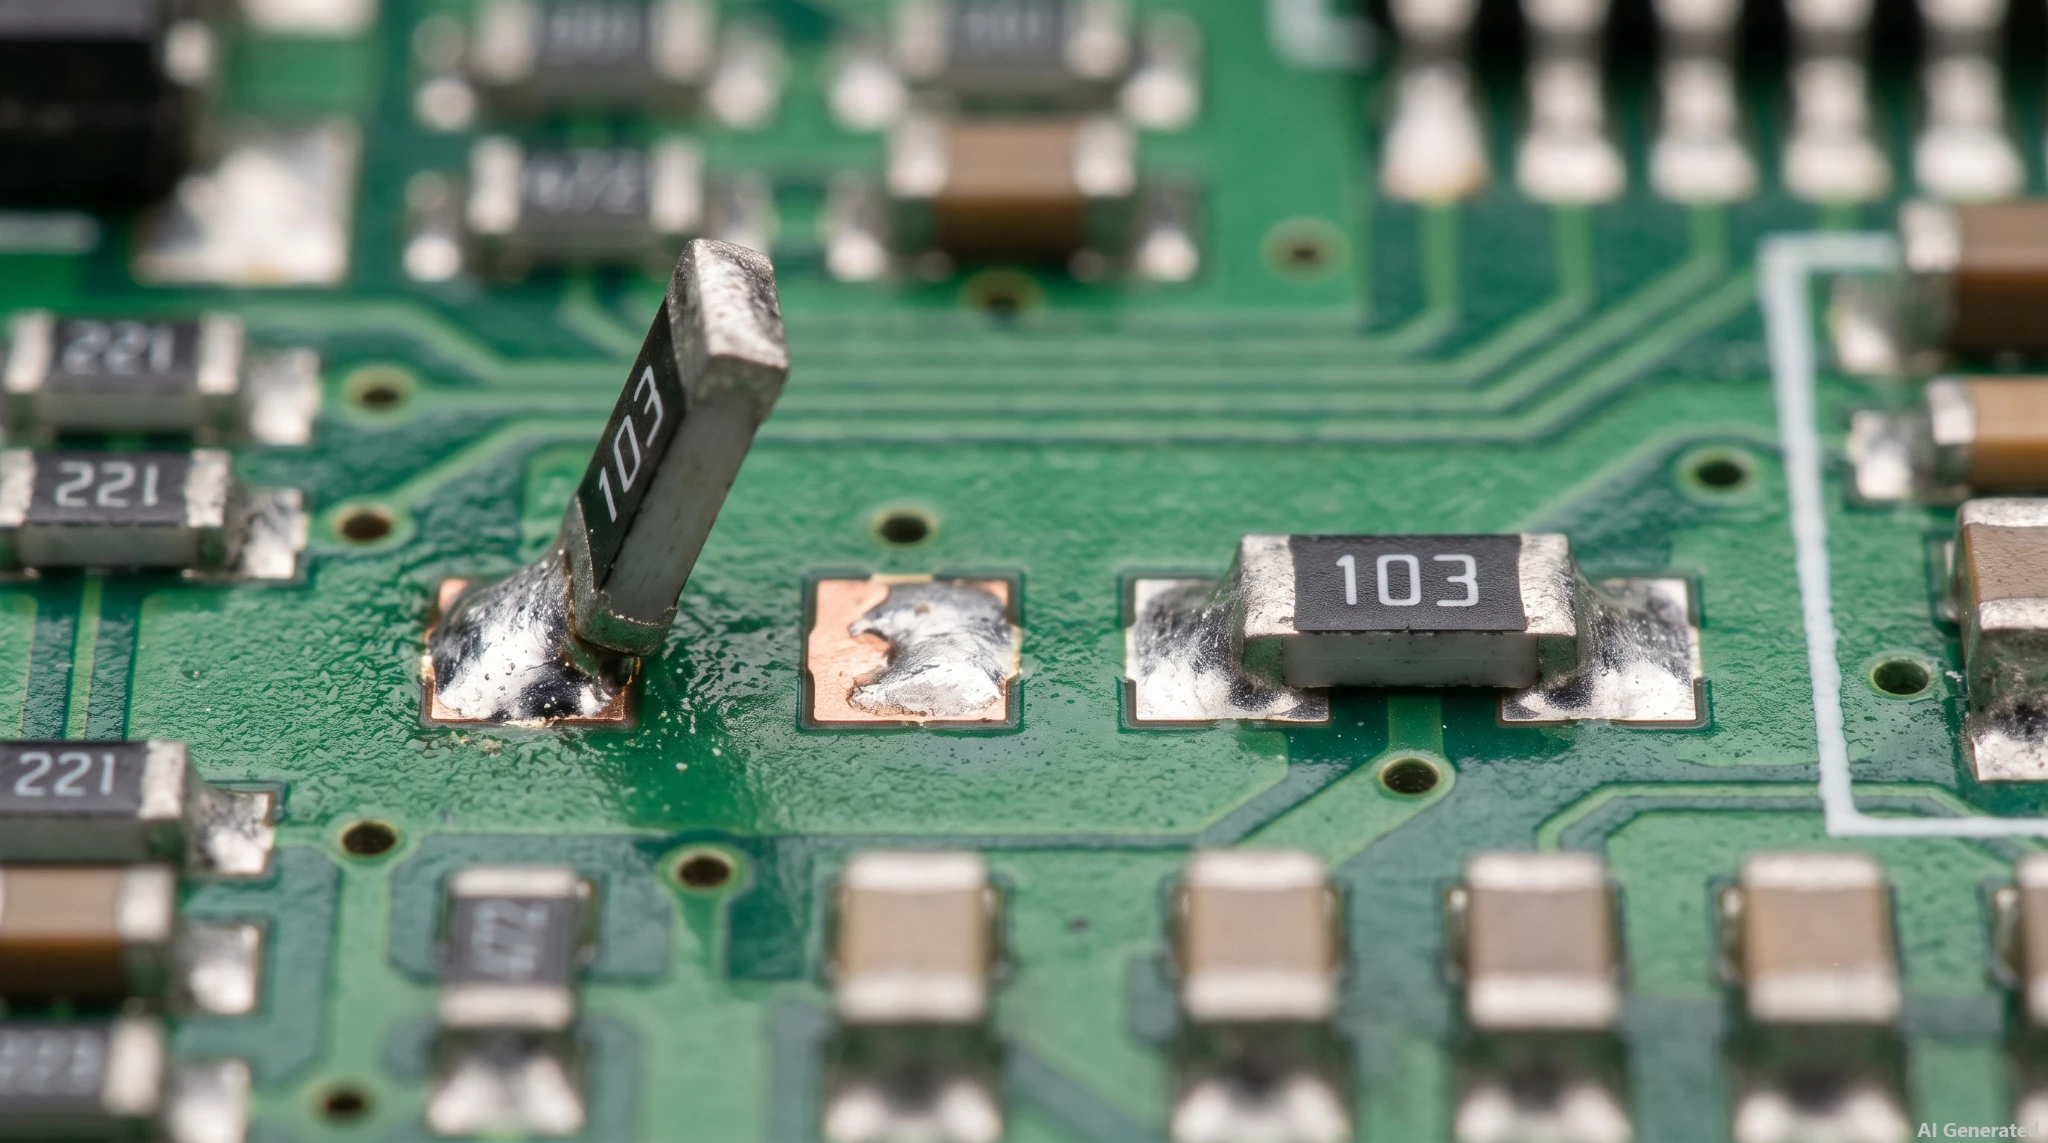
Figure: A tombstoned 0402 chip resistor standing vertically
PCB Tombstoning Causes and Fixes: Quick Reference
Tombstoning occurs when the solder wetting forces at the two ends of a component become unbalanced, often because of differences in solder-paste volume, pad temperature, pad geometry, or thermal mass.
| Symptom on the Board | Root Cause | Immediate Process Fix | Permanent Design Fix |
|---|---|---|---|
| One end vertical, circuit open | Unequal melt timing at the two pads | Extend the 150 °C to 200 °C soak | Make both pads identical in size and copper |
| Tombstones cluster at plane-connected pads | Plane-side pad heats slower and melts late | Slow the ramp to 1 °C to 2 °C per second | Add thermal relief spokes on that pad |
| Only 0402 and smaller parts are affected | Wetting force is large against a low mass | Use a wide-melting-range anti-tombstoning paste | Move to 0603, where the board area allows |
| Paste smeared toward one pad | Print paded off-target on the pads | Recalibrate stencil-to-board alignment | Rebuild the footprint using current, component-specific land-pattern guidance |
| Scattered tombstones, no pattern | Placement offset or skew before reflow | Check nozzle pickup and placement offset | Widen the pad gap to aid self-centering |
What Is Tombstoning?
PCB tombstoning is a reflow soldering defect in which a two-terminal surface-mount component lifts off one pad and stands upright on the other. One joint forms correctly. The other never wets. The result is an open circuit.
Tombstoning is also described by several related terms in SMT literature and industry documentation:
- Manhattan effect: A term referring to the skyscraper-like appearance of tombstoned components.
- Drawbridging: A related term sometimes used when a component lifts at one end but remains partially tilted rather than fully upright.
- Stonehenge effect: used when parts lift in rows
- Crocodiling and surfboarding: both used for partial lifts
- Vertical chip migration: the formal wording in some inspection documents
Note
Billboarding is related but distinct. A billboarded part has flipped onto its long edge with both terminals still touching solder.
Unlike tombstoning, it does not necessarily create an open circuit, so it usually passes the continuity test.
Why Does Tombstoning Happen?
Molten solder pulls. As paste collapses and wets a termination, surface tension drags the component toward that pad and up its side. When both pads melt together, the two pulls cancel. When one melts first, nothing opposes it.
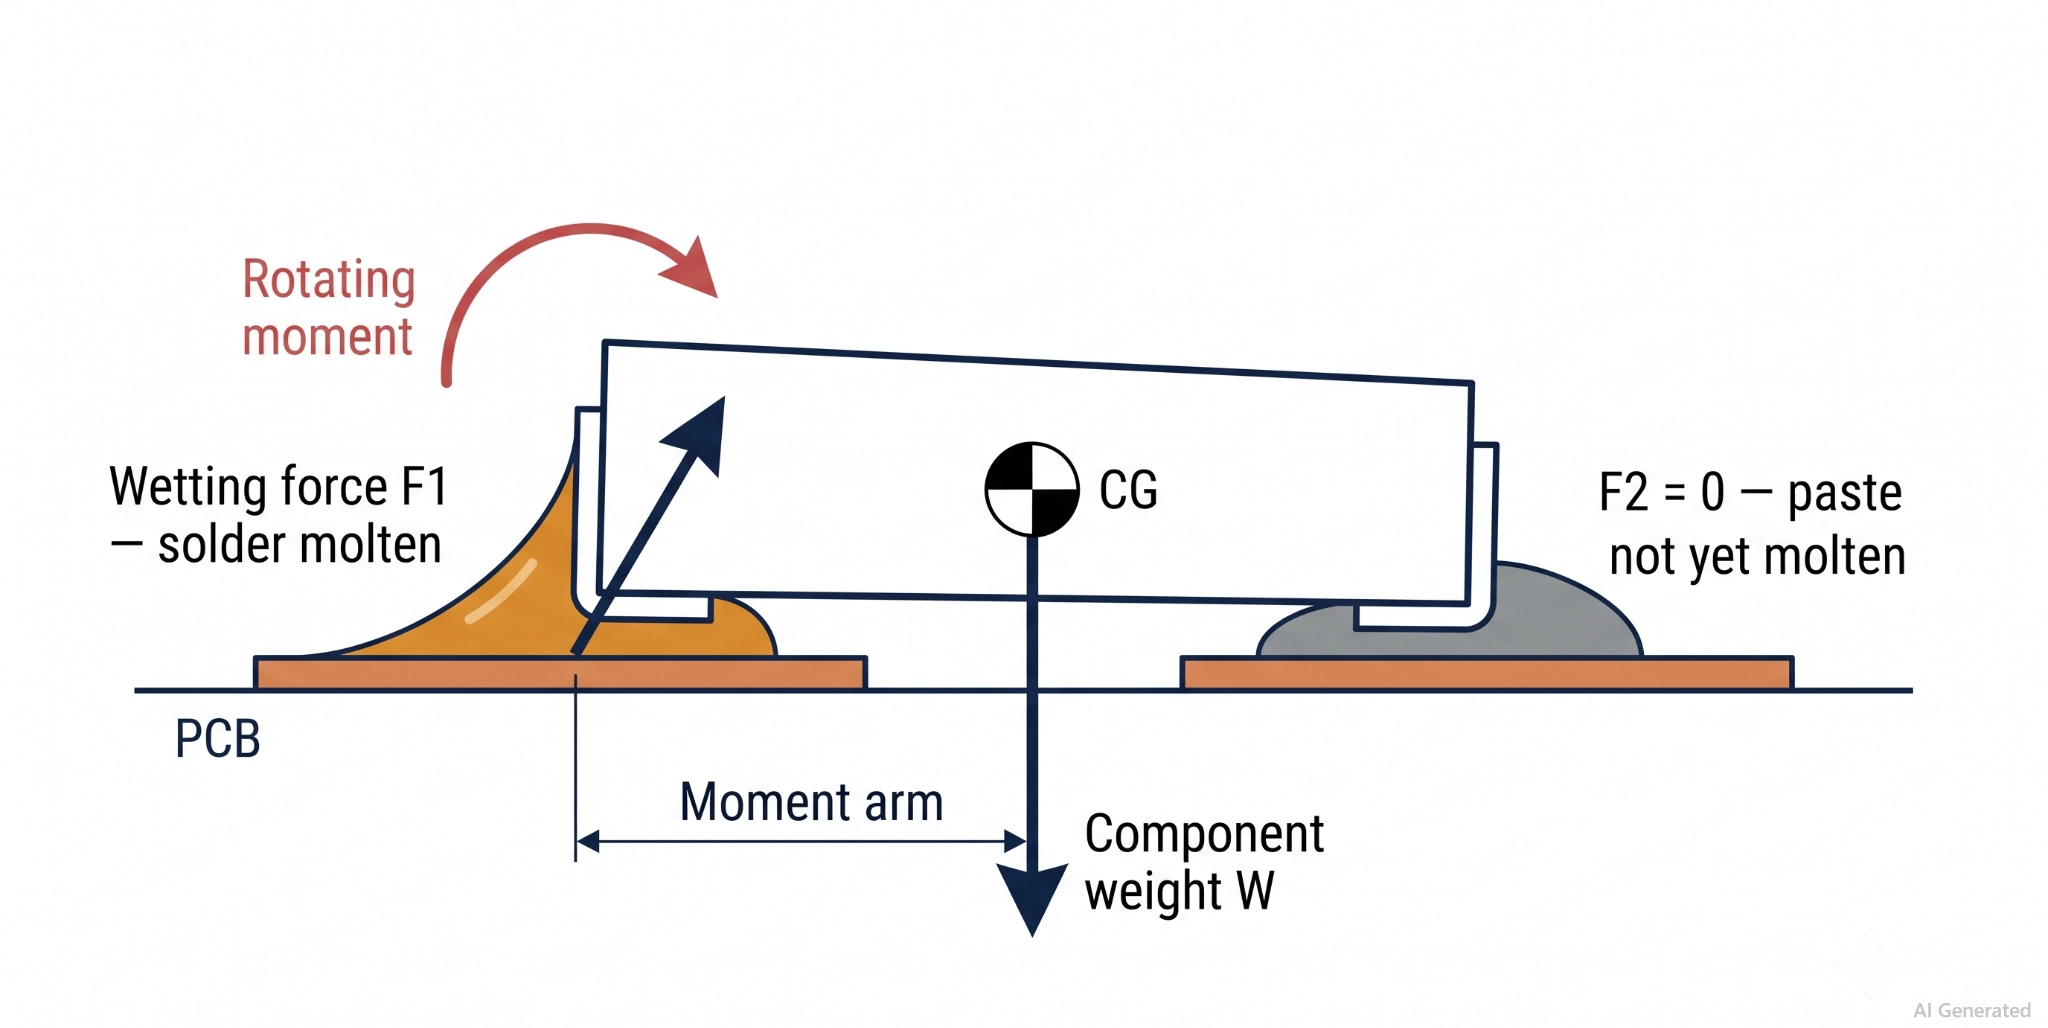
Figure: Force diagram illustrating the tombstone defect of an SMT chip component during reflow soldering
Let's break down exactly how this failure occurs, step by step:
- The pad on the isolated trace reaches 217 °C first because it has less copper to drain heat.
- Its paste coalesces and wets the termination, applying force only at one end.
- The second pad is still below the liquidus, so its paste is an unmelted brick.
- The wetting force acts on a moment arm about the center of gravity, and the part rotates.
- The second joint never forms, because its termination is now in the air.
Note
Two things follow here: First, tombstoning is a timing problem, not a temperature problem, so peak temperature is rarely the knob that fixes it. Second, the defect is decided within a few seconds on either side of the liquidus, which is why the shape of the reflow soldering process matters more than any single oven setting.
Fix: The rule of thumb says that if both pads cross 217 °C together, the part cannot tombstone.
What Causes PCB Tombstoning?
Most PCB tombstoning problems can be traced to seven interacting factors.
- Thermal imbalance between the two pads, usually one pad tied to a plane
- Unequal paste volume from off-target printing or mismatched apertures
- Placement offset, which pushes one termination deeper into its paste brick
- Pad and footprint mismatch the part actually fitted
- Paste chemistry and alloy, specifically, how sharply the alloy melts
- Component geometry, meaning low mass and a tall body
- Board warpage, which lifts one pad clear of its paste before reflow
1. Uneven Solder Paste Volume
Unequal paste means unequal thermal mass, unequal melt timing, and unequal pull. Before blaming the oven, review how to apply solder paste correctly.
2. Component Placement Offset and Skew
A part set down toward one pad sinks deeper into that deposit and shallower into the other. In published 0201 testing, deliberate placement offsets had a greater influence on tombstoning than most other variables.
3. Uneven Thermal Conditions Between Pads
This dominates in real designs. A pad connected directly to a large copper plane can act as a heat sink and reach the solder's liquidus temperature later than a pad connected to a narrow trace.
4. Solder Paste Chemistry, Surface Finish, and Melting Behavior
Solder alloy, flux chemistry, and surface finish influence how quickly and uniformly solder wets each termination. A narrow melting range can make small timing differences more consequential, so verify alloy behavior and any anti-tombstoning paste with the supplier and with board-specific trials.
5. Pad Geometry and Footprint Design
Pad geometry and footprint design set the balance between the two ends. Unequal pad size, solder-mask opening, or copper connection can produce unequal paste volume or heating, and make one termination wet first.
6. Component Geometry and Board Warpage
Small parts have a tall termination relative to their footprint, so the wetting force acts high up on a long lever arm. Warpage lifts one pad clear of its paste before the melt zone.
How Pad Design Causes Tombstoning
Pad geometry decides whether the two ends can melt together at all. Matched pads on matched copper arrive at the liquidus within about a second of each other. Mismatched pads never will.
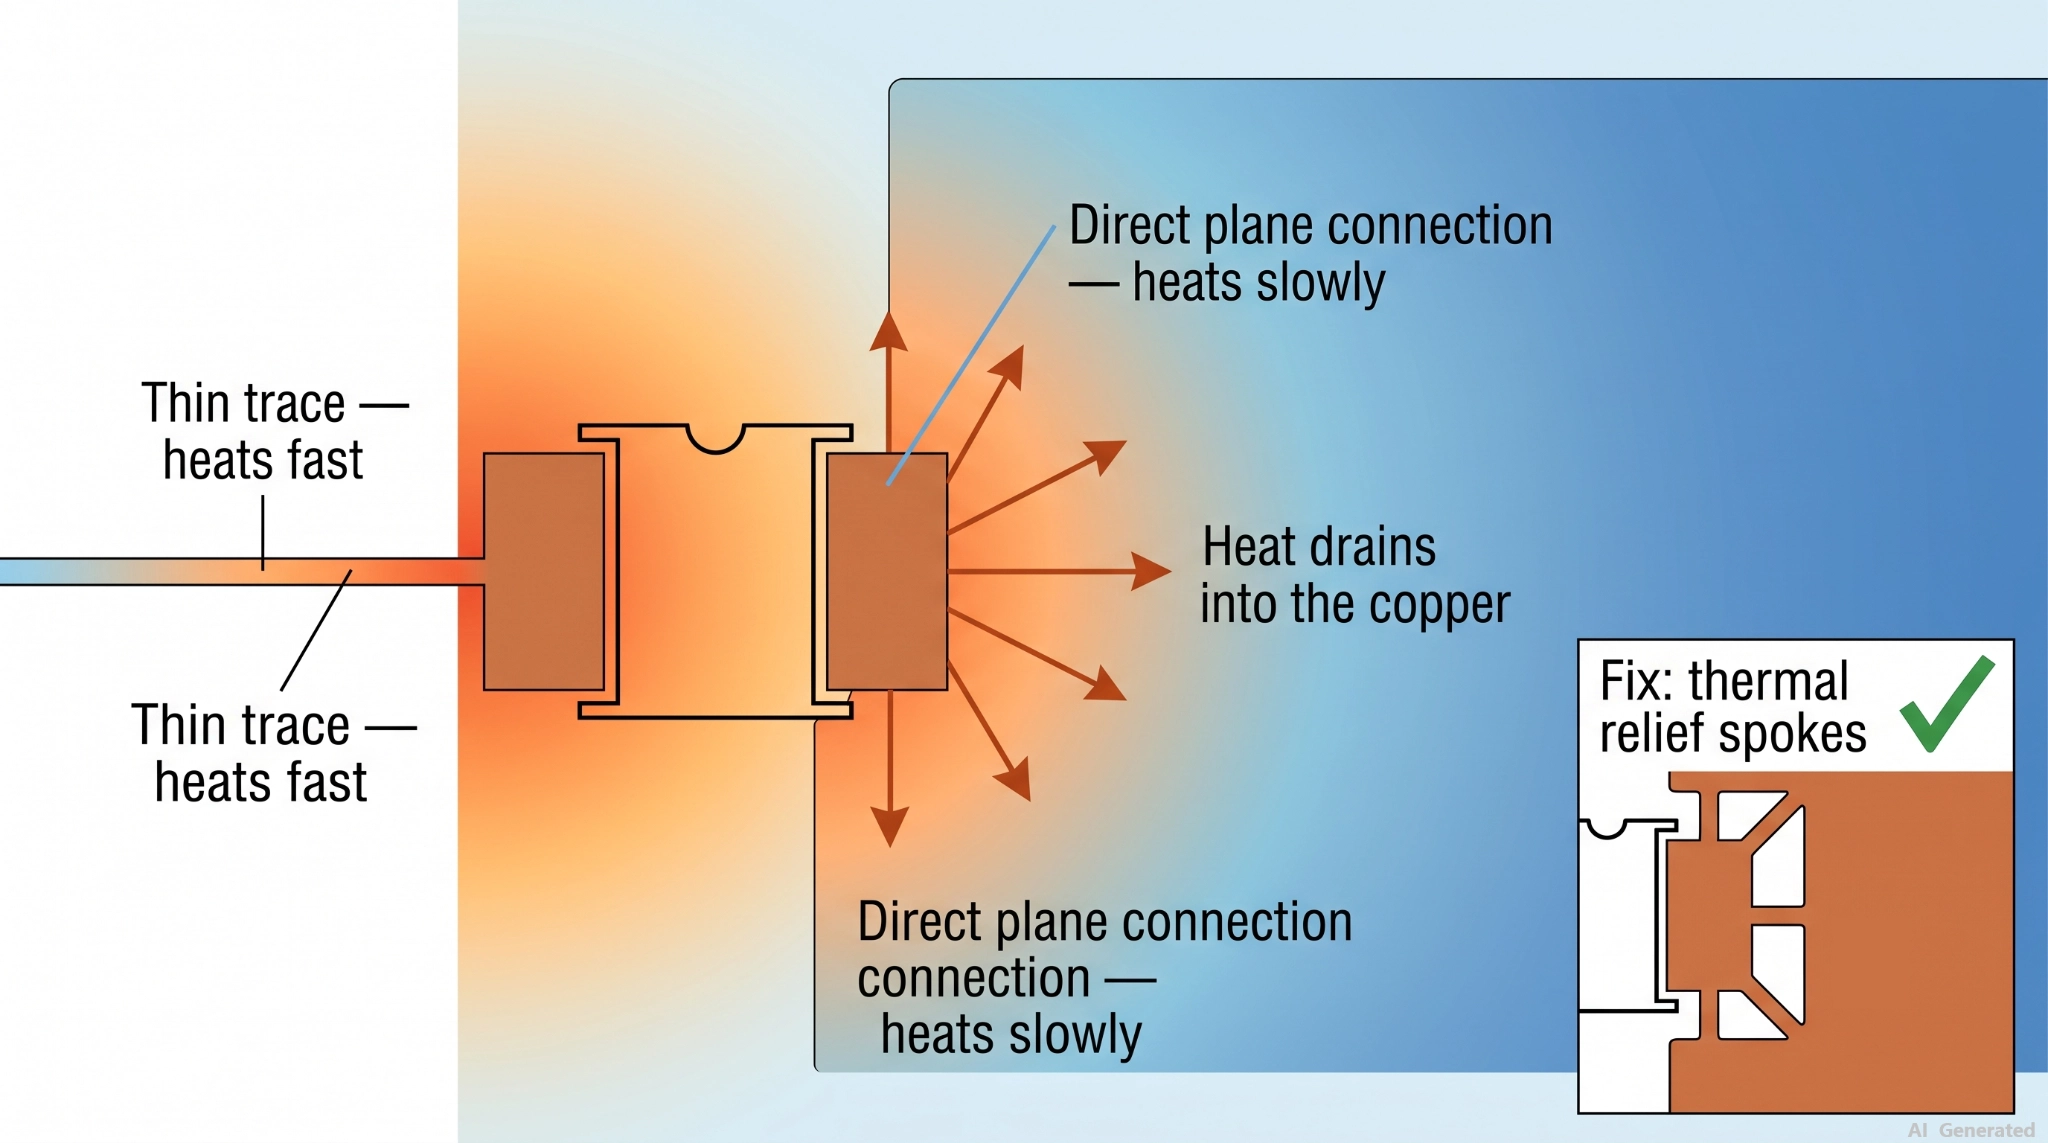
Figure: One chip pad on a thin isolated trace beside a second pad flooded into a ground plane
The copper connection is the variable most designers forget. A pad dropped straight into a plane keeps drawing heat from the joint throughout preheat, so its paste remains solid while its neighbor has already wetted.
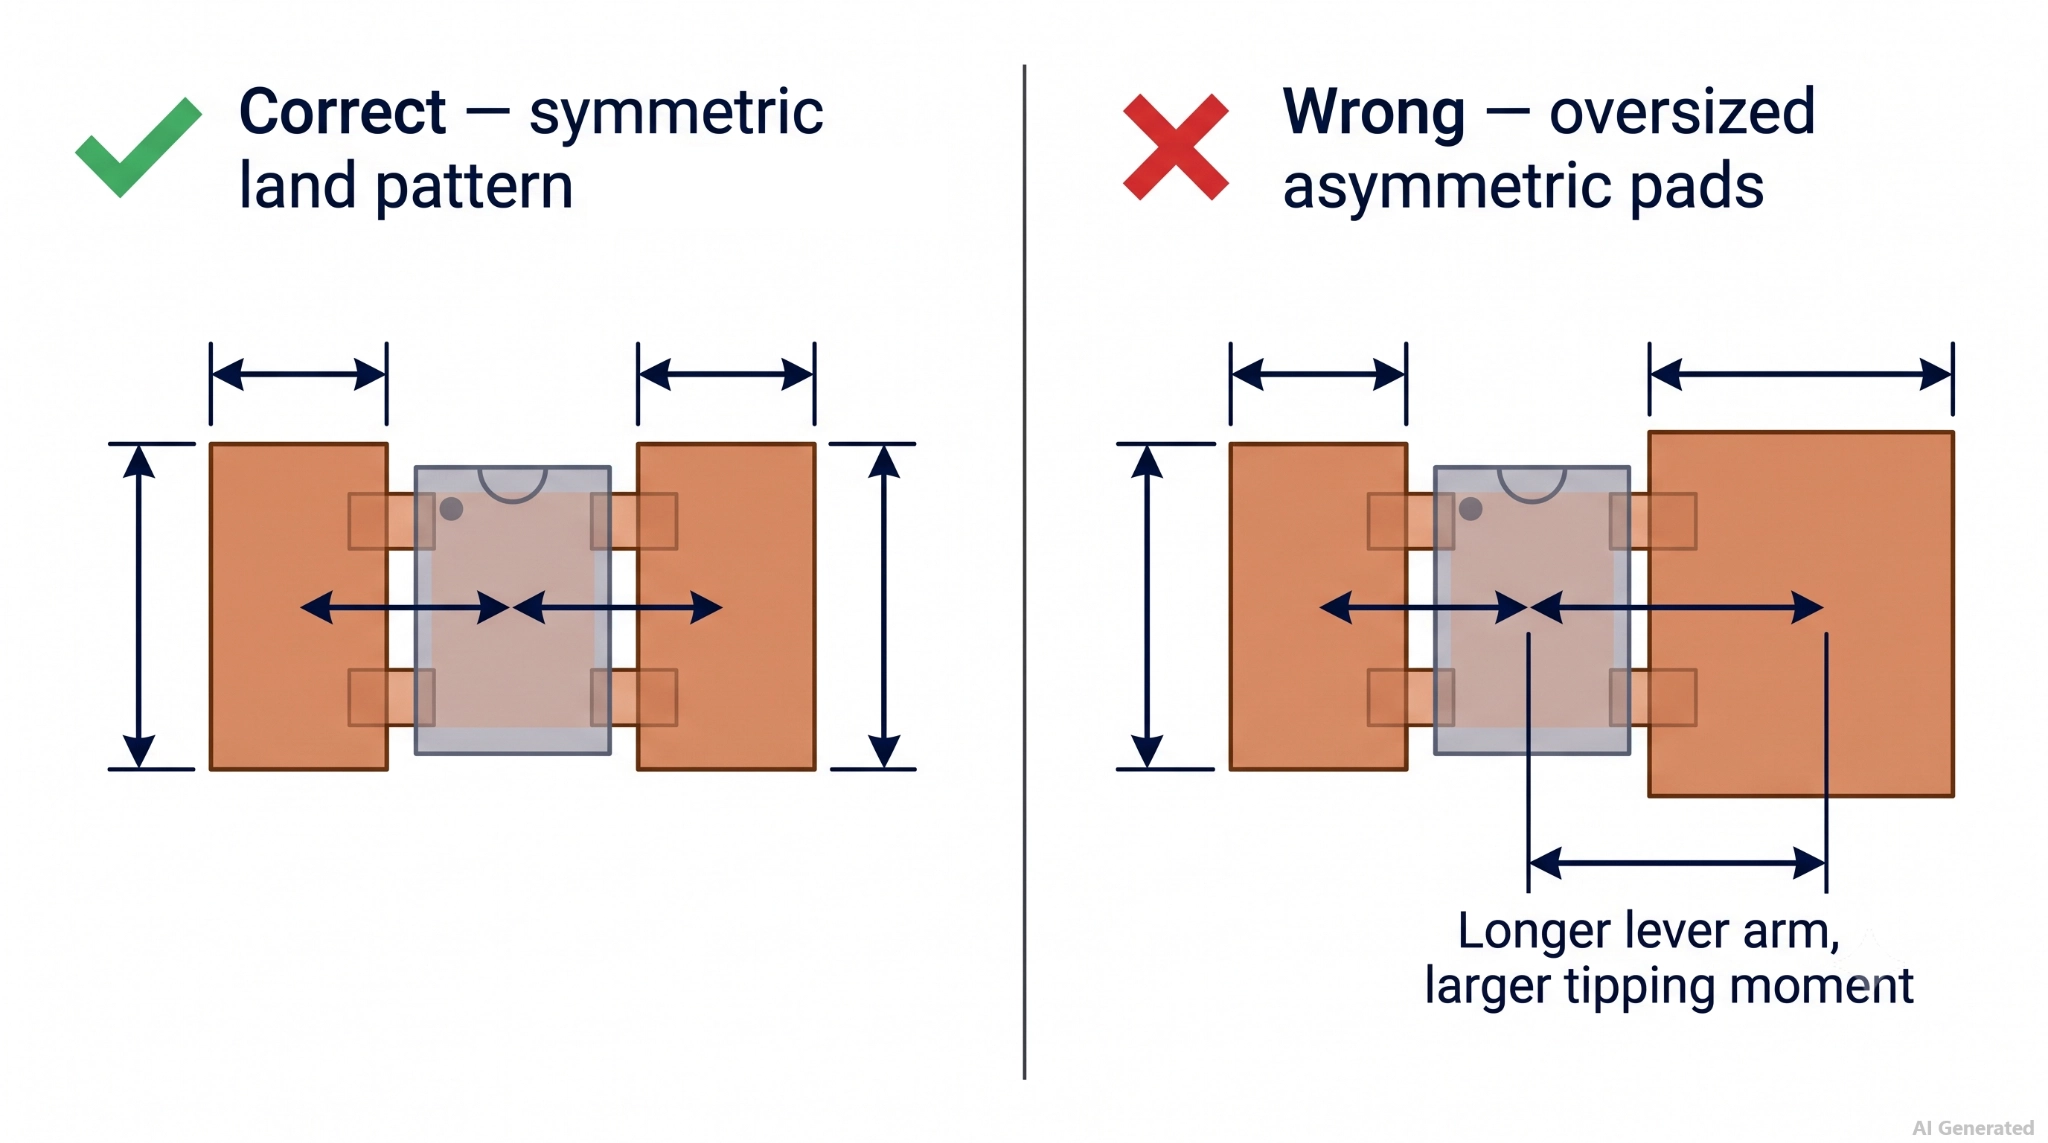
Figure: A symmetric IPC-7351B pad pattern compared against an oversized asymmetric pad pair
IPC-7351B publishes three pad geometries per device family: density level A for the largest pads, level B for the median, and level C for the smallest. Level B is the correct default for chip passives.
Apply the five pad rules to every two-terminal footprint:
- Match the two pads exactly in length, width, and solder mask opening.
- Match the copper connection, giving a plane-side pad thermal relief spokes, not a solid pour.
- Match the trace entry, using the same trace width on both ends.
- Size the pads to the part fitted, not to a larger part that once used the footprint.
- Keep vias out of chip pads, since via-in-pad showed far higher tombstone rates in 01005 testing.
Warning
Reusing a single pad pattern across two package sizes is a documented source of defects. In one SMTA study, correctly sized pad sets had a 0% positional defect rate, while pads shifted outward had a 38% to 80% positional defect rate. If a footprint is uncertain, check the guidance on effective PCB pad implementation first.
How to Prevent PCB Tombstoning
Prevention spans three stages, each with distinct levers.
Fix the board design first, because an oven profile cannot fully compensate for severe thermal asymmetry between the two pads.
At the PCB Design Stage
- Use IPC-7351B nominal land patterns as a starting point for chip passives, then adjust them for component density, thermal conditions, and the assembly process.
- Give the plane-side pad thermal relief spokes instead of a solid connection.
- Keep both pads on the same copper layer with identical trace widths.
- Keep closely spaced rows of small passives consistently oriented where possible, especially on boards with known directional thermal gradients.
- Avoid 0402 and smaller parts along a board edge that will be clamped or warped.
During Stencil Printing and Component Placement
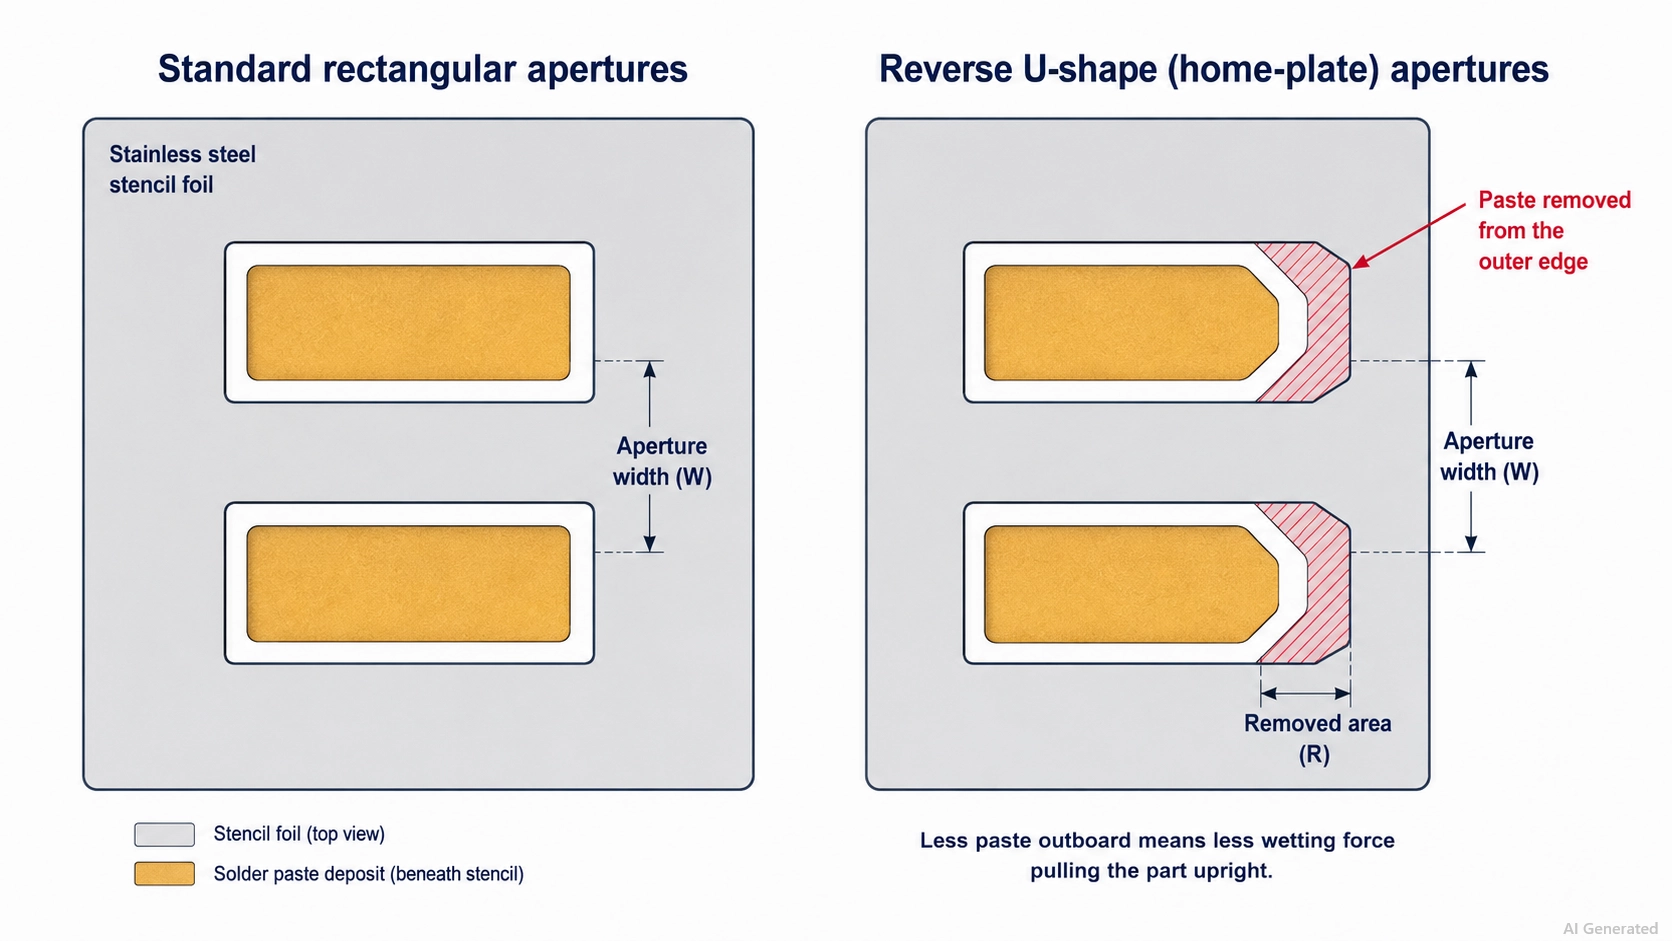
Figure: A standard rectangular aperture pair compared against a reverse U-shape aperture pair
The most effective aperture change is the reverse U-shape, which removes paste from the outer edge of each pad. In published testing, a standard rectangular print covered about 93% of the pad area, while the reverse U-shape covered about 80%. Two constraints apply when you reshape an aperture. Keep at least 7.5 mil (0.19 mm) between the inside edges of the two apertures for 0201 and larger chips.
Also, keep the IPC-7525 area ratio above 0.66, since the added wall area of a reverse U-shape can drop a 0.7 ratio to 0.5.
Reflow Profile Optimization
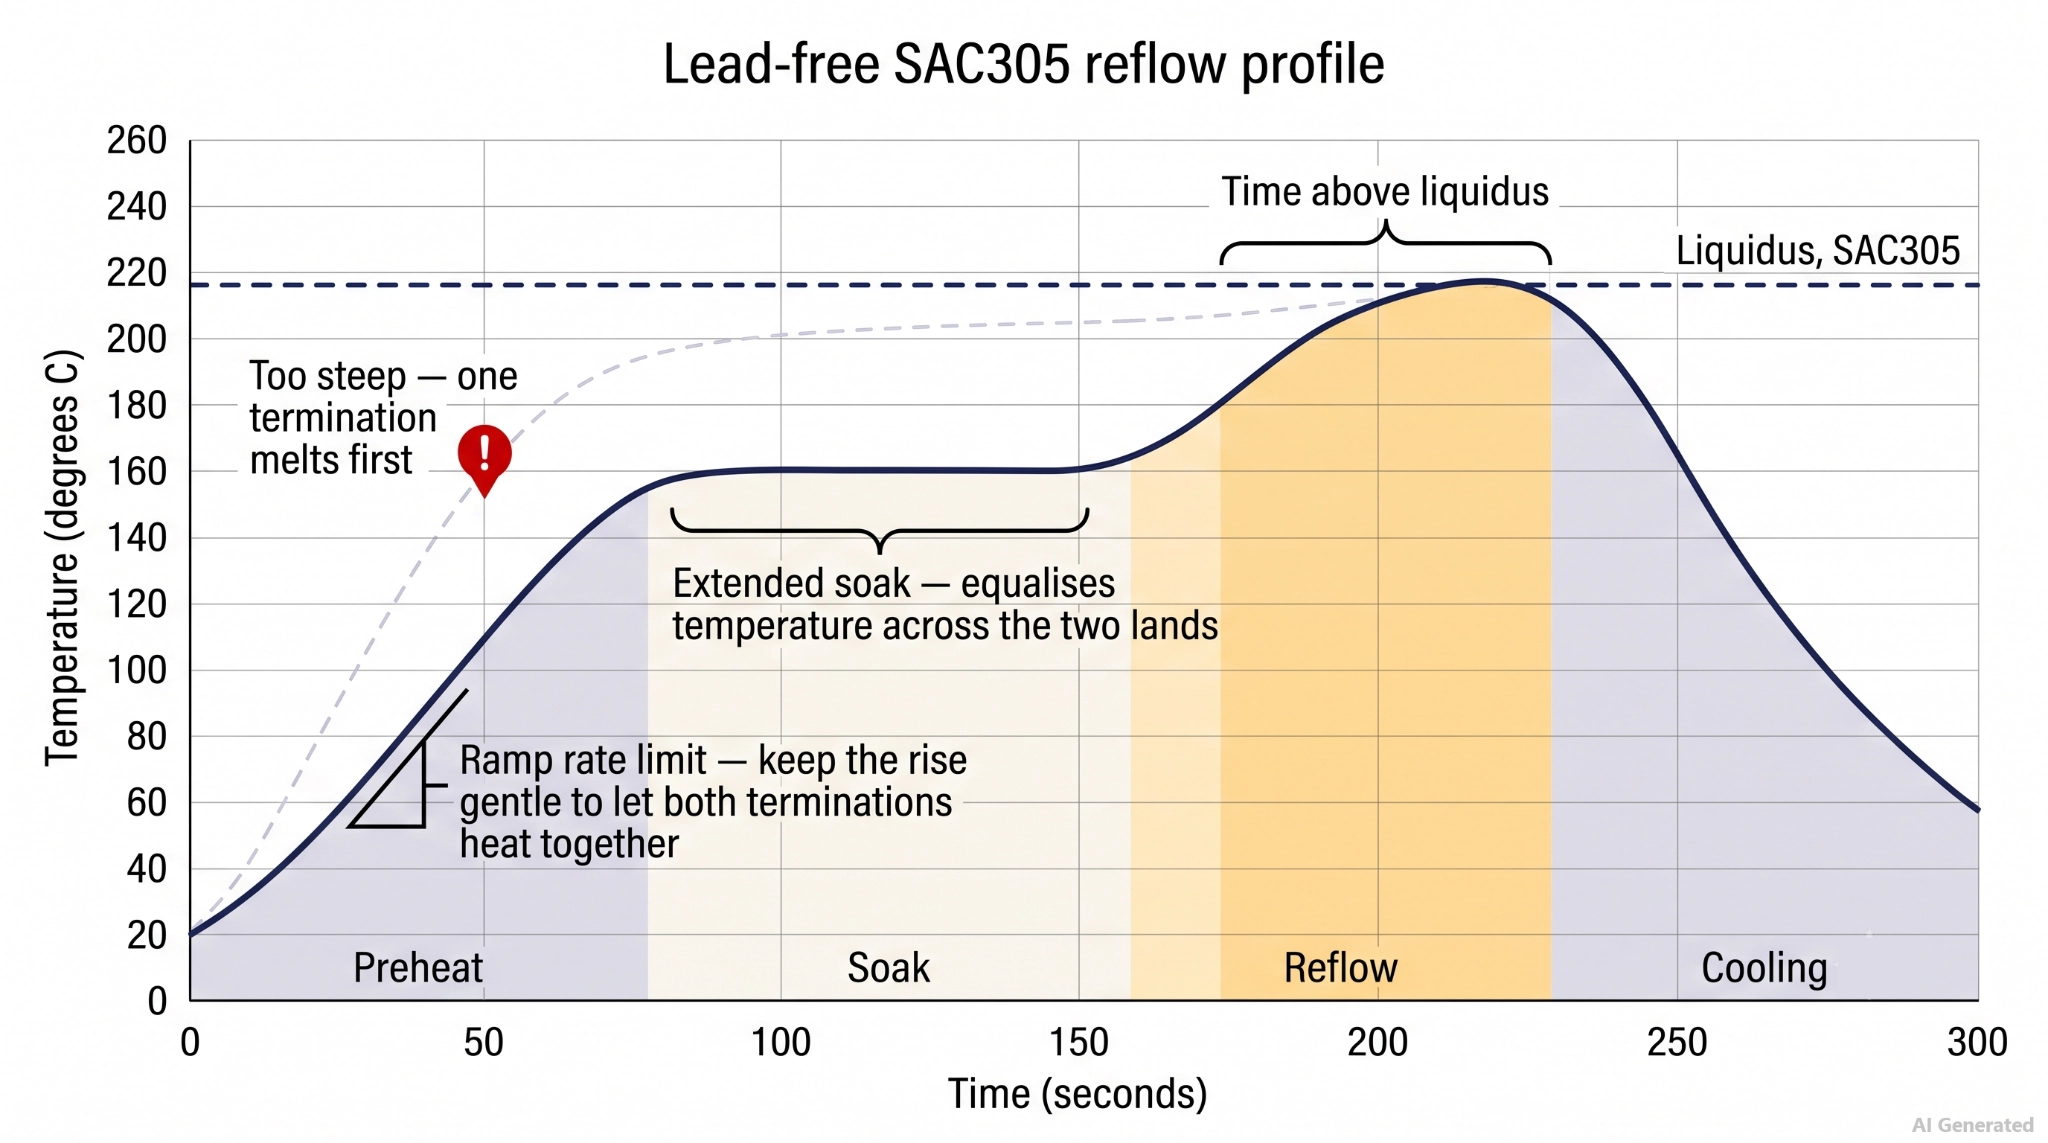
Figure: Lead-free reflow profile with the ramp rate limit
Set the profile to buy the two pads time to equalize:
- Ramp rate: typically 1 to 3 °C/s; use a slower ramp when needed to reduce thermal gradients across thermally asymmetric pads.
- Soak: 150 °C to 180 °C for 60 to 120 seconds. Stretching the 150 °C to 200 °C band from about 68 to about 118 seconds is a documented anti-tombstoning change.
- Liquidus: 217 °C to 221 °C for SAC305, the exact value should follow the solder-paste manufacturer's specification.
- Peak: 235-250 °C, high enough to wet and low enough to protect the parts.
- Time above liquidus: 45 to 90 seconds, subject to the solder-paste manufacturer's recommended profile.
Note
One 01005 study reported fewer tombstones from a straight ramp-to-peak profile than from a soak profile, so profile against your own board and read the full breakdown of reflow profile stages.
How JLCPCB Prevents Tombstoning in PCB Assembly
Most tombstoning risk is created upstream of reflow and becomes visible only during soldering, so prevention starts with PCB design, stencil printing, and process control.
JLCPCB addresses these risks at multiple points in the assembly process:
- DFM review before fabrication, flagging asymmetric chip pads and plane-connected pads without thermal relief.
- Laser-cut stainless-steel stencils based on the solder-paste layer, with aperture adjustments where needed to maintain reliable paste transfer.
- Solder paste inspection, measuring deposit volume, height, area, and offset before component placement to identify print-related imbalances.
- Profiled lead-free reflow, using controlled ramp, soak, and peak conditions to minimize temperature differences between the two pads.
- Post-reflow AOI compares the assembled board with reference data to detect visible placement and soldering defects, including tombstoning.
Which Components Are Most Prone to Tombstoning? 0201, 0402, and 0603
Risk generally increases as component mass decreases, because the surface-tension forces generated during asymmetric wetting become more significant relative to the component's weight.
- 0201, 0.6 x 0.3 mm (24 x 12 mil), roughly 0.15 mg: One of the highest-risk chip sizes used in high-volume SMT assembly. Even small placement offsets can create enough asymmetry to affect tombstoning risk at this scale.
- 0402, 1.0 x 0.5 mm (40 x 20 mil), about 0.6 mg: A common production size where tombstoning remains a practical concern because 0402 components are widely used in compact products such as wearables, USB-C power electronics, and wireless-earbud modules.
- 0603, 1.6 x 0.8 mm (63 x 31 mil), about 2.1 mg: Roughly three and a half times the mass of a 0402, and tombstoning becomes rare rather than routine.
- 0805 and larger: tombstoning is generally less common, while placement shift and skew may become more noticeable failure modes.
It turns out the package code tells you only half of it. In one 0201 study, about 95% of the observed defects were associated with capacitors rather than resistors. 0201 capacitors fared worse than 0201 resistors because their terminations are smaller and their bodies are about 25% taller.
Upsizing a decoupling capacitor from 0402 to 0603 increases the nominal component-body area by about 0.78 mm² and can materially reduce tombstoning risk.
Package trade-offs are covered further in the guide to SMD resistor package sizes, and you can check availability for a specific value in the JLCPCB parts library.
How to Rework a Tombstoned Component
A tombstoned part is repairable. A common rework approach is to reflow both joints together rather than mechanically prying the component from one end.
Mechanical prying can lift or damage the pad and turn a component rework job into a board repair.
- Confirm the defect under a stereo microscope at 10x to 20x, and check neighboring parts in the same row for partial lifts.
- Set the hot air station to bring the joint to 235 °C to 250 °C, using the smallest nozzle that covers both pads.
- Preheat the local area for 30 to 60 seconds so the part is not fighting cold copper.
- Reflow both joints together, circling the nozzle over the part rather than holding it on one end.
- Lift the part straight up with fine tweezers once both joints are visibly molten.
- Wick both pads clean, apply fresh flux, and re-tin to a flat, even surface.
- Apply fresh solder paste or tin the pads as required by the rework process, place a replacement component, and solder both terminations evenly.
- Inspect the joint against the IPC criteria below, then electrically verify the net.
Warning: Always fit a new part. A component that has been heated twice and pulled off a pad has already stressed its termination plating.
IPC-A-610 Acceptability Criteria for Tombstoning
A component with one termination fully off its pad creates an open circuit and is unacceptable in all three IPC-A-610 product classes.
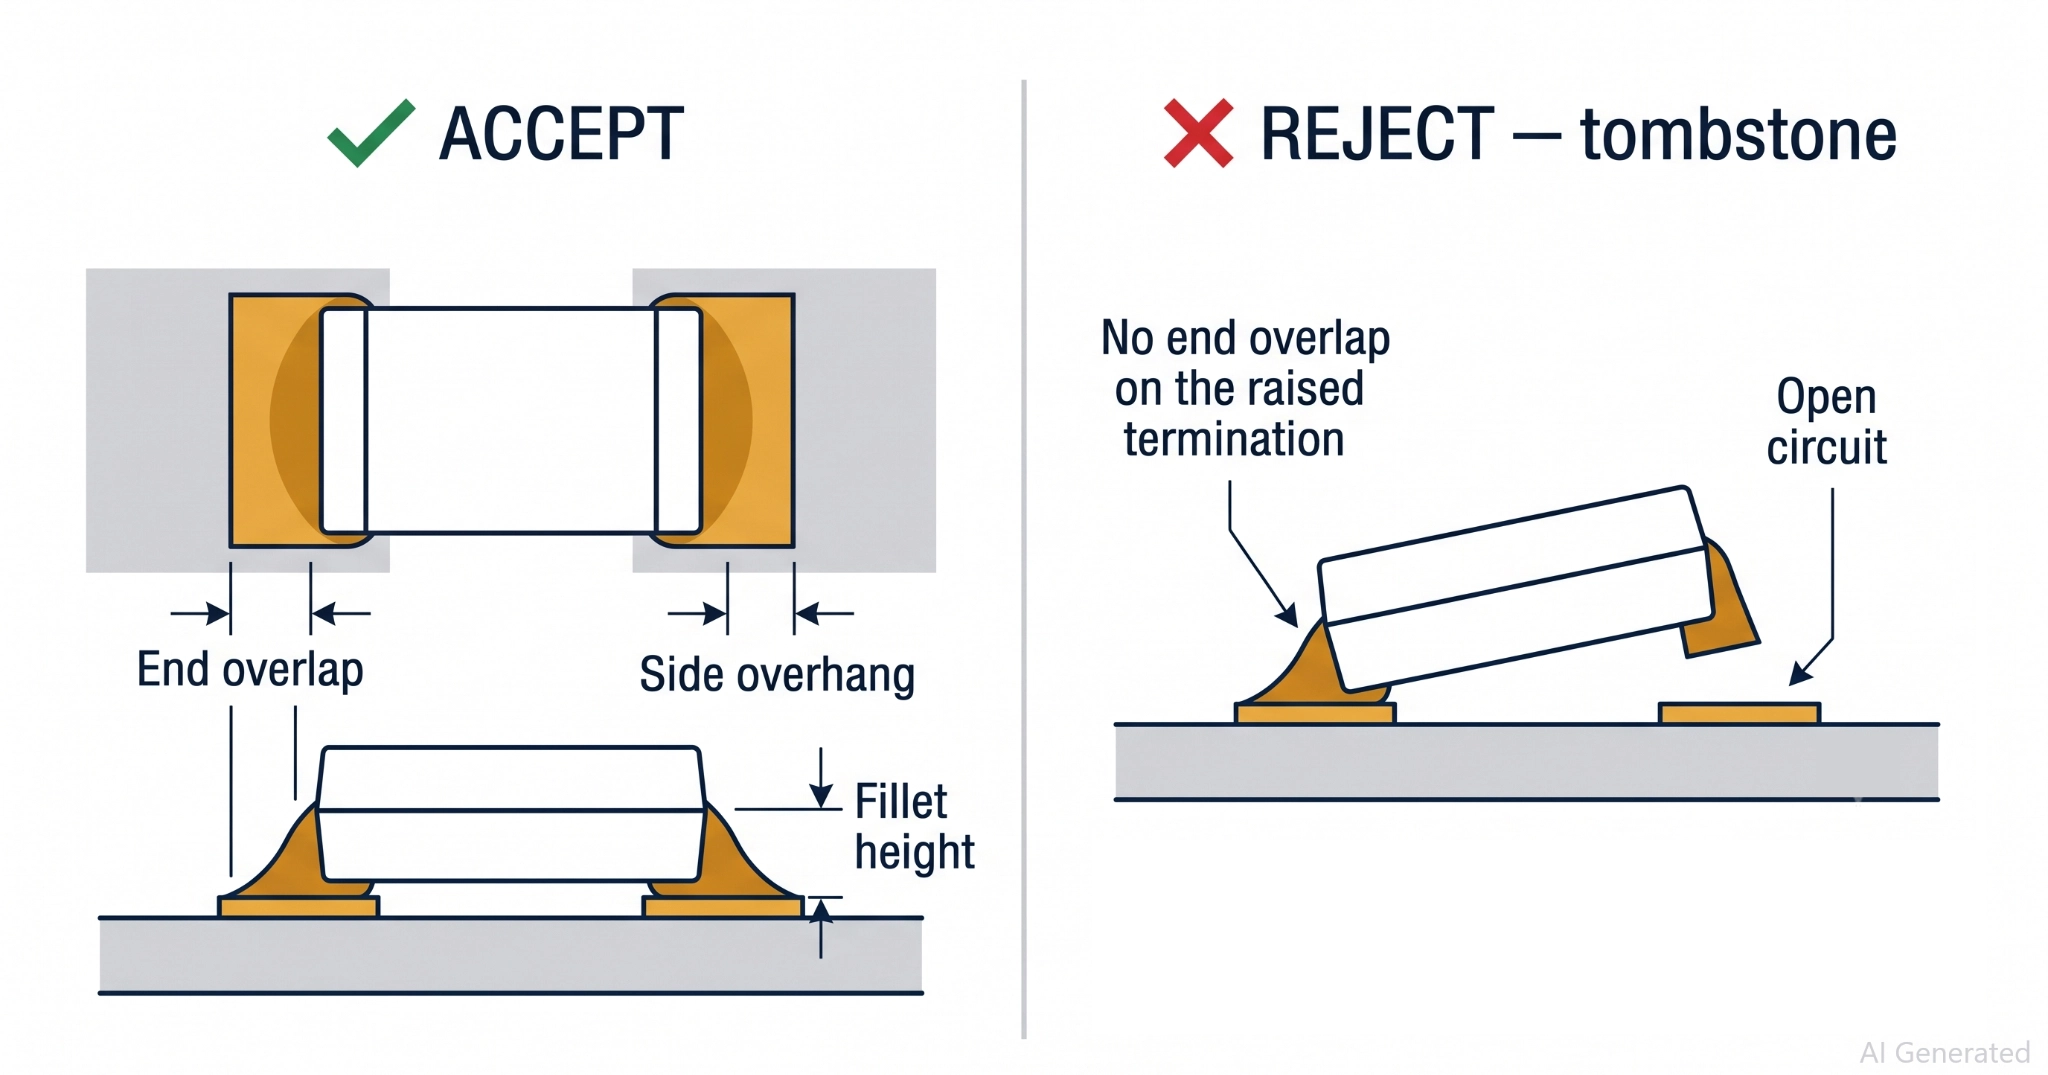
Figure: Acceptable and unacceptable chip component solder joints
| Condition on a Chip Component | Class 1 | Class 2 | Class 3 | What It Means for Your Board |
|---|---|---|---|---|
| Termination and land do not overlap | Defect | Defect | Defect | No soldered connection exists; reject/rework |
| Minimum end joint width (C) | ≥50% W/P | ≥50% W/P | ≥75% W/P | Minimum width of the soldered end joint |
| Maximum side overhang (A) | ≤50% W/P | ≤50% W/P | ≤25% W/P | Controls lateral placement |
| End overlap (J) | Wetted fillet evident | ≥50% R | ≥75% R | Measures termination-to-land overlap along the component length |
| Tombstoning | Defect | Defect | Defect | One termination was lifted from the board |
| Billboarding/mounting on side | Dedicated criteria | Dedicated criteria | Dedicated, stricter criteria | Must be evaluated under the specific billboarding clause |
IPC-A-610 provides visual acceptance criteria for electronic assemblies. IPC J-STD-001 specifies requirements for soldered electrical and electronic assemblies.
Class 3 applies to high-performance or harsh-environment electronic products where continued performance or performance-on-demand is critical, such as certain avionics, life-critical medical, defense, and other high-reliability applications.
How to Detect PCB Tombstoning: AOI, X-Ray, and Visual Inspection
Tombstoning is usually easy to identify after reflow because the component is visibly lifted or standing on one end. The harder problem is catching the cause before the panel enters the oven.
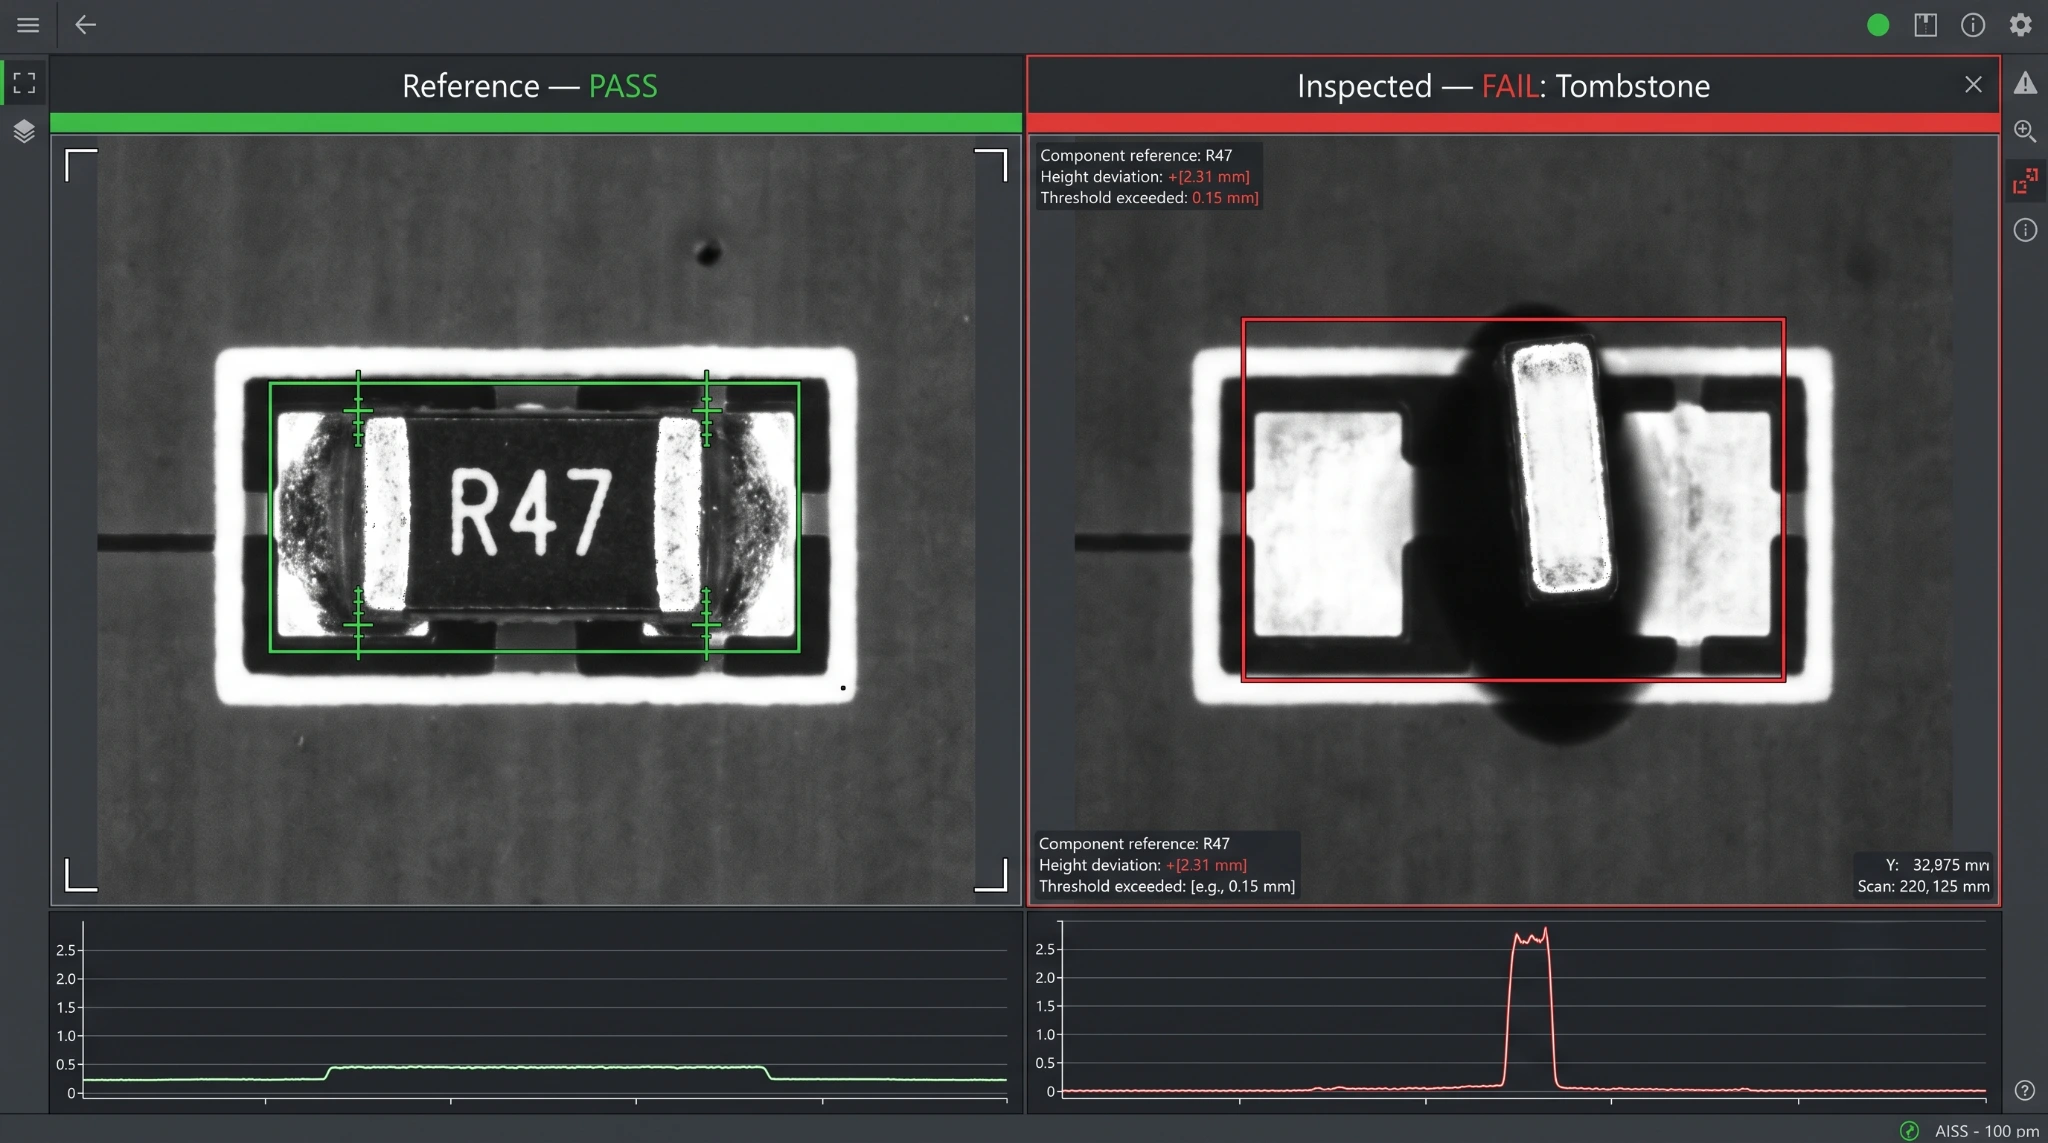
Figure: An automated optical inspection view of a tombstoned chip
Each inspection stage sees a different part of the problem:
- Solder paste inspection (SPI), before placement, measures solder-paste volume and other deposit characteristics at each pad, allowing print-related imbalances to be corrected before components are placed.
- Automated optical inspection (AOI), after reflow, checks component position, orientation, and visible solder-joint features against reference data. 3D AOI can add height and three-dimensional profile information when needed and can help identify borderline partial lifts that are difficult to classify from 2D images alone.
- Visual inspection at 10x to 20x remains the arbiter for borderline lifts and end joint width.
- X-ray inspection is generally unnecessary for routine inspection of conventional two-terminal chip passives because both solder joints are externally visible. It is more valuable for hidden solder joints and internal defects.
PCB Tombstoning vs. Other SMT Defects
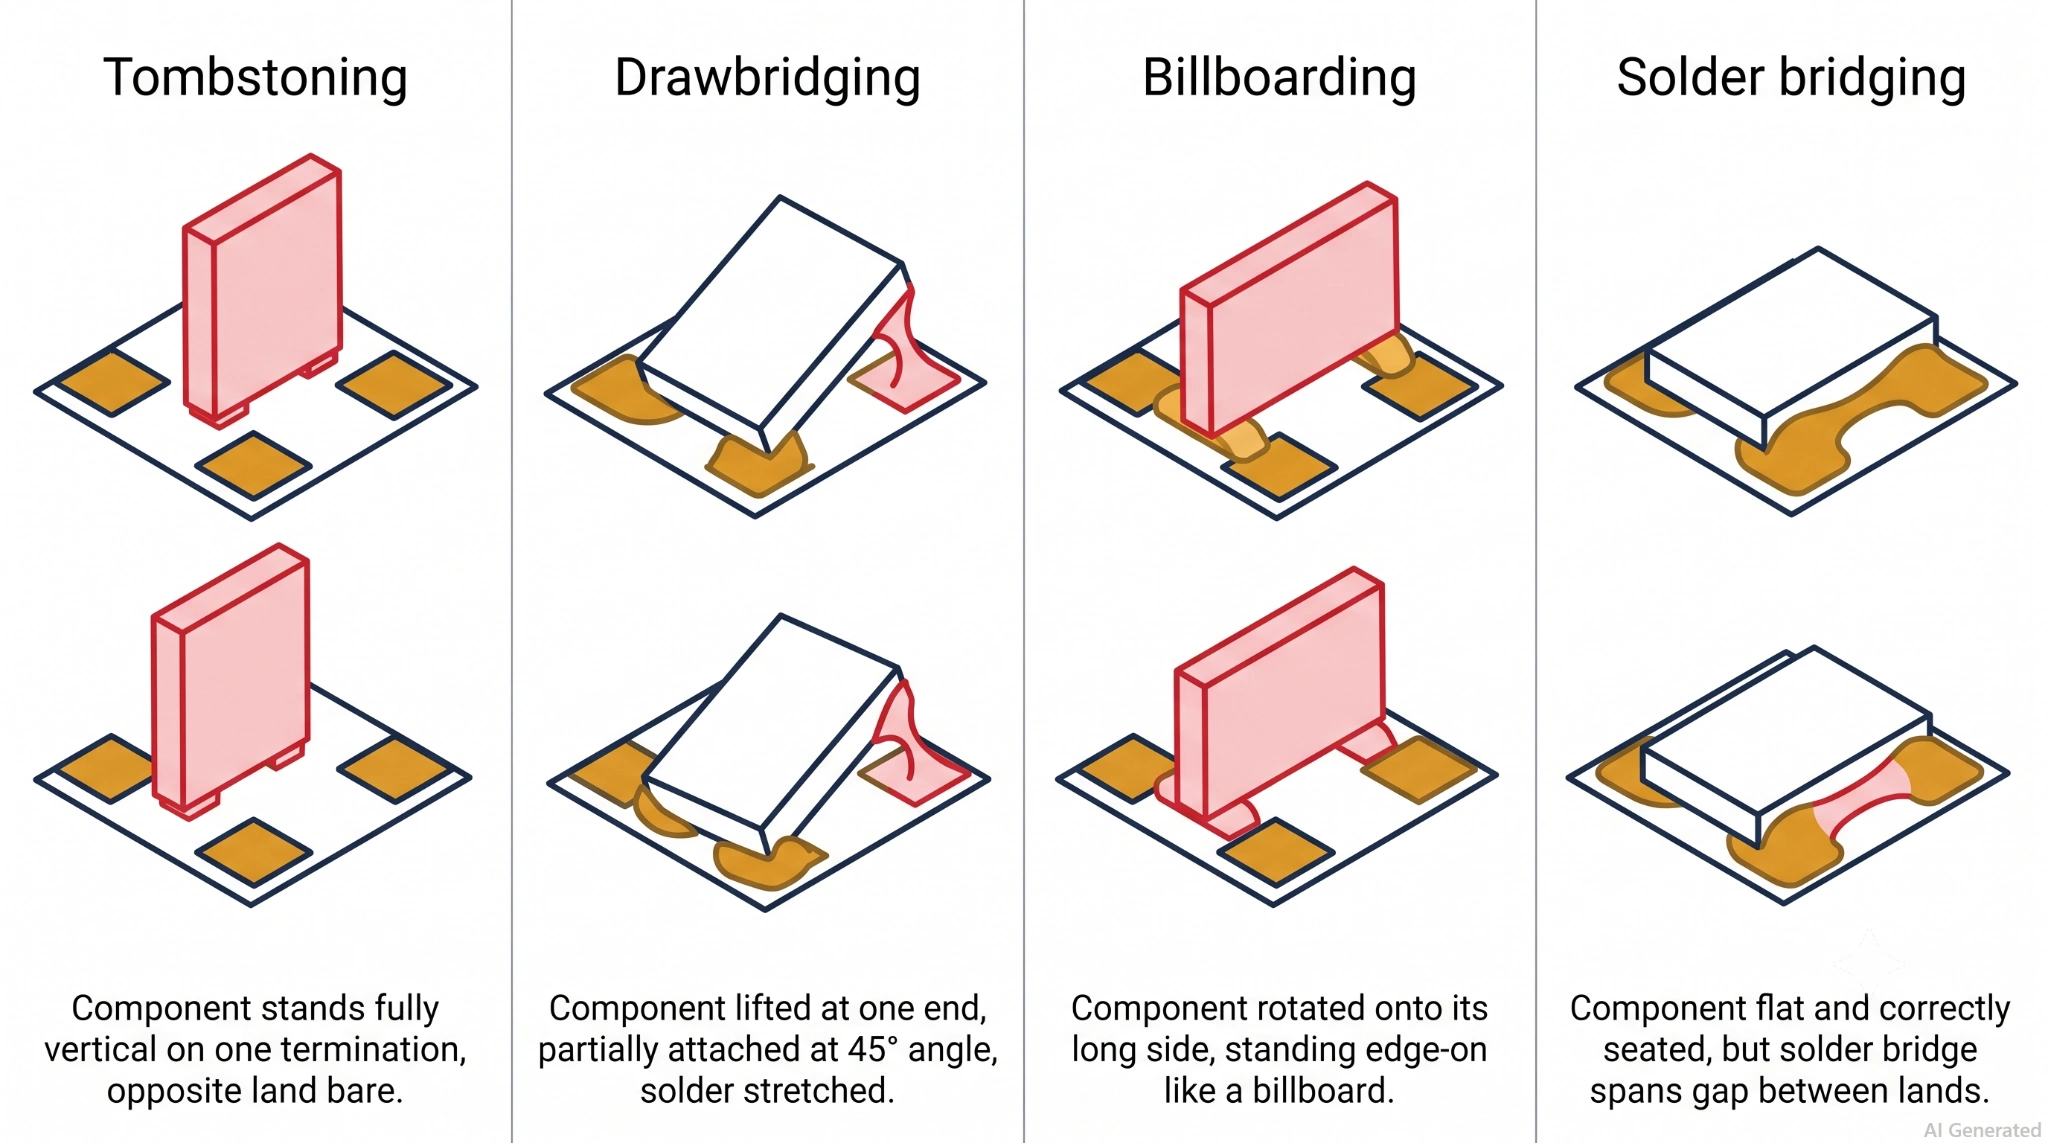
Figure: Comparison of tombstoning, drawbridging, billboarding, and solder bridging on chip components
| Defect | What You See | Electrical Result | Typical Cause | Primary Troubleshooting Focus |
|---|---|---|---|---|
| Tombstoning | One end of the component lifts from the pad | Open circuit if contact is lost | Unequal heating, paste volume, or solder wetting at the two pads | Pad geometry, paste balance, and reflow profile |
| Drawbridging | One end lifts and the component remains tilted above the PCB | Open or unreliable connection if contact is lost | Unequal heating or solder wetting between the two pads | Pad symmetry, paste balance, and reflow conditions |
| Billboarding | Component stands on its long edge rather than lying flat | May cause an open or unreliable connection | Component pickup or placement error | Component orientation and placement setup |
| Skew or shift | Component is displaced or rotated from its intended position | Open or short, depending on the location | Placement offset or paste/pad imbalance | Placement accuracy, footprint, and stencil design |
| Solder bridging | Solder connects two adjacent pads or joints | Short circuit | Excess solder volume, large apertures, or stencil misalignment | Stencil aperture design and print alignment |
| Cold joint | Poor wetting or incomplete solder coverage | Intermittent or open connection | Insufficient heat input or time above liquidus | Reflow profile and solderability |
Conclusion
PCB tombstoning is a wetting-force imbalance, not simply an oven setting problem. Control pad symmetry, copper connection, paste volume, placement, and the reflow profile together. When a defect appears, correct the underlying imbalance before reworking the part; that is how you improve first-pass yield for 0402 and smaller passives.
The most reliable prevention strategy is to control the entire SMT process rather than trying to fix the problem at the oven alone. When tombstoning does occur, inspect the affected pads and solder joints before reworking the part.
FAQs about Tombstoning
Q: What causes tombstoning in PCB assembly?
Unequal wetting forces at the two ends of a chip component during reflow. When solder on one pad melts first, surface tension rotates the part about its center of gravity. Unequal paste volume, placement offset, and thermal imbalance all create that timing difference.
Q: Which components are most likely to tombstone?
Small two-terminal passives in 0201 and 0402 packages, because their mass is too low to resist molten solder. Capacitors fail more often than resistors of the same package code, since their terminations are smaller and their bodies roughly 25% taller.
Q: Can a tombstoned component be reworked?
Yes. Reflow both pads together with hot air, lift the part straight up once the joints are molten, wick and re-tin both pads, then fit a new component. Never pry a tombstoned part off, because that lifts the pad from the laminate.
Q: Can AOI detect tombstoning reliably?
Yes, for fully lifted parts. Post-reflow AOI compares the component silhouette against a reference image, and a vertical chip is unmistakable. Partial lifts are less certain on 2D systems, so 3D AOI with height measurement suits dense 0201 assemblies better.
Popular Articles
• SMT Assembly Process Explained and Equipment Used: A Step-by-Step Guide to PCBA Manufacturing
• Common PCB Assembly Methods and Soldering Techniques Explained
• SMD Soldering Tools You Need: Complete Guide from Beginner to Pro
• What Is BGA Void? Causes, IPC Limits, and Solutions
• Reflow Soldering: Everything You Need to Know
Keep Learning
How to Solder Wires to a Circuit Board Properly: Step-by-Step Guide
Learning how to solder wires to a circuit board is a fundamental skill for electronics repair, prototyping, and PCB assembly. Whether you are attaching power leads, signal wires, or test connections, a weak solder joint can cause intermittent failures, lifted pads, or long-term reliability issues. In this step-by-step guide, you'll learn the correct tools, preparation methods, and soldering techniques needed to create strong, clean, and reliable wire-to-PCB connections. From preparing the wire and PCB......
PCB Soldering Basic Techniques and Overview
Soldering means joining metal components with a melted metal called solder, which has a low melting point compared to other metals. Soldering is crucial in the electronics industry and is the primary method of joining electrical components. There are different types of soldering materials based on quality and their melting points. The most common combination is a tin or lead metal alloy mixed with silver or brass. The soldering iron melts the metal so it can be used like glue to connect two pieces. On......
SMT Assembly Process Explained and Equipment Used: A Step-by-Step Guide to PCBA Manufacturing
Today's high-performance electronics, from pocket-sized smartphones and IoT sensors to sophisticated industrial control systems, are made possible by a manufacturing miracle: Surface Mount Technology (SMT). SMT is the backbone of electronics manufacturing, allowing us to have the incredible component density and miniaturization. A bare circuit board is simply a substrate. The process of transforming it into a functional electronic circuit is known as Printed Circuit Board Assembly. This article outlin......
Common PCB Assembly Methods and Soldering Techniques Explained
Whether you're designing your first prototype or scaling up to production, understanding PCB assembly methods and soldering techniques is crucial to achieving reliable, high-performance circuit boards. Modern PCBA primarily relies on Surface Mount Technology (SMT) and Through-Hole Technology (THT)—each offering unique advantages for component density, durability, and manufacturability. In this guide, we'll break down the major PCB assembly methods, key soldering techniques such as reflow and wave sold......
What Is Tombstoning? A Practical Guide to Causes, Reflow Risks, Prevention, and Rework
Key Takeaways Definition: Tombstoning occurs when a small two-terminal component lifts off one pad during reflow and stands upright, leaving one end without a proper solder connection. Root Cause: Unequal solder wetting forces act on the two terminals, often due to differences in pad temperature, solder-paste volume, pad geometry, or thermal mass. Highest Risk: Small passive components, such as 0201 and 0402 resistors and capacitors, are especially susceptible because their low mass and small terminat......
Rigid-Flex PCB Assembly: Design, Process, Quality & Cost
Miniaturization, higher functionality, and mechanical adaptability are three main trends in modern electronics. Circuit boards that can tolerate bending, vibration, and compact or small installation spaces are becoming more and more necessary for modern devices like smartphones, medical implants, and aerospace systems. Combining flexibility and stability, rigid-flex PCBs provide both mechanical strength and design freedom, while flexible PCBs allow for bending and folding in confined spaces. This hybr......