
How to Choose an ESP32 Development Board: A Beginner-Friendly Guide
13 min
- What Is an ESP32 Development Board?
- Types of ESP32 Development Boards (Overview)
- Best ESP32 Development Boards for Beginners (Quick Picks)
- How to Choose the Right ESP32 Development Board
- Common Mistakes Beginners Make When Choosing an ESP32 Board
- ESP32 vs ESP8266 vs Arduino Boards
- Understanding the ESP32 Family: Classic vs. S2, S3, C3, C6, and P4
- Why Choose an ESP32 Board as a Beginner?
- FAQ
- Conclusion
The leap from blinking a simple LED to building a cloud-connected smart home device is a thrilling milestone for any electronics beginner. At the heart of this transition is often one undisputed champion: the ESP32. However, when you first search for an ESP32 development board, you are instantly met with a dizzying array of models, shapes, and specifications.
How do you know which one is right for your first IoT (Internet of Things) project?
In this beginner's guide, we will break down what makes these boards special, compare the most popular variations, and help you pick the perfect one. Once you master the basics, consider turning your prototype into a polished product. When that time comes, using a service for fast, easy prototype PCB assembly can seamlessly bridge the gap between breadboard and reality.
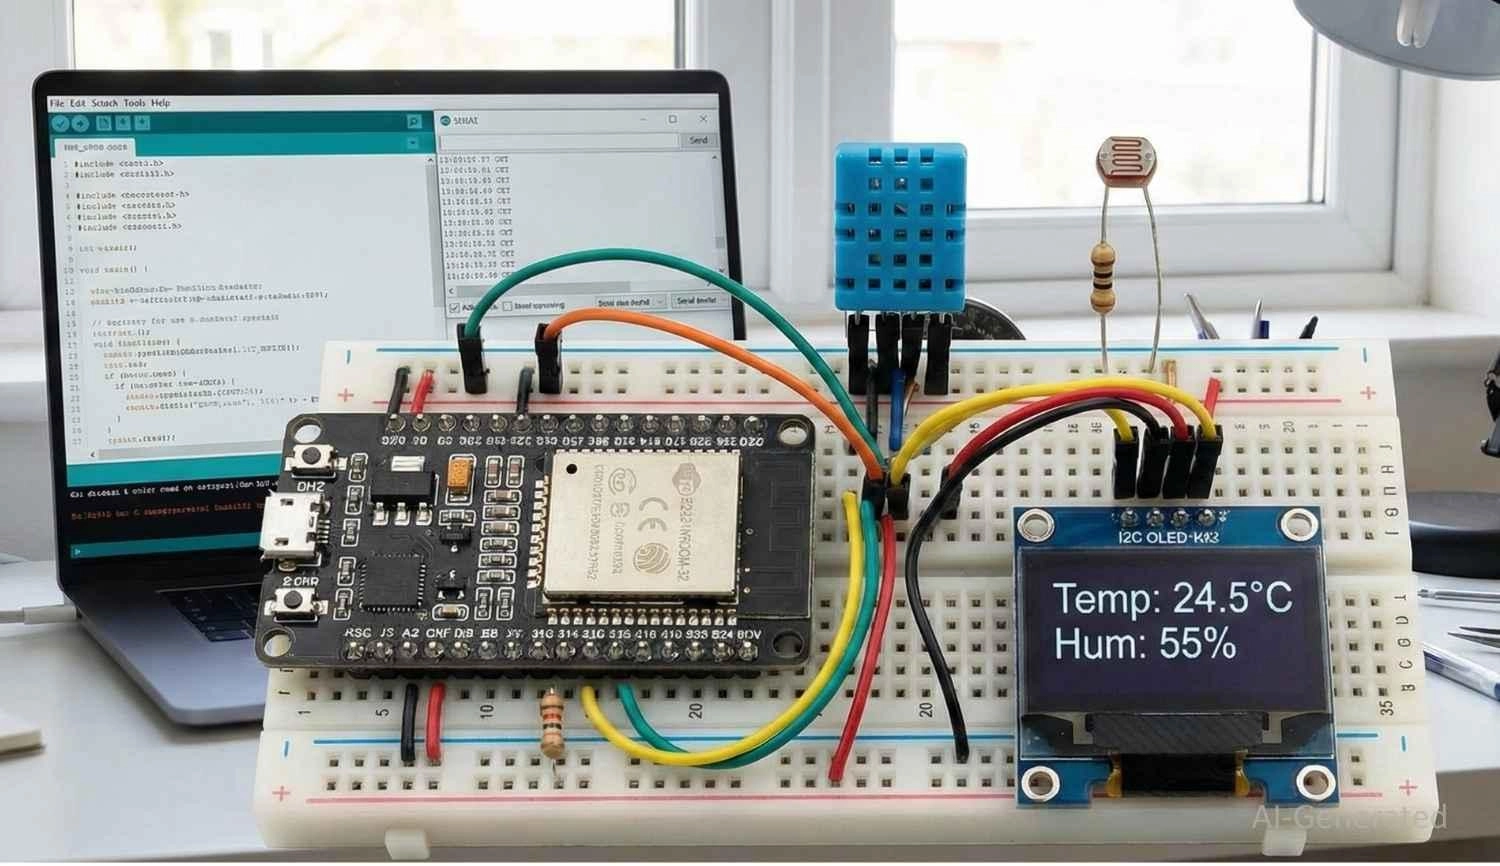
Figure: An ESP32 development board set up on a breadboard for a beginner IoT project.
What Is an ESP32 Development Board?
Definition & What Makes ESP32 Special
Created by Espressif Systems, the ESP32 is a low-cost, low-power system-on-a-chip (SoC) series equipped with Wi-Fi and dual-mode Bluetooth capabilities. However, a bare ESP32 chip is tiny and difficult for a beginner to use directly because it lacks the necessary supporting circuitry, like voltage regulators and USB interfaces.
An ESP32 development board takes this powerful microcontroller and mounts it onto a printed circuit board (PCB) alongside a USB-to-UART bridge, power regulation, and accessible pin headers. This makes it "plug-and-play."
You simply connect it to your computer via USB, open your IDE, and start coding. If you ever plan to embed these bare chips directly onto your own custom boards later, understanding the transition from a breadboard prototype to a fully assembled product, such as the difference between a bare PCB and PCBA, is a fantastic next step.
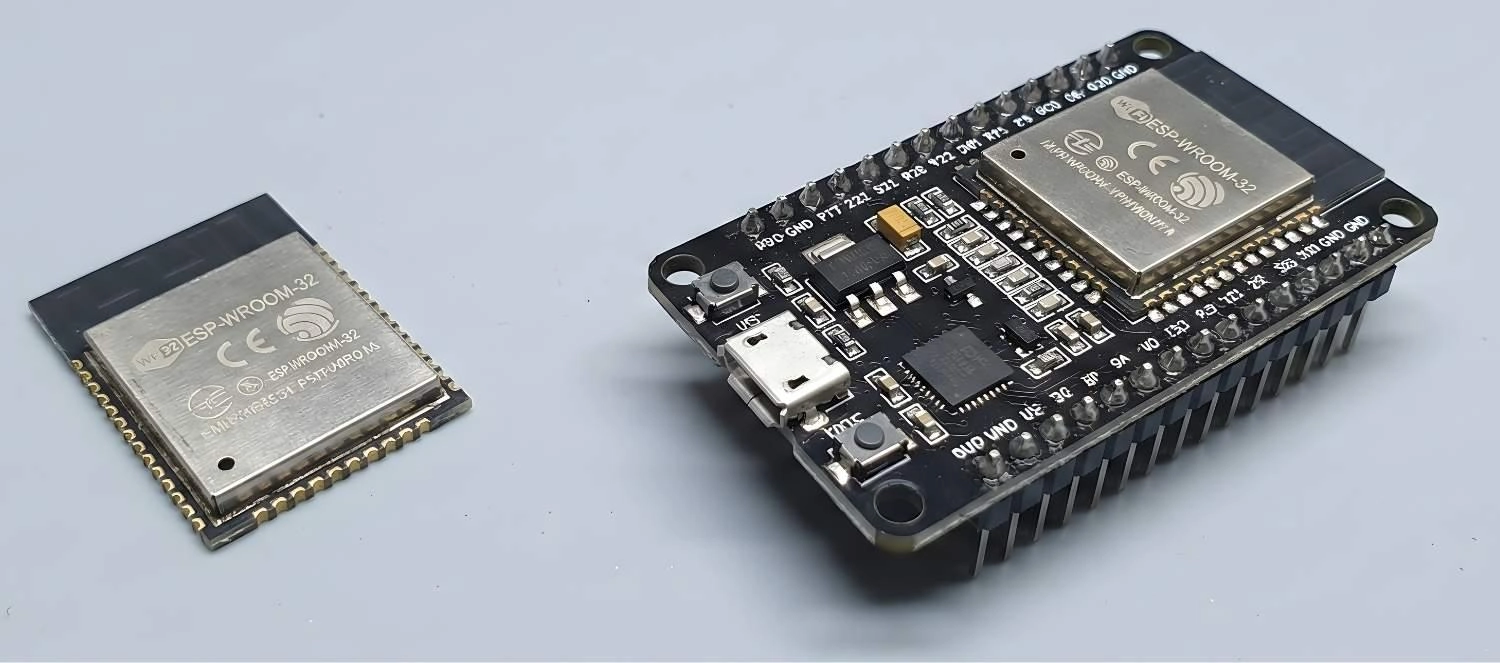
Figure: Comparison between a bare ESP32 module and a complete ESP32 development board with USB and pin headers.
Types of ESP32 Development Boards (Overview)
Types of ESP32 Boards Comparison
| Board Category | Core Features | Price Range | Recommended Uses |
|---|---|---|---|
| Official DevKits | Barebones, highly reliable, standard GPIO access. | $7 - $12 | Breadboard prototyping, learning basics. |
| Third-Party Standard | Battery charging circuits, custom form factors (e.g., Feather). | $6 - $20 | Portable IoT projects, battery-powered sensors. |
| Special Purpose | Built-in Camera, OLED/TFT display, or LoRa modules. | $9 - $25 | Smart cameras, dashboards, long-range tracking. |
ESP32 boards generally fall into three categories:
1. Official Espressif DevKits (DevKitC, DevKitS)
These are designed by Espressif Systems (the creators of the ESP32). They are the gold standard for reliability and are guaranteed to have perfectly documented pinouts.
2. Third‑Party Boards (NodeMCU, LOLIN, TTGO, Heltec, Adafruit)
These boards are incredibly popular. Brands like Adafruit and LILYGO (TTGO) take the ESP32 and add their own twists, such as LiPo battery charging circuits, STEMMA QT connectors for plug-and-play sensors, or smaller form factors.
3. Special Purpose Boards
These are tailored for specific niches. Examples include the ESP32-CAM (integrates a camera module and microSD slot) or the TTGO T-Display (features a built-in color LCD).
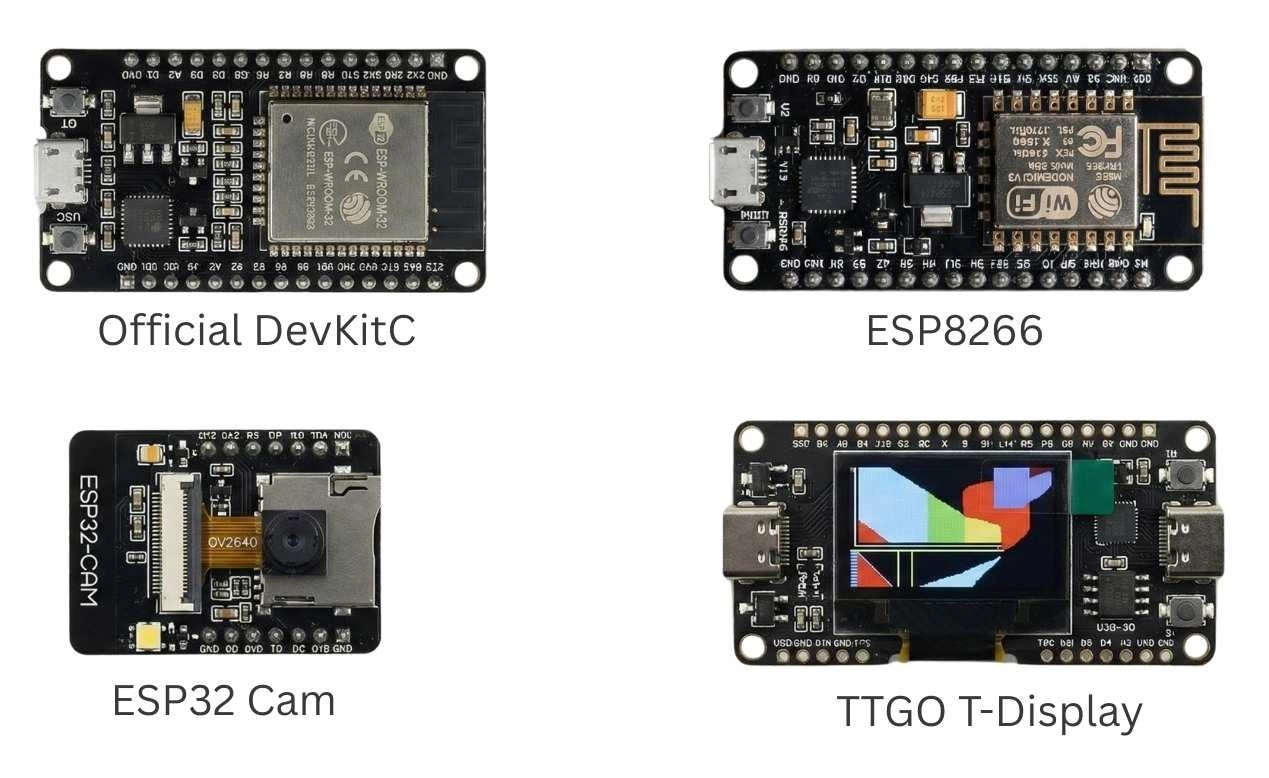
Figure: Various types of ESP32 development boards, including standard, camera-integrated, and display-integrated models.
When you are ready to move beyond commercial dev boards and build your own custom solutions, you can easily verify custom manufacturing costs via the JLCPCB Quotation Page and source your necessary chips and components directly from the JLCPCB Parts.
Best ESP32 Development Boards for Beginners (Quick Picks)
Best ESP32 Development Board Comparison at a Glance
| Board Model | Key Specs / Features | Approx. Price | Best For |
|---|---|---|---|
| ESP32 DevKitC V4 | Dual-core, 4MB Flash, CP2102 | ~$8.00 | Absolute beginners, reliable prototyping. |
| NodeMCU-32S | Dual-core, 4MB Flash, Breadboard friendly | ~$6.00 | Budget-conscious makers, general IoT. |
| TTGO T-Display | 4MB Flash, Built-in 1.14" Color TFT | ~$15.00 | Visual data readouts, portable UI devices. |
| ESP32-CAM | OV2640 Camera, MicroSD slot, no onboard USB | ~$9.00 | Surveillance, image recognition projects. |
To narrow down your search, here are our top recommendations for an esp32 development board comparison:
Best Overall: ESP32 DevKitC (V4)
If you just want a board that works flawlessly out of the box, the ESP32 DevKitC V4 is the best esp32 development board to start with. It fits nicely on a breadboard, uses the stable CP2102 USB-to-UART bridge, and has universal community support.
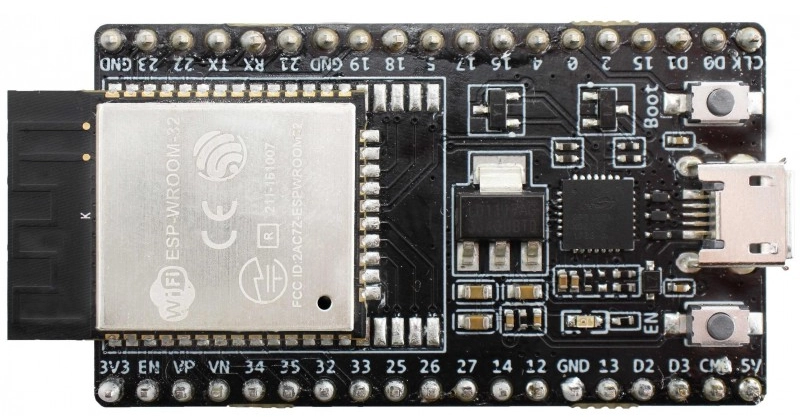
Figure: Close-up product shot of the official ESP32 DevKitC V4 development board.
Best for IoT Projects: NodeMCU-32S
Highly popular in the maker community, the NodeMCU-32S is cheap, easy to find, and heavily documented. It’s perfect for building web servers, fetching API data, or connecting to MQTT brokers for smart home setups.
Boards with Built‑In Displays: LILYGO TTGO T-Display
Wiring an LCD to an ESP32 can be tedious for a beginner. The TTGO T-Display solves this by integrating a crisp 1.14-inch IPS color display right onto the board. It is perfect for IoT dashboards, weather stations, or monitoring sensor data locally.
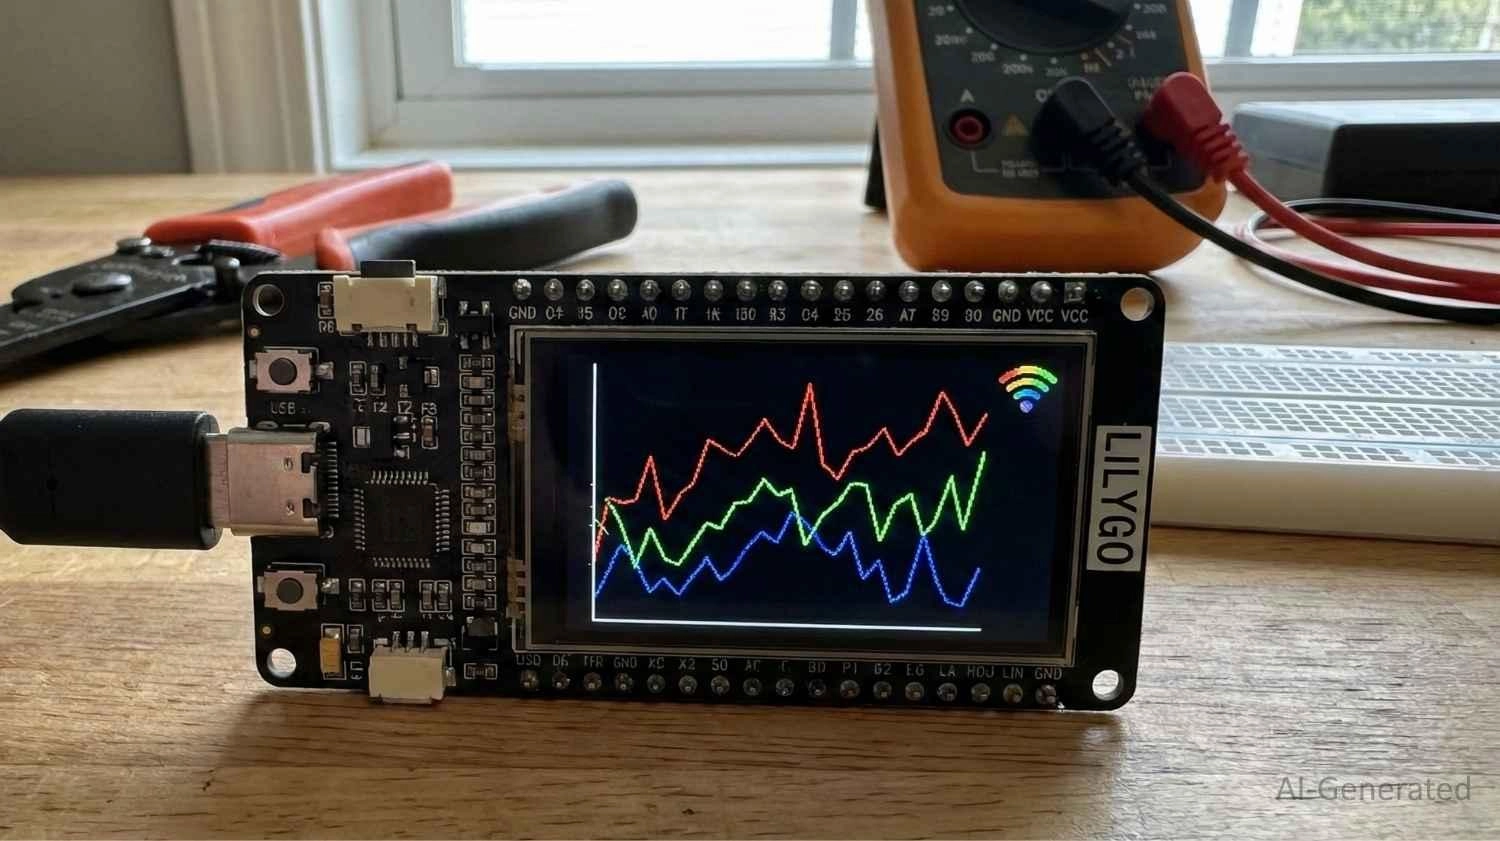
Figure: LILYGO TTGO T-Display ESP32 board showing a vibrant graphic on its built-in screen.
Boards with Large Memory: ESP32-WROVER-KIT
If your project is heavy on graphics or audio, you need PSRAM. Boards utilizing the WROVER module rather than the standard WROOM module give you that extra memory overhead to prevent your board from crashing during intensive tasks.
How to Choose the Right ESP32 Development Board
Consider the following factors when choosing an ESP32 board
1. Project Requirements (Wi‑Fi/Bluetooth/PSRAM)
All standard ESP32 boards have Wi-Fi and Bluetooth. However, memory differs. The standard WROOM modules have enough RAM for 95% of beginner projects. But if you want to process audio, run complex graphical user interfaces (GUIs) on a screen, or handle camera streams, look for an ESP32-WROVER board, which includes extra external memory known as PSRAM.
2. Breadboard Compatibility & Form Factor
Not all ESP32 boards are created equal in size. A classic beginner trap is buying a 38-pin dev board that is too wide for a standard breadboard, leaving no exposed holes to plug in your jumper wires! If you plan to do a lot of prototyping, look for narrower boards (often labeled as "NodeMCU-32S" or "narrow pitch"), or be prepared to bridge two breadboards together.
3. Pinouts & Peripheral Needs
Evaluate the General Purpose Input/Output (GPIO) pins. Do you need multiple Analog-to-Digital Converters (ADCs) for sensors? Hardware SPI/I2C for displays? Ensure the board breaks out enough pins for your project. When you later graduate to designing your own boards, optimizing these connections is crucial - a concept detailed in our solder pad design explained guide.
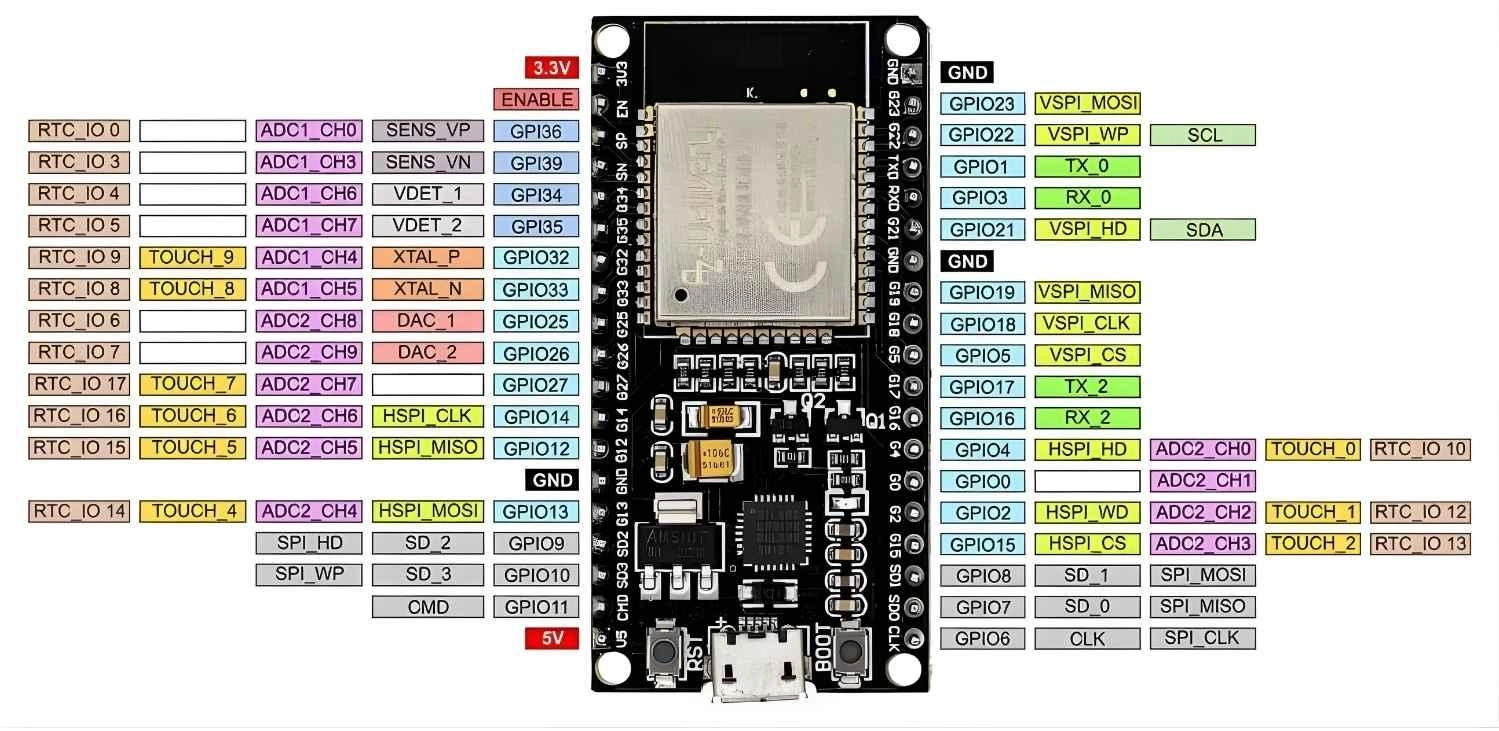
Figure: Pinout diagram for a standard 38-pin ESP32 development board.
4. Power Options & Battery Support
How will you power your project? While all boards can be powered via USB, if you are building a remote IoT sensor (like a smart garden monitor), you will want a board with a built-in JST connector for a LiPo battery and an integrated charging circuit. Brands like Adafruit and LILYGO frequently include these battery management features.
5. USB Interface & Driver Considerations
Check the USB-to-UART chip on the board. Common ones include the CP2102 and CH340. The newer boards may use CH9102 or CP2102N bridges.
The CP2102 is generally more stable and often auto-installs drivers on Windows and Mac. Also, take note of the USB port type - many modern boards have finally upgraded from Micro-USB to the much more convenient USB Type-C.

Figure: Close-up view of a CP2102 USB-to-UART chip and USB-C port on a dev board.
6. Documentation & Community Support
Stick to boards with widely available pinout diagrams. A generic, unnamed board might save you a dollar, but the lack of a reliable pinout map will cause hours of frustration when you accidentally connect a sensor to a restricted boot pin.
7. Price vs Value
Evaluate what you are actually paying for. A basic board costs ~$5. A board with a built-in OLED screen or an 18650 battery holder might cost ~$15. If your project requires a screen anyway, buying the board with an integrated display offers better value and less wiring clutter.
Common Mistakes Beginners Make When Choosing an ESP32 Board
1. Choosing a board with too many or too few features
Don't buy an ESP32-CAM if you just want to blink an LED and read a temperature sensor. The lack of an onboard USB port makes the CAM module notoriously difficult for absolute beginners to program. Start simple.
2. Ignoring community support or documentation quality
You might find an ultra-cheap generic clone online, but if its pin labels are incorrect or its voltage regulator is flimsy, you will spend more time debugging the hardware than writing code.
3. Overlooking project-specific power requirements
ESP32 chips draw significant current during Wi-Fi transmission spikes (peaks of 300–500 mA depending on RF conditions). Cheaper boards sometimes use inadequate voltage regulators, leading to sudden reboots or "brownout" errors. Understanding power stability is vital. In fact, managing power fluctuations is a core PCB design skill.
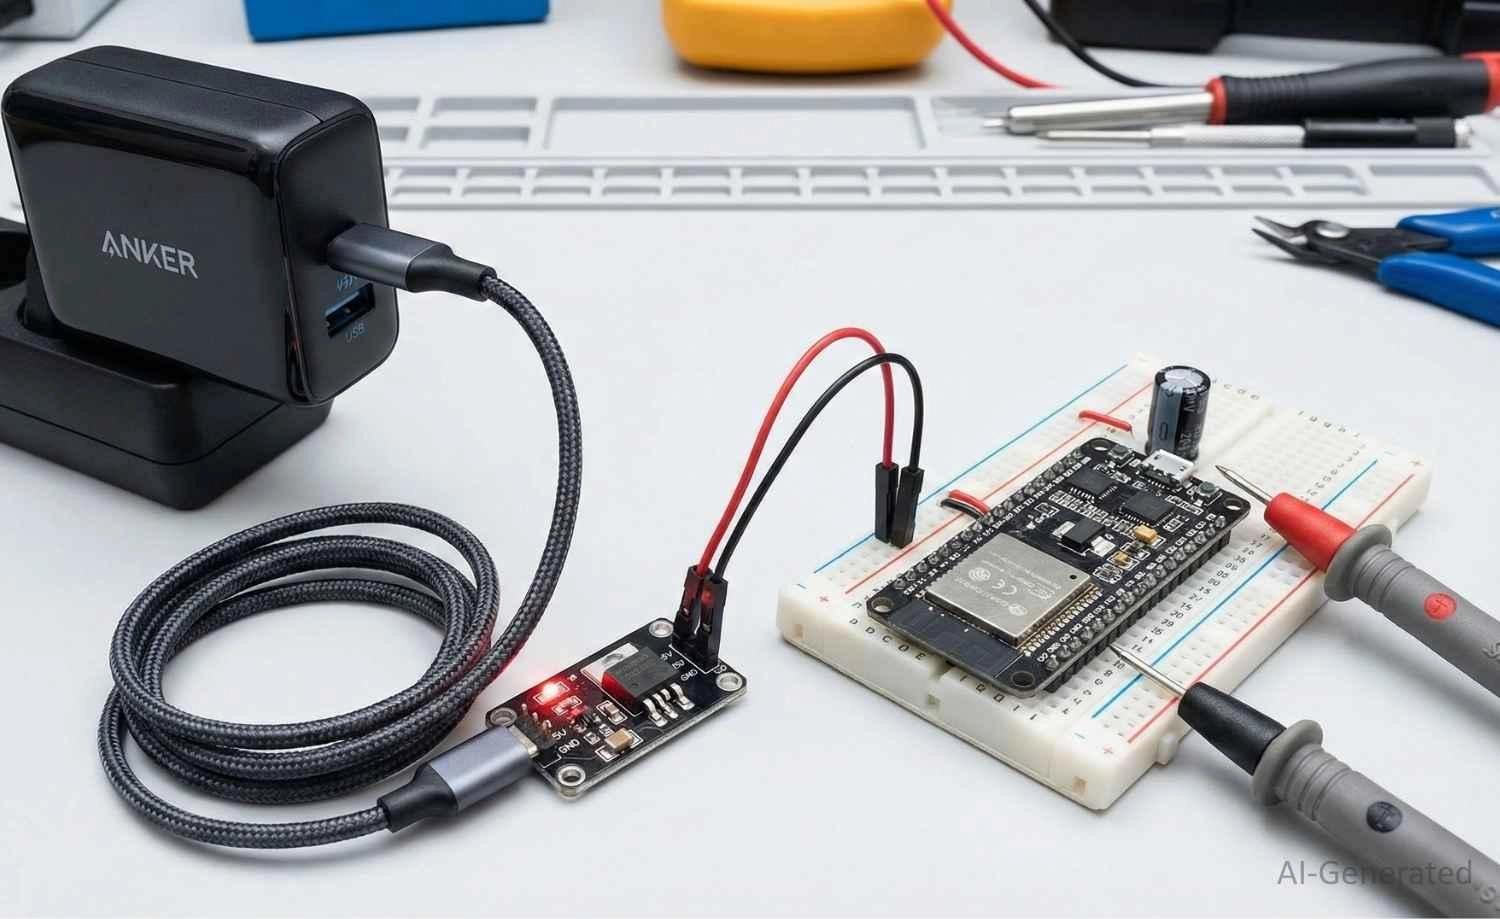
Figure: A stable power supply setup for an ESP32 development board using a breadboard power module.
ESP32 vs ESP8266 vs Arduino Boards
If you are an absolute beginner, you might be wondering how the ESP32 stacks up against other famous boards:
● Arduino Uno (ATmega328P): Excellent for basic electronics, but lacks native internet connectivity. It runs at 16 MHz with 2KB of RAM.
● ESP8266: The predecessor to the ESP32. It brought cheap Wi-Fi to the masses but has a single-core processor, fewer GPIO pins, and no Bluetooth.
● ESP32: The ultimate upgrade. Featuring a dual-core processor running up to 240 MHz, 520 KB of SRAM, built-in Wi-Fi, and Bluetooth Low Energy (BLE). It easily outpaces the others in IoT applications.
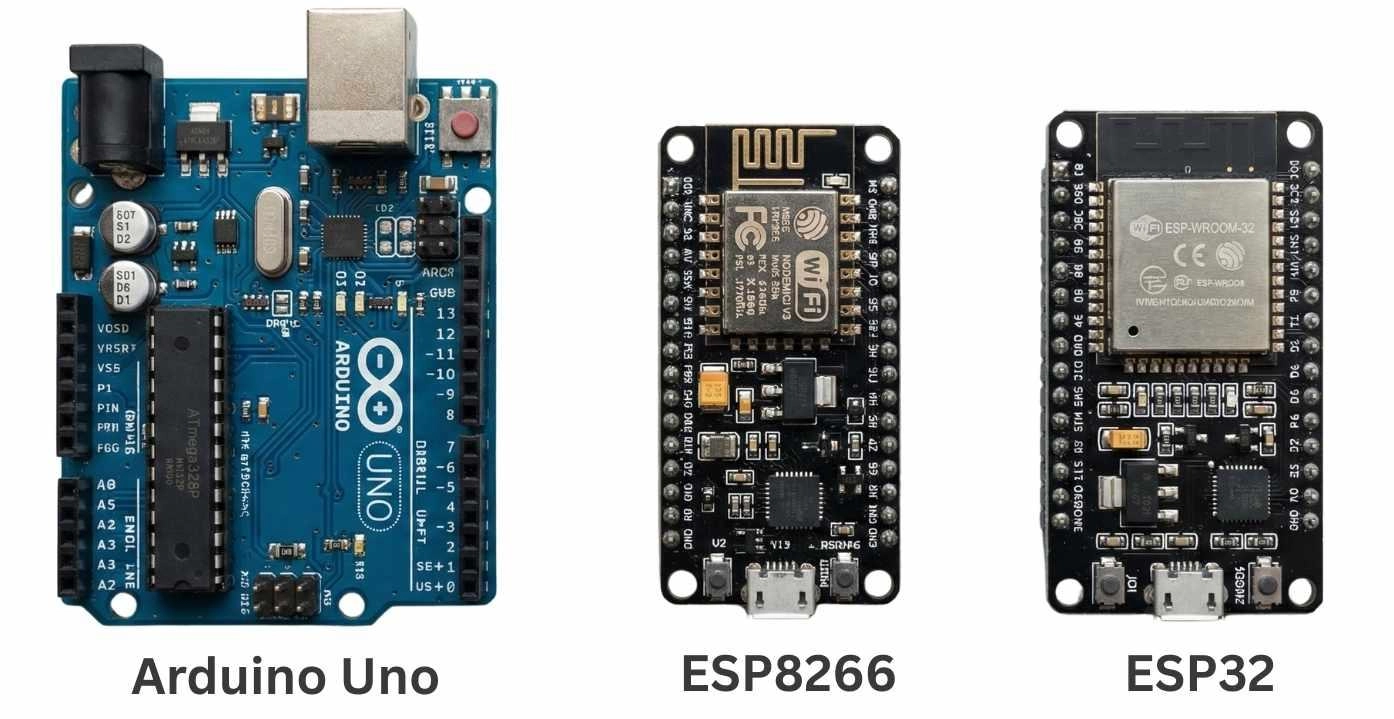
Figure: Comparison between Arduino Uno, ESP8266 NodeMCU, and ESP32 development boards.
Understanding the ESP32 Family: Classic vs. S2, S3, C3, C6, and P4
As you browse for boards, you will inevitably notice extra letters and numbers attached to the ESP32 name. Espressif has expanded the ESP32 family into several specialized chips. Here is a simple beginner breakdown so you know exactly what you are looking at:
[Figure Suggestion: An infographic or family tree showing the ESP32 Classic alongside the newer S-series (S2, S3) and C-series (C3, C6) chips. Alt Text: The ESP32 microcontroller family tree showing Classic, S2, S3, C3, and C6 variants.]
● ESP32 (Classic): This is the original, highly reliable dual-core workhorse we’ve been discussing. It is still the most widely available and is perfect for 90% of beginner projects.
● ESP32-S2: A single-core variant that introduced native USB support. This means you can program it to act like a mouse or keyboard when plugged into your computer.
If you decide to build a custom product around this specific chip later, check out how to design an ESP32-S2 module PCB.
● ESP32-S3: The modern powerhouse. It features a dual-core processor, native USB, and specialized instructions built for artificial intelligence (AI), machine learning, and driving high-resolution color displays.
● ESP32-C3: Often called the "ESP8266 killer," this is a low-cost, single-core chip designed to be a highly efficient, ultra-cheap alternative for simple IoT sensors that don't need massive processing power.
● ESP32-C6: The future-proof connectivity chip. It adds support for Wi-Fi 6, Zigbee, and Thread, making it the go-to choice if you want to build modern smart home devices compatible with the Matter protocol.
● ESP32-P4: The outlier of the family. It surprisingly lacks Wi-Fi and Bluetooth, but features dual high-speed processing cores designed primarily for high-performance edge computing and multimedia processing.
For an absolute beginner, standard dev boards utilizing the Classic ESP32 or the ESP32-S3 are generally the best starting points due to the overwhelming amount of tutorials and code libraries available for them.
Why Choose an ESP32 Board as a Beginner?
1. Low Cost & Powerful Connectivity
The greatest advantage of an ESP32 development board is its cost-to-performance ratio. For less than $5, you get a dual-core processor capable of handling secure web servers, audio processing, and complex automation, all while seamlessly connecting to your home Wi-Fi and Bluetooth peripherals.
2. Rich Community & Tutorials Available
You don't need to learn an entirely new programming language to use it. The ESP32 is fully compatible with the Arduino IDE, MicroPython, PlatformIO, and CircuitPython. Because it is highly popular, if you encounter a bug or need a specific sensor library, a quick internet search will yield dozens of beginner-friendly tutorials, GitHub repositories, and forum threads.
FAQ
Q: Which ESP32 board is best for beginners?
The ESP32 DevKitC V4 is widely considered the best starting point due to its official support from Espressif, high reliability, and standard breadboard-friendly layout.
Q: Should I choose ESP32 DevKitC or NodeMCU?
Both are excellent choices. The DevKitC is the official reference design and is highly reliable. The NodeMCU-32S is a third-party standard that is often slightly cheaper and equally well-documented. You can't go wrong with either.
Q: Do I need extra memory (PSRAM) as a beginner?
Generally, no. The standard 520 KB of SRAM found on WROOM modules is more than enough for reading sensors, controlling relays, and running simple web servers. You only need PSRAM (found on WROVER boards) for audio processing, complex displays, or camera image buffering.
Q: Which ESP32 board is best for IoT projects?
Any standard board works great, but if your IoT project is battery-powered, look for boards from Adafruit (like the ESP32 Feather) or LILYGO that feature built-in LiPo battery connectors and integrated battery charging circuits.
Conclusion
Choosing the right ESP32 development board doesn't have to be intimidating. If you are ever in doubt, the ESP32 DevKitC V4 or a standard NodeMCU-32S will serve as the perfect starting point for 99% of your beginner tutorials. Look for boards with standard USB interfaces, adequate pinouts, and strong community backing.
Once you have successfully built your breadboard prototype and tested your code, you don't have to stop there. Take the next step by turning your messy wiring into a professional, reliable, and compact product utilizing JLCPCB's industry-leading PCB Assembly service. With just a few clicks, you can transition from a beginner hobbyist to a hardware creator!
Popular Articles
• How to Identify SMD LED Polarity: Markings, Testing, and PCB Tips
• How to Create a Bluetooth-Controlled Car With Arduino: A Step-by-Step Guide
• How to Design and Assemble a Reliable ESP32 Module PCB on a 2-Layer Board
• The Ultimate Guide to Relay Symbol: Coil, Contacts, Diagrams, and Circuit Applications
• The Ultimate Guide to PCBA: Process,Types and Techniques for the Electronics Enthusiast
Keep Learning
How to Design an ESP32-S3 Development Board from Scratch: A 4-Layer PCB Design Tutorial
Designing your own ESP32-S3 development board gives you complete control over your hardware architecture while preparing your IoT projects for commercial production. Instead of relying on bulkier, off-the-shelf boards, building a custom design allows you to optimize the board space, expose only the required GPIO pins, and integrate peripherals directly onto a single substrate. In this tutorial, we will design a 4-layer ESP32-S3 development board from scratch. We will walk through the entire hardware d......
Circuit Breaker Symbols Explained: IEC, ANSI, MCB, and Pole Configuration Symbols
Electrical schematics are the universal language of power systems, control circuits, and printed circuit boards. Within these diagrams, the circuit breaker symbol is one of the most critical elements. Getting it right is essential for safety, troubleshooting, and manufacturing. An error as simple as mixing up a circuit breaker with a manual switch or an isolator can lead to catastrophic misinterpretations on the factory floor or during field maintenance. This guide provides a complete, technically acc......
How to Identify SMD LED Polarity: Markings, Testing, and PCB Tips
Surface-mount LED components are ubiquitous in electronics design, serving as everything from simple power indicators to complex lighting arrays. Unlike standard resistors, LEDs are polarized diodes. Identifying SMD LED polarity correctly is critical for prototype troubleshooting and high-volume PCB assembly. A reversed LED results in no light output, broken circuit paths, and potential diode breakdown if the reverse voltage exceeds the component's maximum rating (typically 5V or less for most indicat......
Arduino LED Driver Tutorial: Control More LEDs with 74HC595 and MAX7219
Arduino GPIO pins run out quickly in larger LED projects. By utilizing dedicated LED drivers and expansion ICs, you can drastically reduce pin usage, eliminate processor-heavy multiplexing loops, and simplify display wiring. In this guide, you will learn the operational architecture, wiring configurations, cascading techniques, and optimization strategies for the 74HC595 shift register and the MAX7219 LED driver. Why Arduino Projects Need LED Driver ICs Arduino GPIO and Current Limitations An ATmega32......
How to Create a Bluetooth-Controlled Car With Arduino: A Step-by-Step Guide
This tutorial walks through the complete engineering and implementation of a two-wheel Bluetooth RC car with an Arduino Nano module on a specially designed PCBA (Printed Circuit Board Assembly). While many hobbyists start by wiring motors and Bluetooth modules with jumper cables on a breadboard, this approach is prone to disconnection and signal noise. This guide upgrades that process by teaching you how to design a professional mainboard. Key Design Features Controller: Arduino Nano used as a plug-in......
Fiducial Marks in PCB and SMT Assembly: A Complete Guide to Accuracy and Design Rules
Modern Printed Circuit Boards (PCBs) are complex, integrating high-density components like 0.4mm pitch Ball Grid Arrays (BGAs), 0201 passives, and fine-pitch Quad Flat No-Lead (QFN) packages. In this advanced manufacturing environment, achieving placement accuracy measured in micrometers is crucial. A significant challenge in automated manufacturing is how pick-and-place machines, which handle thousands of components per hour, precisely locate the PCB. A board on a conveyor system is never in the perf......