How to Clean a Soldering Iron Tip Like a Pro: Tools, Steps, and Tips
16 min
In the world of electronics manufacturing, from the humblest DIY project to complex aerospace prototyping, the soldering iron tip (or "bit") is the most critical interface. It is the final link in the thermal chain that transfers energy from the heating element to the solder joint. Yet, it is often the most neglected tool on the workbench.
Many engineers focus heavily on the quality of their soldering station - checking wattage, temperature stability, and heat-up time - while ignoring the condition of the tip itself. An oxidized, pitted, or dirty tip creates a thermal barrier. No matter how expensive your station is, if the tip cannot wet properly, the heat transfer will be inefficient, leading to poor joints and frustrated operators.
This guide will show you exactly how to clean a soldering iron tip properly — not just to make it look shiny, but to restore efficient heat transfer and prevent premature tip failure.
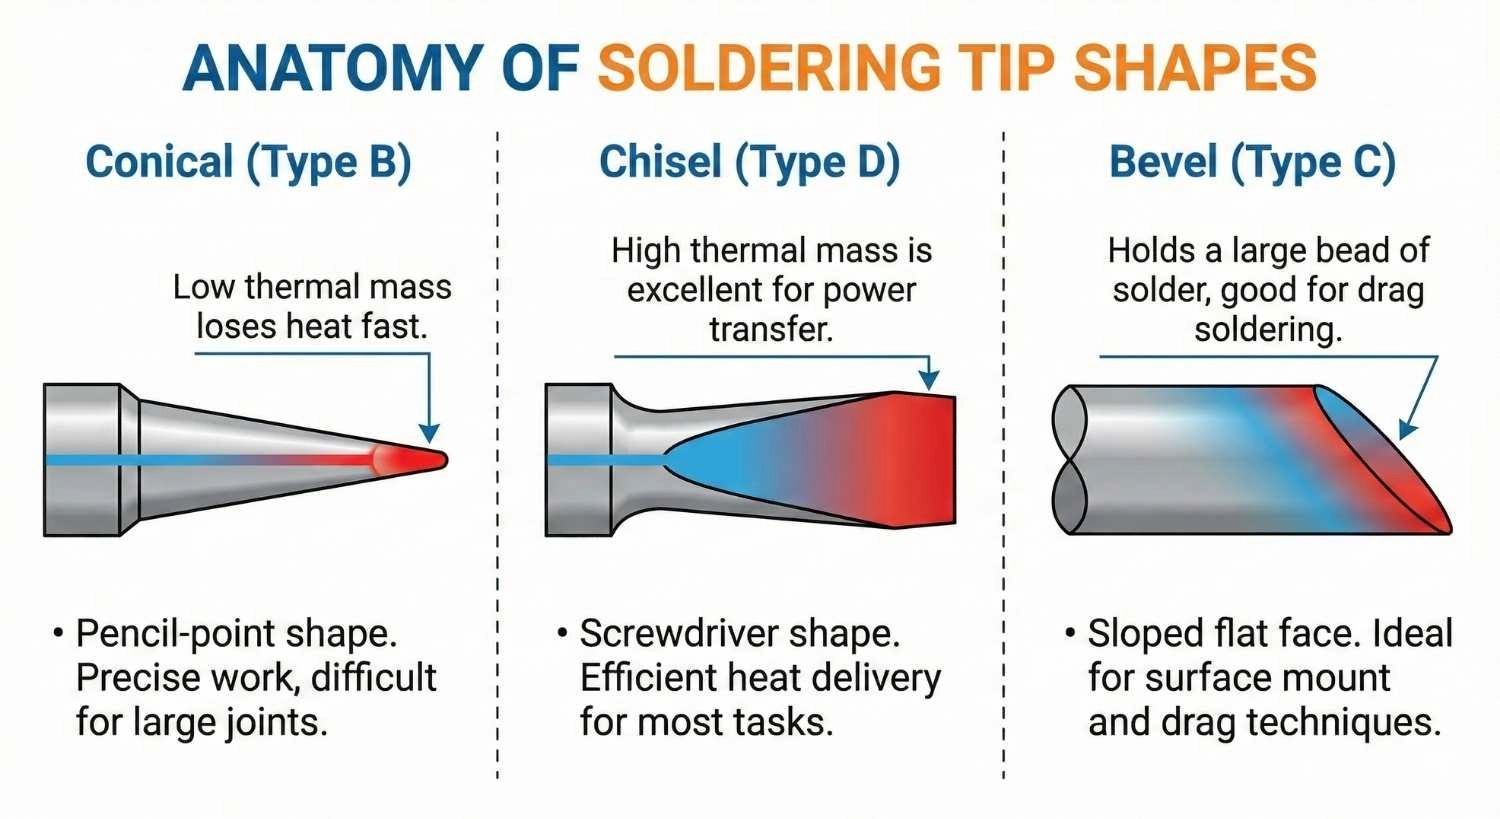
Comparison of soldering iron tip shapes: Conical, Chisel, and Bevel types showing different thermal contact areas.
Note: If you’re looking for a quick answer, jump to the step-by-step cleaning section below.
Common Soldering Iron Tip Problems (Black, Oxidized, and Burnt Tips)
Identifying the state of your soldering iron tip is the first step in restoration. Here are the most common conditions you will encounter.
The "Black Tip" (Oxidation)
This is the most common issue. The tip looks matte black or dark grey. Solder is fed onto the tip immediately, balls up, and falls off, similar to water on a hydrophobic surface. This is called dewetting.
● Cause: Idling at high temps or wiping the tip clean before storage.
The "Pitted Tip" (Corrosion)
This is a catastrophic failure. The surface of the tip has visible holes, craters, or a rough, eaten-away texture.
● Cause: This happens when the iron plating is breached. Tin is a solvent for copper. Once the protective iron layer is scratched (by sandpaper) or eroded (by high-tin lead-free solder), the molten solder dissolves the copper core from the inside out. This tip cannot be saved and must be discarded.
The "Burnt Flux" Tip (Contaminated Tip Surface)
The tip has thick, crusty black deposits near the base or on the shaft, though the very tip might still work.
● Cause: Overusing flux or pushing solder wire too high up the tip shaft.
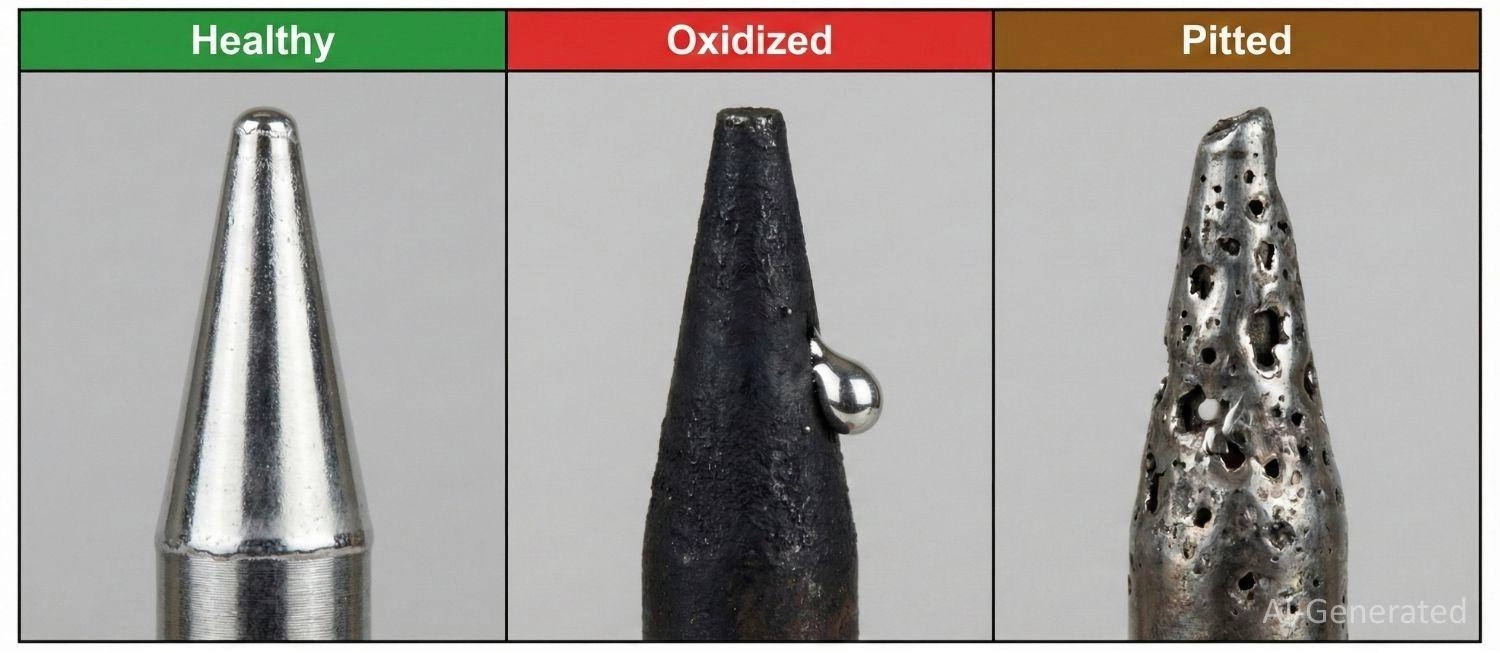
Showing a healthy tip, an oxidized de-wetted tip, and a pitted, corroded tip.
Essential Tools Needed for Cleaning Soldering Iron Tips
You cannot maintain a precision tool with improvised equipment. Before you start soldering, ensure your workbench is equipped with the following.
1. Brass or Stainless Steel Wool
This is the modern gold standard for cleaning, especially for lead-free solders.
● Why it works: It is low-abrasive. The metal shavings are harder than the oxide/flux residue but softer than the iron plating of the tip.
● Thermal Advantage: Unlike a wet sponge, dipping the tip in brass wool does not cause a rapid temperature drop (thermal shock). This keeps the process consistent.
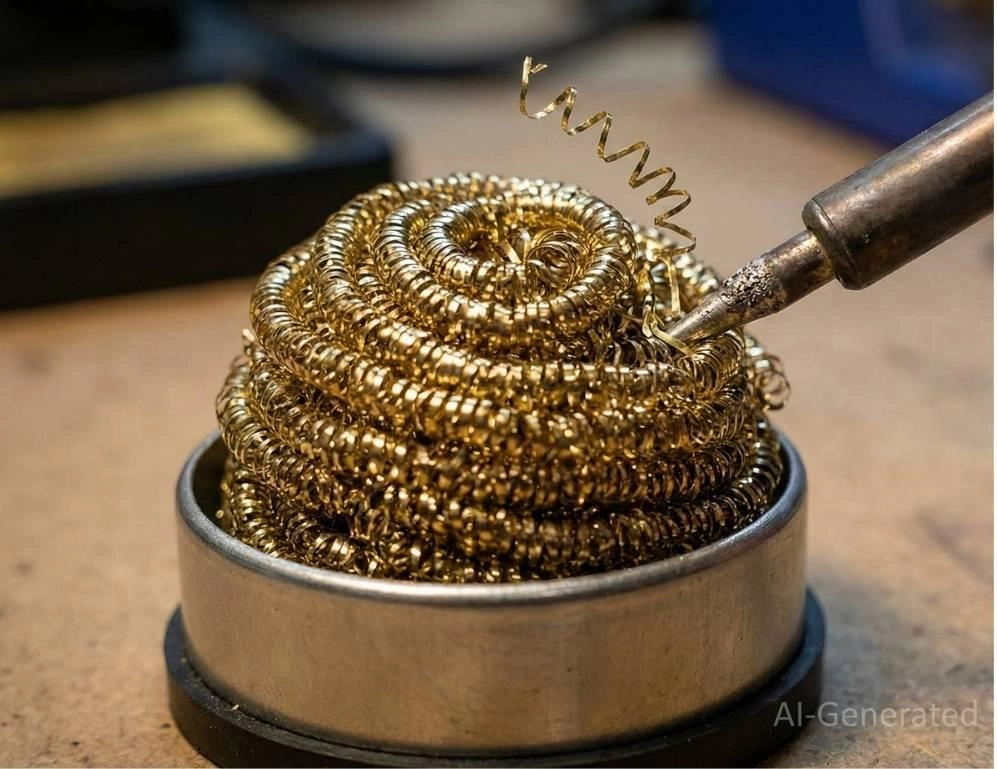
Brass wool soldering iron tip cleaner for removing oxidation without water.
2. Sulfur-Free Cellulose Sponge
The traditional method is still useful for removing heavy flux buildup.
● Requirement: It must be sulfur-free (sulfur corrodes iron) and used with deionized water (minerals in tap water cause scale).
● Warning: The thermal shock of hitting a wet sponge drops the tip temperature by 50℃ - 100℃ instantly.
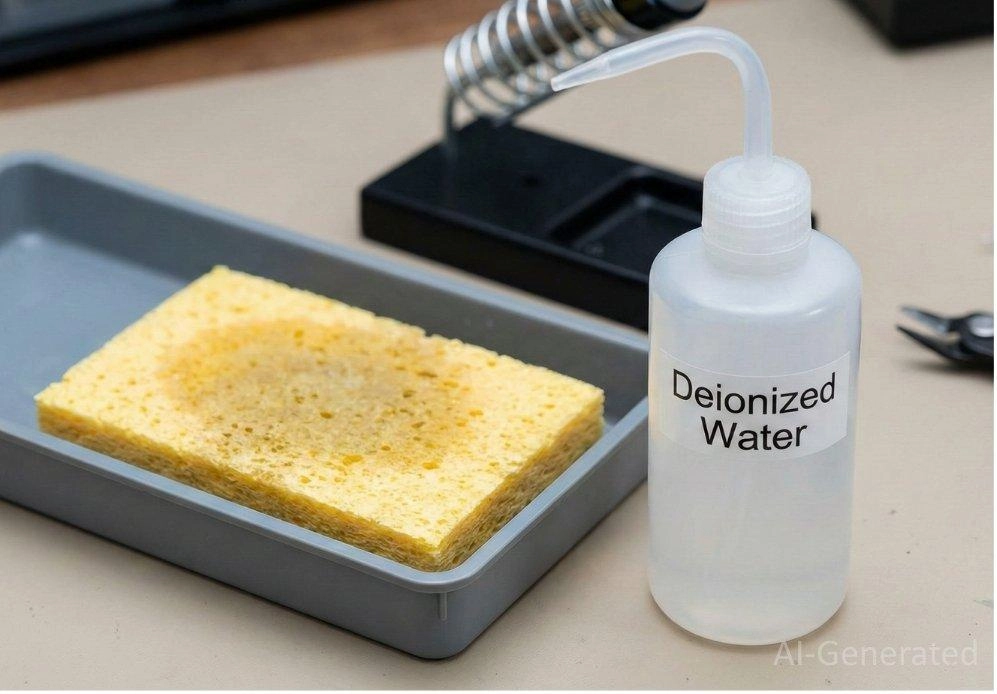
Sulfur-free cellulose cleaning sponge and deionized water bottle for soldering maintenance.
3. Tip Tinner (Activator)
A small metal tin containing a solid paste mixture of solder powder and mild acid (often ammonium phosphate).
● Function: This is your "emergency reset button." It chemically strips oxides when mechanical wiping fails.
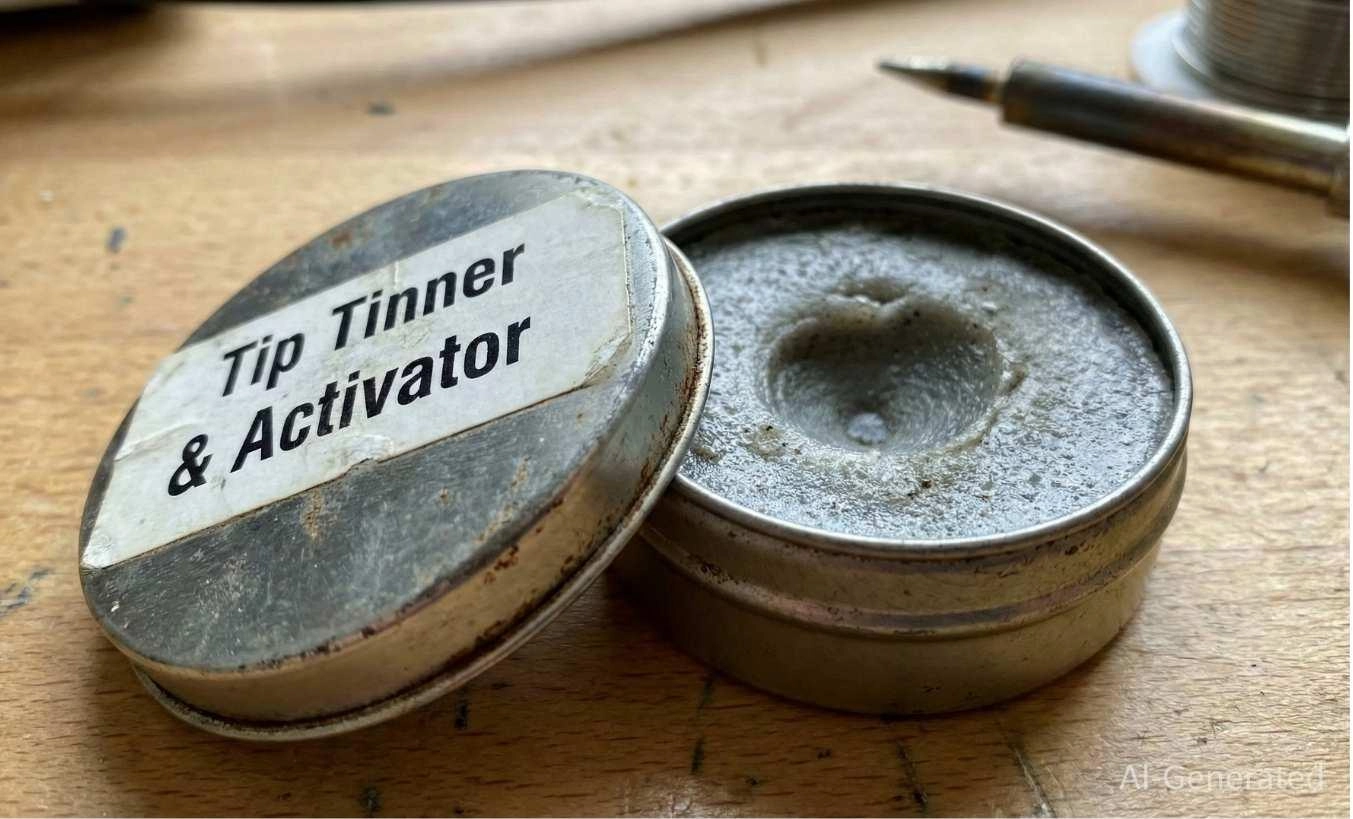
Chemical tip tinner and activator compound for restoring oxidized soldering tips.
4. Polishing Bar
A specialized abrasive block used only for extreme cases. It cleans aggressively but removes a small amount of plating. Use sparingly.
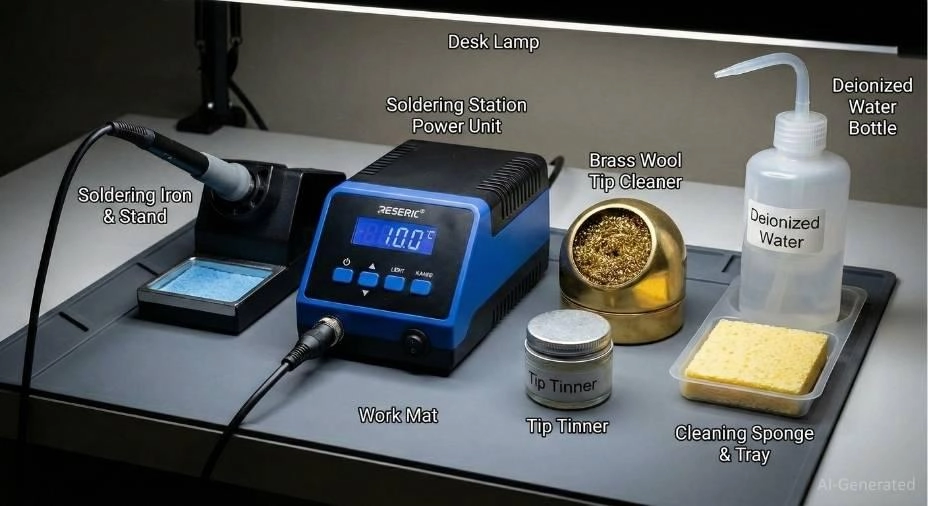
Essential soldering maintenance tools: brass wool, cellulose sponge, tip tinner, and deionized water.
How to Clean a Soldering Iron Tip: Step-by-Step
Maintenance falls into two categories: the routine cycle you do every minute, and the deep cleaning you do when things go wrong.
Situation 1: Routine Soldering Iron Tip Cleaning (The "While-You-Work" Cycle)
Goal: Remove spent flux and old solder to ensure a fresh connection. Perform this immediately before soldering a joint.
Step 1: Heat Up: Allow the iron to reach operating temperature (ideally 350℃).
Step 2: Wipe: Gently plunge the tip into the Brass Wool 2-3 times. Rotate the iron slightly to clean all sides.
Note: Do not stab the wool violently; you want to scrub, not puncture.
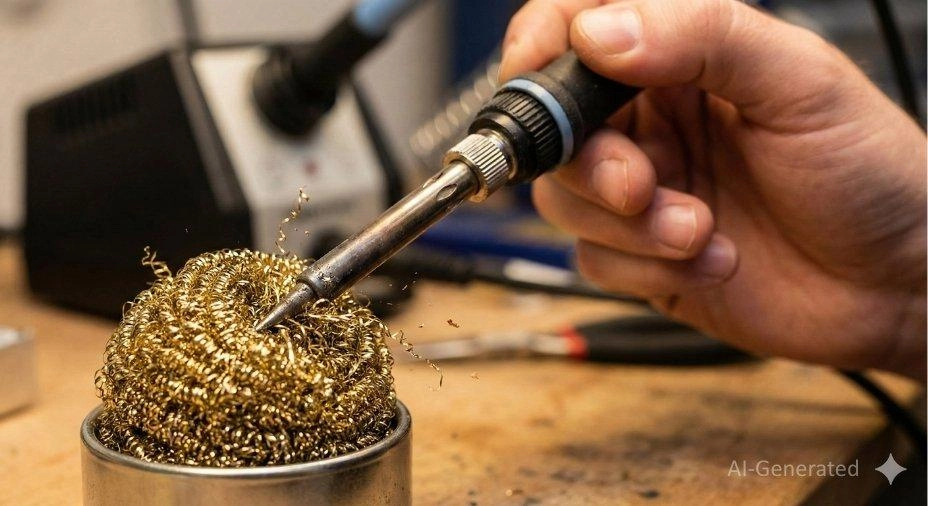
Cleaning the soldering iron tip with brass wool using a twisting motion to remove oxidation.
Step 3: Inspect: The tip should look bright and silver.
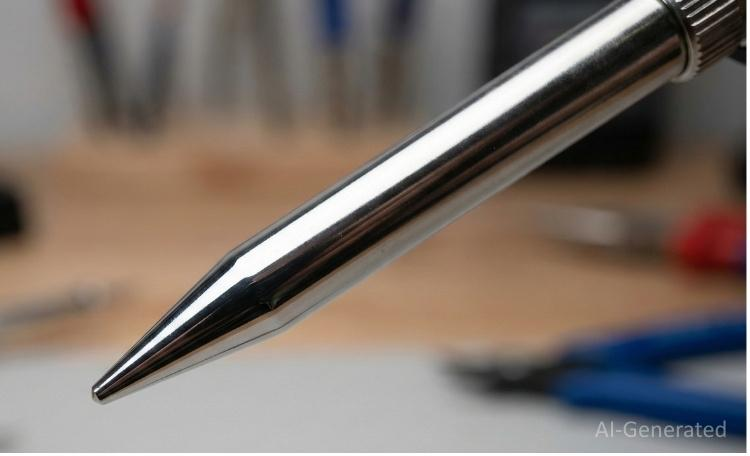
A clean, shiny soldering iron tip showing proper wettability and a mirror finish.
Step 4: Solder: Move immediately to the PCB and make your joint. The flux in the wire will protect the tip during the operation.
Step 5: Re-Coat: Before putting the iron back in the holder, feed a small amount of fresh solder onto the tip.
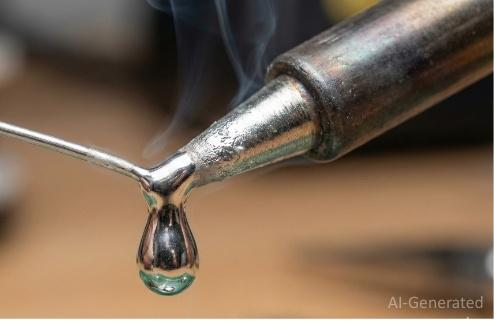
Applying fresh solder to the iron tip to create a sacrificial layer against oxidation before storage.
Situation 2: Deep Cleaning an Oxidized Soldering Iron Tip (Restoring a Black Tip)
Goal: Chemically reduce the iron oxide layer that mechanical wiping cannot remove.
Step 1: Lower the Temperature: Turn your station down to 250℃ - 300℃.
Technical Insight: Tip restorers are chemical reactions. At 400℃, the chemicals boil off before they can react. At 280℃, they stay active and scrub the surface.
Step 2: Dip in Tip Tinner: Insert the black, oxidized tip into the solid Tip Tinner/Activator. You will hear a hiss and see smoke.
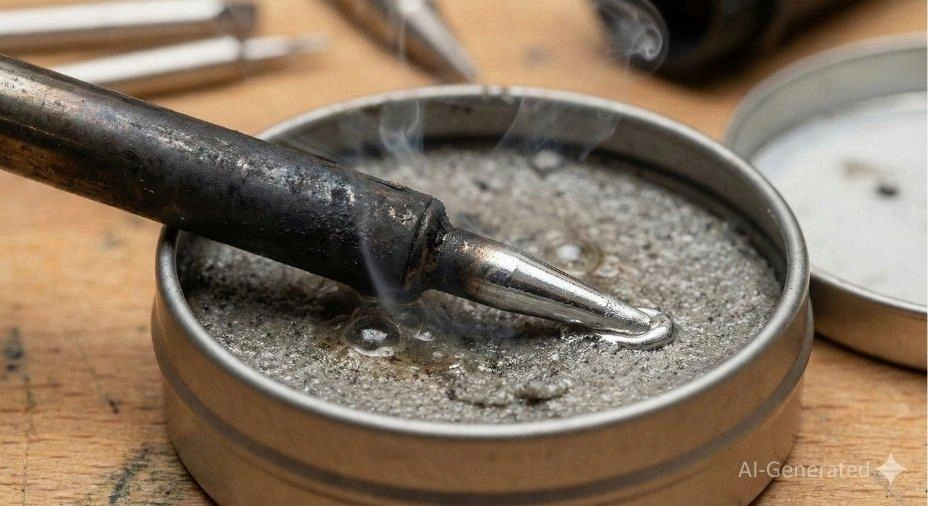
Restoring a black oxidized soldering iron tip using chemical tip tinner compound.
Step 3: Rotate and Dwell: Gently rotate the tip in the melting paste for 3-5 seconds. The mild acid is breaking the oxygen bonds.
Step 4: Wipe and Inspect: Remove the tip and wipe it firmly on brass wool. It should emerge shiny.
Step 5: Seal the Surface: Immediately feed fresh rosin-core solder onto the tip. The exposed iron is highly reactive; if you don't seal it with tin, it will oxidize again in seconds.
Common Mistakes to Avoid When Cleaning a Soldering Iron Tip
Before learning the correct protocol, you must unlearn the bad habits that destroy tips. These are the most frequent causes of premature tip failure in manual assembly.
1. Wiping Clean Before Storage (The Cleanliness Paradox)
This is the number one destroyer of soldering tips. Users often wipe the tip on a wet sponge to make it look shiny and then immediately turn off the station.
● The Result: You have stripped away the protective solder coating and exposed the naked iron plating to hot air. It will oxidize immediately as it cools.
● The Fix: Always leave a large "blob" of solder on the tip when you turn it off. This "Sacrificial Layer" blocks oxygen.
2. Using Sandpaper or Abrasives
Soldering tips are a complex composite, not solid copper. They have a thin iron plating (200–500 microns).
● The Result: Sandpaper, files, or rotary tools will strip the iron plating in seconds. Once the copper core is exposed, the tin in your solder will dissolve the copper, creating a hollow pit. The tip is ruined.
● The Fix: Use only brass wool or chemical tip tinner.
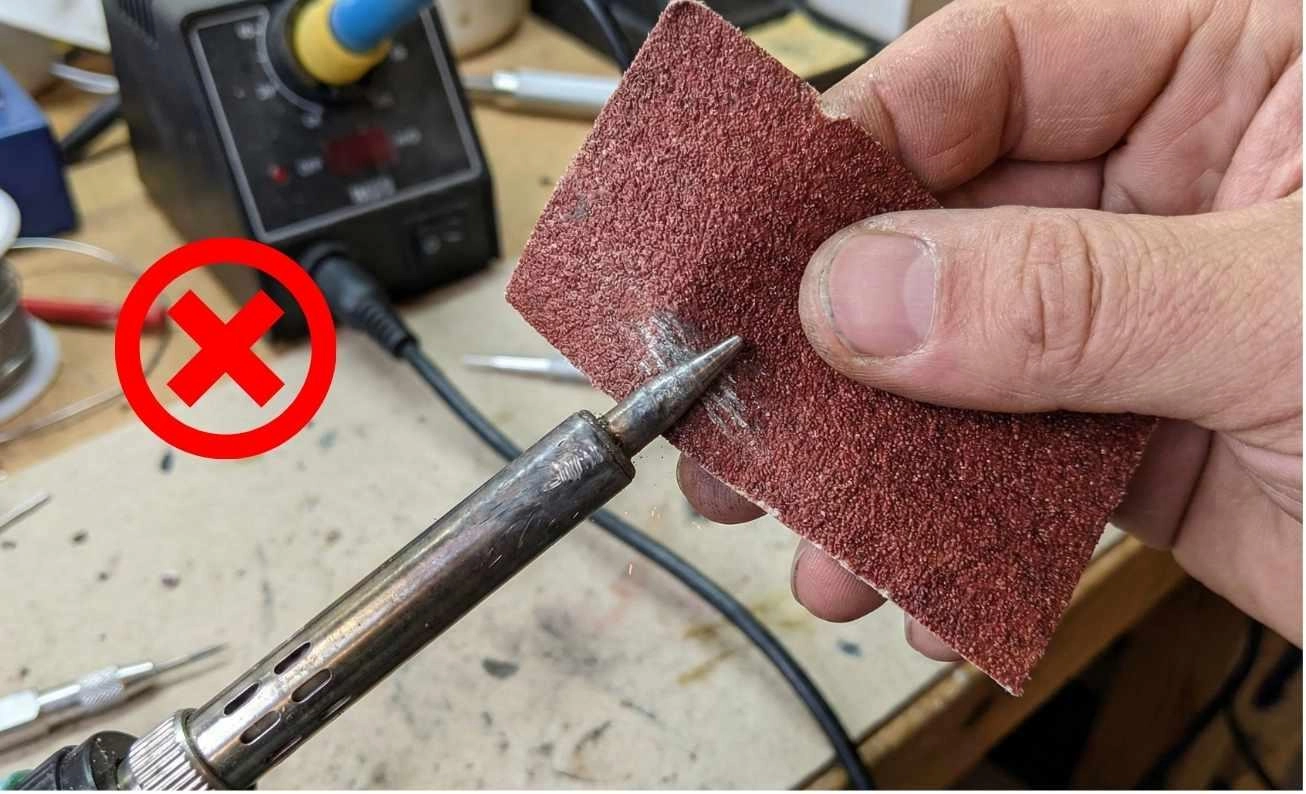
Incorrect cleaning method: using sandpaper on a soldering iron tip strips the plating.
3. Using Tap Water on Sponges
● The Result: Tap water contains minerals (calcium, magnesium) that boil out of solution and form a hard, thermally insulating scale on the tip.
● The Fix: Only use distilled or deionized water for your station sponge.
4. Overheating (Running too Hot)
Engineers often crank the temperature to 400℃ or higher to solder large ground planes.
● The Result: Oxidation kinetics accelerate exponentially above 380℃. Your tip will turn black within minutes of idling.
● The Fix: Keep your station at 350℃ for standard lead-free work. If you need more power, use a tip with higher thermal mass (like a Chisel), not higher temperature.
5. Applying Excessive Force
● The Result: Pushing hard on the pad does not transfer heat faster; it only bends the tip and damages the PCB land pattern.
● The Fix: Clean the tip to restore wettability. A wet tip transfers heat instantly with zero pressure. Let the solder bridge the gap.
6. Ignoring Flux Residue (The Carbon Trap)
Flux is essential, but it is also corrosive.
● The Result: If "Active" (RA) flux residue is left on the tip shaft, it eats into the plating. Furthermore, spent flux carbonizes into a hard black shell that creeps down onto the working surface.
● The Fix: If you see black residue building up, clean it immediately. Use RMA (Rosin Mildly Activated) or No-Clean flux for daily use to minimize corrosion.
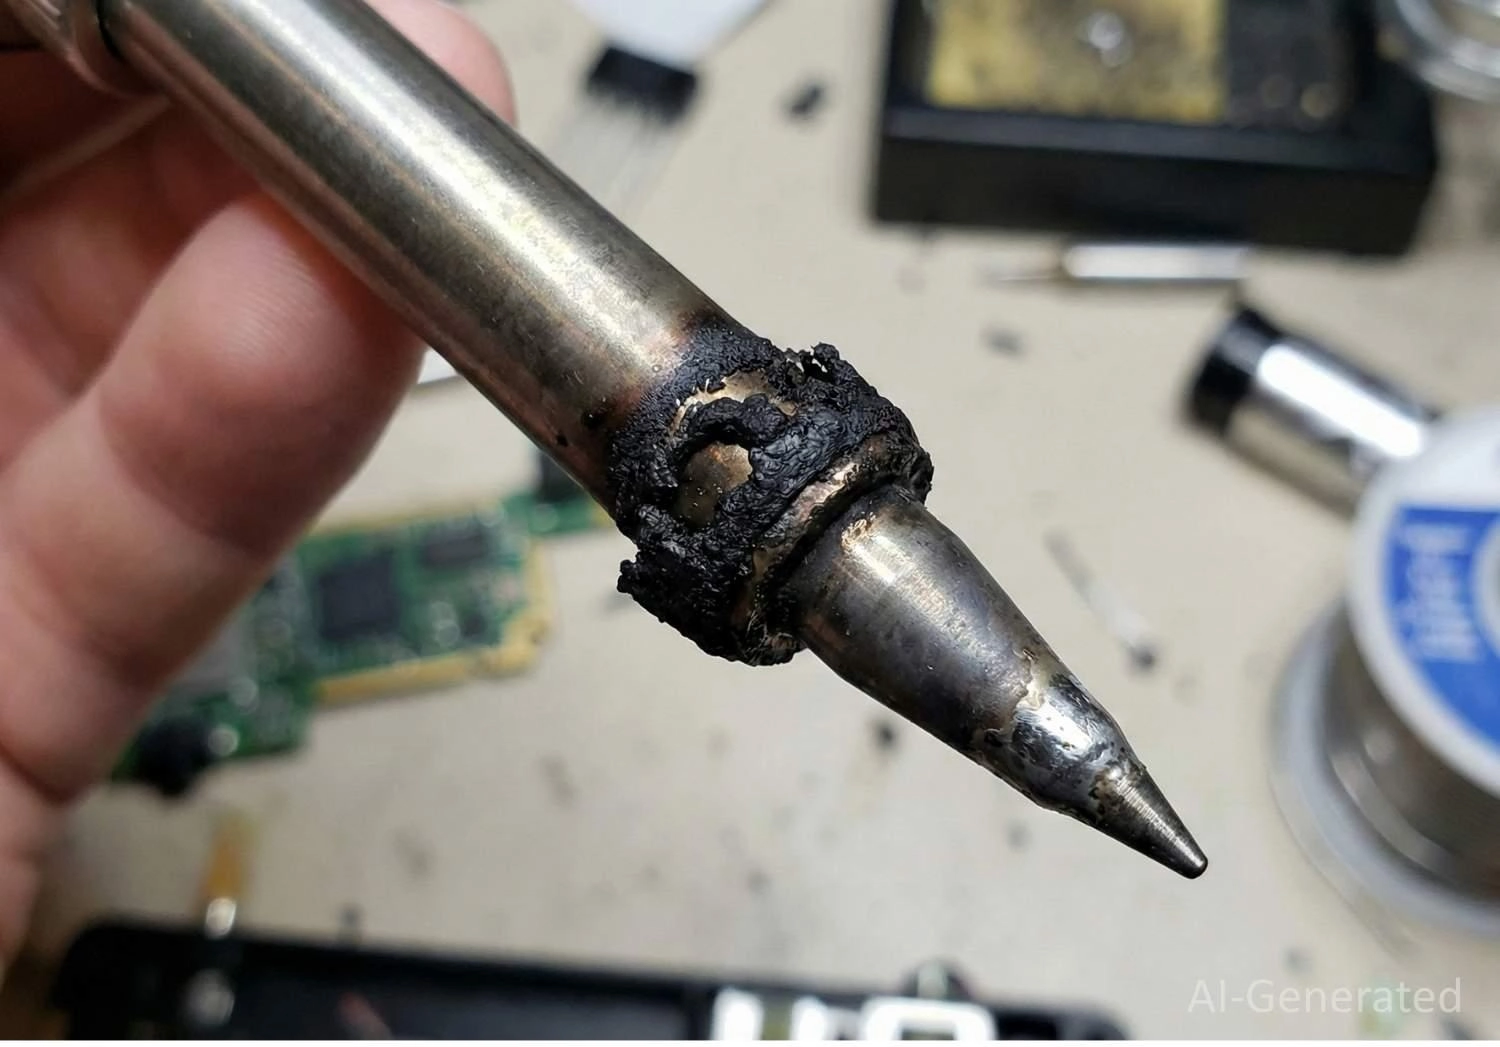
Soldering iron tip showing damaging carbonized flux residue buildup on the shaft.
How to Extend Soldering Iron Tip Life (Maintenance Tips and Best Practices)
Professional technicians in IPC-certified assembly houses follow strict protocols to make tips last for months or years. Here are their secrets.
Tip 1: The "Sacrificial Layer" Strategy
This is the single most important habit to develop. Never wipe your tip clean before putting it into the holder.
● The Mistake: Many users wipe the tip so it looks shiny, then put it in the stand. That shiny iron is now naked and exposed to hot air. It will oxidize immediately.
● The Pro Way: Always flood the tip with a large blob of solder before turning off the station or putting it down.
● The Science: This solder blob sacrifices itself. The outside of the blob forms a "skin" of oxide, but the molten tin inside keeps the iron plating hermetically sealed and oxygen-free.
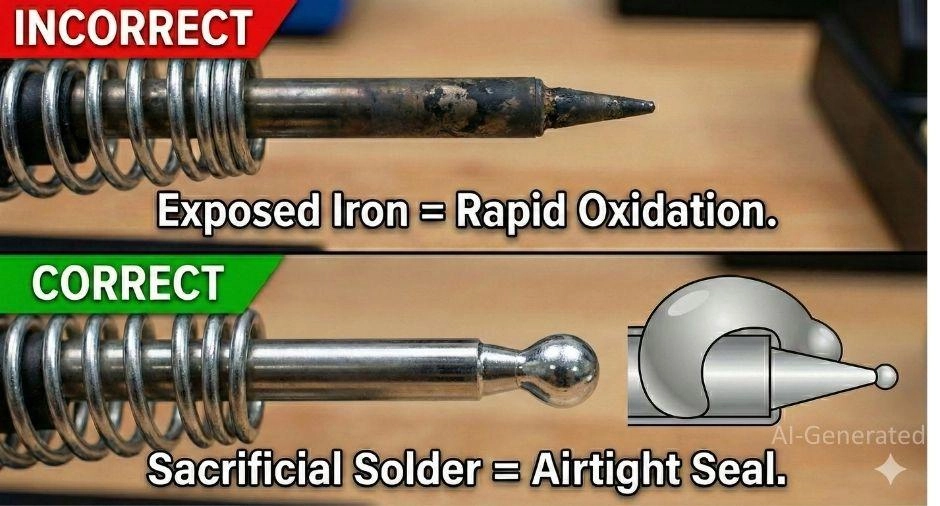
Comparison of soldering iron storage methods: incorrect dry storage leading to oxidation versus correct storage with a sacrificial solder blob.
Tip 2: Manage Your Temperature
Just because your station goes to 450℃ doesn't mean you should use it.
● Stay at 350℃: For standard lead-free soldering (SAC305), this is the optimal balance between performance and oxidation.
● Use Auto-Sleep: If your station has a "Sleep" mode, enable it. It drops the temp to 200℃ when idle.
● Thermal Mass over Temperature: If you are struggling to solder a ground plane, don't just crank the heat. Switch to a larger tip (Chisel instead of Conical). A larger tip holds more heat reserve, allowing you to solder massive joints at lower, safer temperatures.
Tip 3: Never Use Abrasives
Soldering tips are not solid copper. They are a complex composite.
1. Copper Core: Heat transfer.
2. Iron Plating: Protection.
3. Chrome Plating: Solder restriction (on the shaft). If you use sandpaper, files, or a Dremel, you will sand right through the iron plating (which is often only 200-500 microns thick). Once the copper is exposed, the tip is dead.
Tip 4: Use the Right Flux - and Clean Residue Promptly
Flux is a double-edged sword: it removes oxides from your PCB, but it also corrodes your tip.
● Avoid "Active" Flux: Highly active (RA) fluxes contain halides that eat through iron plating. Use RMA (Rosin Mildly Activated) or No-Clean flux for standard assembly.
● The Carbon Trap: If flux residue is left on the tip for too long, it carbonizes into a hard black shell. If you see black residue building up on the shaft, clean it immediately with a damp sponge before it hardens.
Why It Is Important to Clean Your Soldering Iron Tip
The primary function of a soldering tip is to conduct heat. To do this, the iron plating on the tip must be "wetted" with solder. Wetting creates an intermetallic bond (Cu-Sn) that allows heat to flow almost instantly into the joint.
When a tip is dirty or oxidized, that intermetallic bond is broken. The "black" oxidation layer acts as a powerful thermal insulator. This leads to a cascade of problems:
● Thermal Inefficiency: You may have your station set to 350℃, but the tip might only deliver 250℃ effectively to the joint because the oxide layer blocks the flow.
● Component Stress: To compensate for poor heat transfer, operators often press harder (damaging pads) or increase the dwell time (overheating sensitive ICs).
● Cold Solder Joints: If the tip cannot heat the pad and lead simultaneously and quickly, the solder will not flow properly, resulting in a crystalline, brittle joint that fails under vibration.
For high-reliability sectors, tip hygiene is not optional - it is a standard operating procedure.
What Causes Oxidation and Contamination on Soldering Iron Tips?
Oxidation is the natural enemy of the soldering iron. While modern tips are constructed with a copper core for conductivity, they are plated with a layer of iron to prevent the copper from dissolving into the tin. The battle for maintenance is fought on this thin iron surface.
The two main culprits of tip failure are environmental and chemical:
The Heat-Oxygen Reaction
Iron reacts with atmospheric oxygen to form Iron Oxide (Fe2O3). This reaction rate is governed by temperature.
● At 350℃: Oxidation occurs, but standard flux can easily manage it.
● At 400℃ and above: The oxidation rate accelerates exponentially. A shiny tip can turn black and unwettable in minutes if left idle at high temperatures.
Flux Carbonization
Flux is necessary to clean the PCB pads, but it is destructive to the tip if misused. When rosin-based flux is heated beyond its active range for too long, the volatile compounds boil off, leaving behind solid resins. These resins burn and carbonize, forming a hard, black, enamel-like coating on the tip. This carbon layer is non-conductive and repels molten solder.
When Manual Soldering Iron Tip Maintenance Is No Longer Enough
Even with the strictest maintenance protocols, manual soldering has inherent physical limitations. Prototyping a few boards by hand is feasible, but maintaining consistent tip temperature, pressure, and dwell time across thousands of joints is impossible for a human operator.
As your project scales from a breadboard proof-of-concept to a market-ready product, manual tip maintenance becomes a bottleneck.
● Human Variable: A tired operator might hold the iron for 5 seconds instead of 3, overheating a component.
● Thermal Recovery: Even the best iron lags when soldering massive ground planes, leading to potential cold joints.
● Component Density: Modern 0201 passives and BGA (Ball Grid Array) components simply cannot be soldered reliably with a manual iron.
This is where the transition to JLCPCB's Automated SMT Assembly becomes critical. Unlike a manual iron that fights oxidation in open air, industrial reflow ovens operate in controlled Nitrogen (N2) environments. By displacing oxygen, JLCPCB eliminates the very chemical reaction (oxidation) that you fight to clean off your tip every day.
Automated assembly offers:
1. Precision Reflow Profiles: Every joint hits the exact liquidus temperature for the exact required time.
2. AOI (Automated Optical Inspection): Cameras verify every fillet geometry, far faster than a human with a microscope.
3. Scalability: The quality remains consistent, whether producing a single prototype board or engaging in low-volume production of up to 10,000 units.
Learn More About: JLCPCB Manufacturing & Assembly Capabilities
Conclusion
A soldering iron is a precision instrument, not a pry bar or a wood burner. By keeping your temperature reasonable, prioritizing brass wool over wet sponges, and religiously using the "Sacrificial Layer" storage method, you ensure consistent thermal performance.
While these manual skills are vital for prototyping, they introduce variables - human inconsistency, oxidation risks, and thermal recovery lags - that can jeopardize mass production. When your prototype is perfected and you are ready to scale, relying on manual soldering is a liability.
JLCPCB’s PCBA Service eliminates these variables. We utilize industrial Nitrogen (N2) Reflow Ovens. By displacing oxygen with nitrogen during the soldering process, we prevent oxidation entirely, ensuring that every single joint - from the first to the ten-thousandth - meets IPC Class 3 standards for wettability and reliability.

FAQs
Q1. Solder is climbing up the shaft of the iron (Chrome Bleed). How do I fix this?
This is called "chrome bleed." The shaft of the tip is chrome-plated to stop solder from sticking, keeping the solder concentrated at the working end. If you scratch this chrome (often by cleaning too aggressively with a wire brush), solder will creep up the shaft. This creates a large surface area that radiates heat away from the joint. This cannot be repaired; the tip must be replaced.
Q2. Why does my tip turn black immediately after cleaning?
Your temperature is likely too high (above 400℃), or you are using a very aggressive "Active" flux that burns instantly.
● The Fix: Lower your temperature to 350℃. Clean the tip, and then tin it immediately (within 1 second). Do not give the air time to attack the iron.
Q3. Can I use tap water on my sponge?
It is highly discouraged. Tap water contains dissolved minerals like calcium, magnesium, and chlorides. When the water boils off on the 350℃ tip, these minerals are left behind as a hard scale. This scale is a thermal insulator and can corrode the iron plating over time. Always use distilled or deionized water.
Q4. How do I choose the right tip shape to prevent oxidation?
Larger tips (like Chisel or Bevel) generally last longer than fine Conical tips.
● Reason: Fine tips have very low thermal mass and a high surface-area-to-volume ratio at the point. They tend to overheat locally and oxidize faster. Utilizing a larger tip allows you to solder at lower temperature settings, which naturally slows down the oxidation chemical reaction.
Q5. Why is the solder balling up and rolling off?
This is the classic definition of "de-wetting." It means the oxide layer is so thick that the solder cannot touch the iron plating. The surface tension of the solder pulls it into a ball because it cannot "wet" the surface. You need to perform the "Deep Cleaning" step mentioned in Section 6 using a chemical Tip Tinner.
Keep Learning
How to Clean a Soldering Iron Tip Like a Pro: Tools, Steps, and Tips
In the world of electronics manufacturing, from the humblest DIY project to complex aerospace prototyping, the soldering iron tip (or "bit") is the most critical interface. It is the final link in the thermal chain that transfers energy from the heating element to the solder joint. Yet, it is often the most neglected tool on the workbench. Many engineers focus heavily on the quality of their soldering station - checking wattage, temperature stability, and heat-up time - while ignoring the condition of......
How to Create a Bluetooth-Controlled Car With Arduino: A Step-by-Step Guide
This tutorial walks through the complete engineering and implementation of a two-wheel Bluetooth RC car with an Arduino Nano module on a specially designed PCBA (Printed Circuit Board Assembly) is illustrated in this tutorial. While many hobbyists start by wiring motors and Bluetooth modules with jumper cables on a breadboard, this approach is prone to disconnection and signal noise. This guide upgrades that process by teaching you how to design a professional mainboard. Key Design Features: ● Control......
How to Design and Assemble a Reliable ESP32 Module PCB on a 2-Layer Board
Many engineers fail when designing their first ESP32 PCB due to antenna issues, power instability, or SMT defects. Designing a custom board with an ESP32 Module strikes the perfect balance between customizability and ease of manufacturing. Unlike a chip-down design, the module integrates the crystal oscillator, flash memory, and RF matching network, reducing the PCBA risk significantly. Nonetheless, the SMD package (for example, the ESP32-S2-WROOM modules) comes with its own challenges at JLCPCB SMT. ......
What Is the Best Flux for Soldering Electronics? Quick Selection Guide
Choosing the best flux for soldering electronics is a critical—yet often overlooked—factor in achieving reliable solder joints during electronic assembly. Industry surveys indicate that more than one-third of soldering defects, approximately 35%, can be traced back to improper flux selection or incorrect application. Whether you are performing manual soldering during PCB prototyping or operating a high-volume Surface Mount Technology (SMT) production line, a clear understanding of flux chemistry, acti......
PCB vs PCBA: Key Differences You Need to Know!
Understanding the difference between a PCB (Printed Circuit Board) and a PCBA (Printed Circuit Board Assembly) is fundamental to anyone involved in electronics design or manufacturing. PCB and PCBA describe two distinct stages of electronic product development — The first refers to the bare board, and the other to the fully assembled, functional circuit. In this guide, we’ll break down their key differences, explore how each is made, and explain why both are essential to the performance and reliabilit......
Files Needed for PCB Assembly: A Checklist
Your PCB design may appear perfect in your EDA software. The traces are routed correctly, components are placed correctly, and simulations are passed. However, this finished design remains a digital concept. The most important step is to transform that digital file set into a physical, functional board through SMT Assembly (Surface Mount Technology Assembly). A single error in your exported PCB files, whether it's a mismatched component footprint, an incorrect rotation, or a missing solder paste layer......