Capacitor Voltage Rating Explained with Examples
7 min
- What Is a Capacitor Voltage Rating?
- How Is Capacitor Voltage Rating Decided?
- What Happens If a Capacitor Voltage Rating Is Exceeded?
- Why Capacitor Voltage Derating Matters
- Capacitor Polarity and Voltage Ratings
- Types of Capacitors and Their Voltage Ratings
- Practical Examples of Capacitor Voltage Ratings
- Capacitor Voltage Selection Guidelines for PCB Design
- Conclusion

Capacitors are small components widely used not only for power delivery but also for signal conditioning in electronic circuits. In this article, we focus on the capacitor voltage rating across different types of capacitors.
At first glance, capacitors look simple—small cans, discs, or chips on a PCB. However, their markings carry essential design information, including capacitance and voltage rating. These are not arbitrary values but directly affect circuit reliability.
Ignoring the voltage rating when selecting a capacitor is like inflating a balloon without knowing its limit. Overstress it, and it will deform and eventually burst. Similarly, exceeding the rated voltage can lead to circuit failure, board damage, or even explosive failure.
This article explains what capacitor voltage rating means, how it is determined, and what happens when it is exceeded. We will also look at the role of polarity and how different capacitor types vary in their voltage handling.
What Is a Capacitor Voltage Rating?
The capacitor voltage rating (also called rated voltage, working voltage, or WVDC) is the maximum continuous DC voltage that can be applied across the terminals indefinitely at rated temperature without damaging the dielectric.
Voltage Rating vs Capacitance
A capacitor labeled 10 uF / 25 V carries two independent specs:
- 10 uF: capacitance, which represents how much charge it stores per volt
- 25 V: the dielectric's electrical limit, which is completely independent of capacitance
Swapping a 10 uF / 25 V cap with a 10 uF / 50 V part keeps the same capacitance but doubles the voltage headroom. Beginners often treat these as linked; they are not. If you are working with tiny surface-mount components, learning how to read SMD capacitor codes is essential to identify these markings correctly on microscopic packages.
Additionally, make sure you match these electrical parameters to the correct capacitor symbol during schematic capture to prevent assembly mistakes.
Working Voltage, Rated Voltage, and Surge Voltage
- Working Voltage(WVDC): The continuous DC voltage applied to the capacitor during normal, steady-state circuit operation.
- Rated voltage (VR): the maximum safe continuous DC voltage, which is the number printed on the body of the component.
- Surge voltage (VS): per IEC/EN 60384-1, this is typically 1.10x-1.25x V_R for aluminum electrolytics, allowed for <=30 s every 5 min; this is not a continuous operating point.
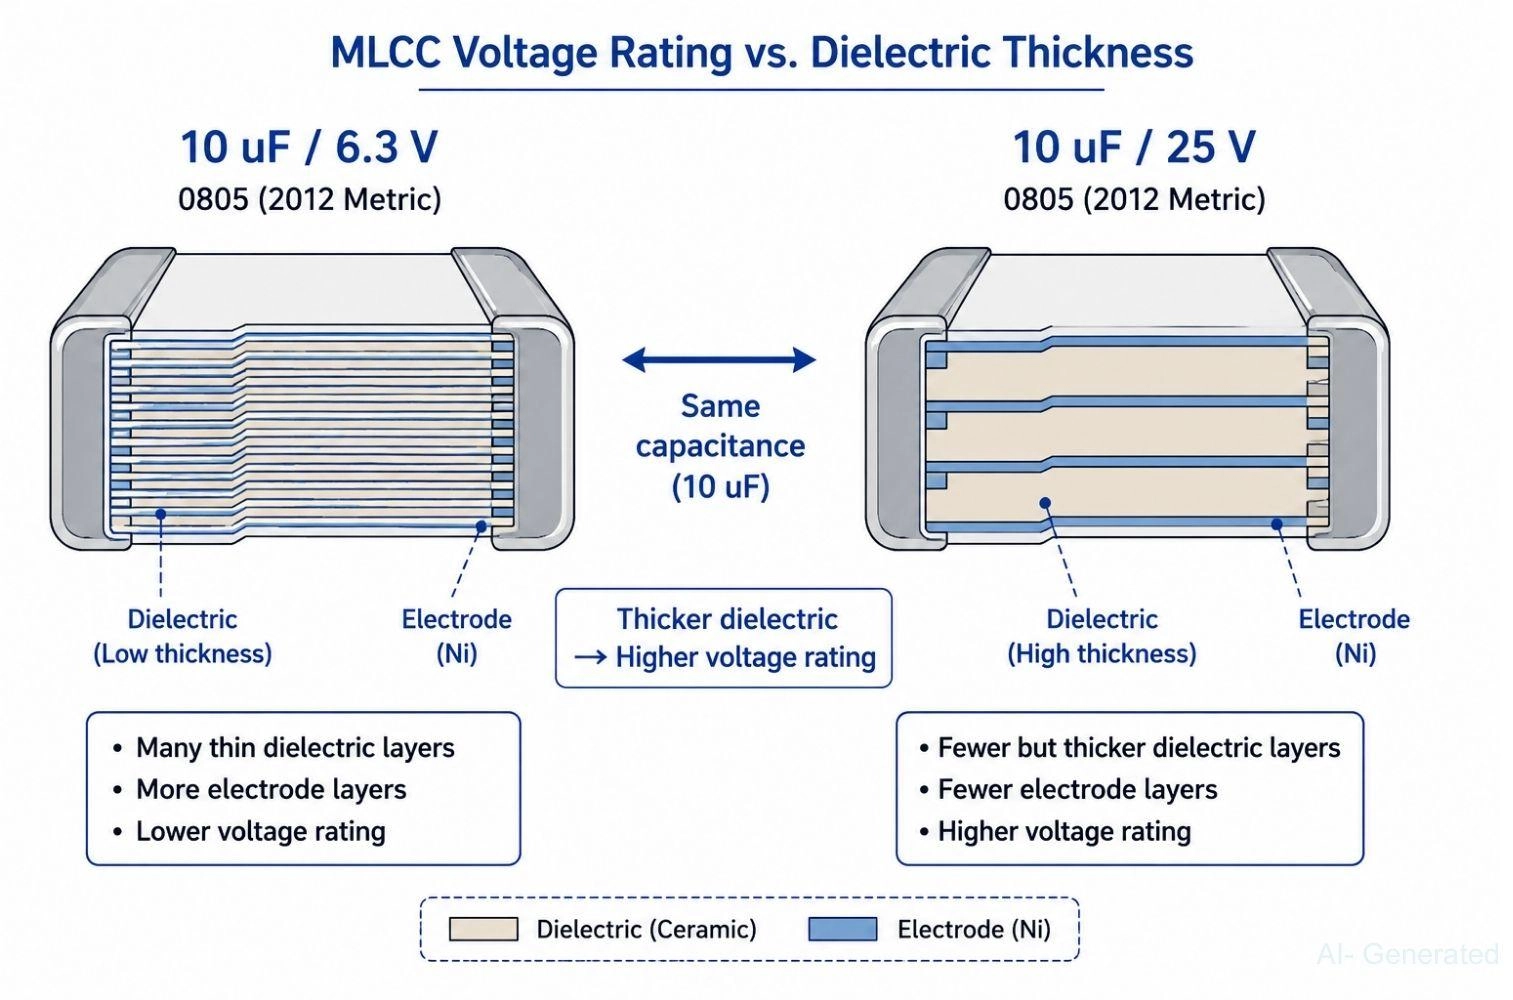
Figure: Comparison of two MLCC capacitors with identical capacitance but different voltage ratings, showing how a higher voltage rating requires thicker dielectric layers.
How Is Capacitor Voltage Rating Decided?
1. Dielectric Material
The dielectric is the insulating material between the capacitor plates. The dielectric strength is measured in volts per micron. The thickness of the dielectric determines how much voltage it can withstand before breakdown.
- Ceramic dielectric: These dielectrics have relatively high dielectric strength. So compact capacitors with high voltage ratings are possible to manufacture.
- Electrolytic dielectric: This capacitor dielectric consists of a thin oxide,which means they have higher capacitance but lower voltage ratings.
2. Physical Dimensions
- The thicker the dielectric layers, the higher the voltage rating, due to a greater breakdown voltage.
- Larger size usually means higher rated voltage, but at the cost of space on the PCB.
What Happens If a Capacitor Voltage Rating Is Exceeded?
Capacitor Overvoltage Failure: Dielectric Breakdown and Short Circuit
When the electric field strength exceeds the dielectric's breakdown threshold, the insulating layer punctures. In MLCCs, this results in a hard short circuit between the plates. In aluminum electrolytics, it triggers high leakage currents, gas generation, and eventual venting of the electrolyte.
In MnO2-cathode tantalums, dielectric breakdown can trigger thermal runaway, where the manganese dioxide ignites exothermically, which is why tantalums are notorious for catching fire when over-voltaged.
For polarized capacitors like these, reversing the installation polarity is equally catastrophic; check out our comprehensive capacitor polarity guide to avoid orientation errors during assembly.
Why Capacitor Voltage Derating Matters
Derating for Reliability and Extended Capacitor Service Life
Operating near or above the rated voltage accelerates wear and increases leakage current, even if the cap doesn't fail immediately. Running a capacitor at 80% of its rated voltage instead of 100% can extend its operational service life by 2x-3x.
Temperature adds to this stress: in high-temperature environments (85 C or 105 C), additional voltage derating is highly recommended to protect the physical chemistry of the component.
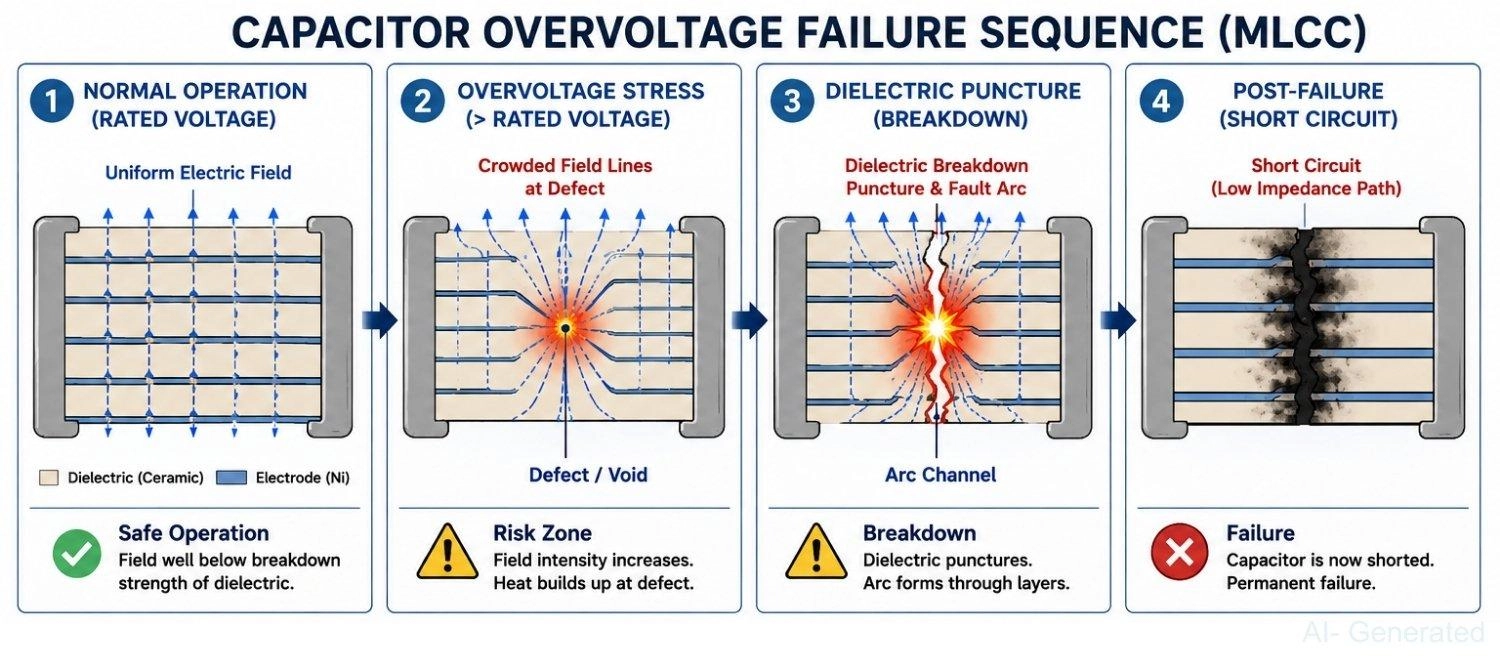
Figure: Illustration of capacitor overvoltage failure modes: dielectric stress, breakdown puncture, MLCC short circuit, and electrolytic venting.
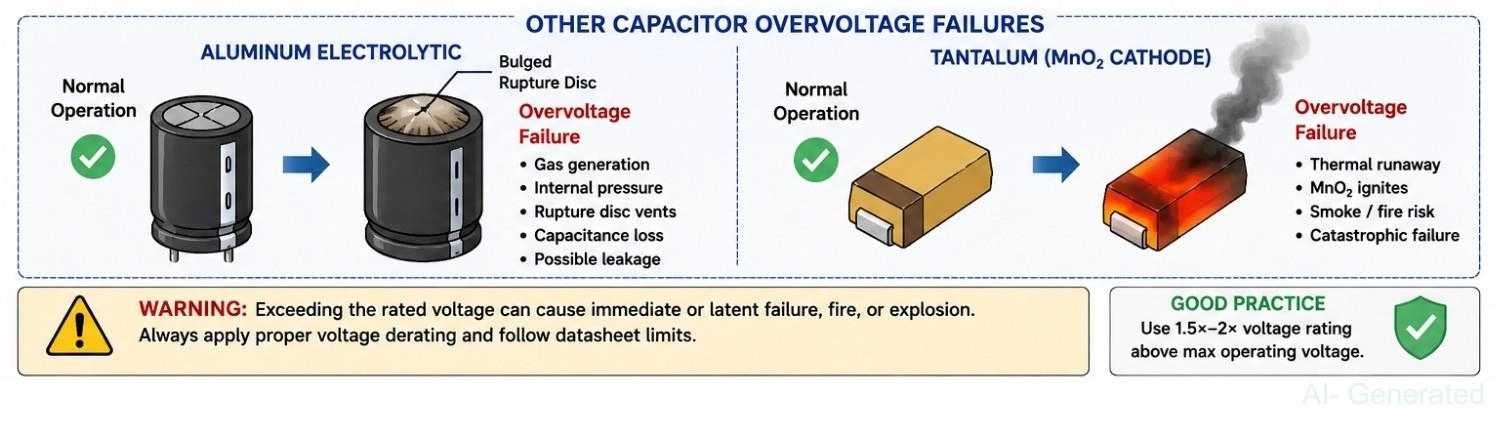
Figure: Illustration of capacitor overvoltage failure of Aluminium Electrolytic Capacitor and Tantulum Capacitor
Capacitor Polarity and Voltage Ratings
Not all capacitors behave the same way with respect to voltage and polarity.
1. Polarized Capacitors:
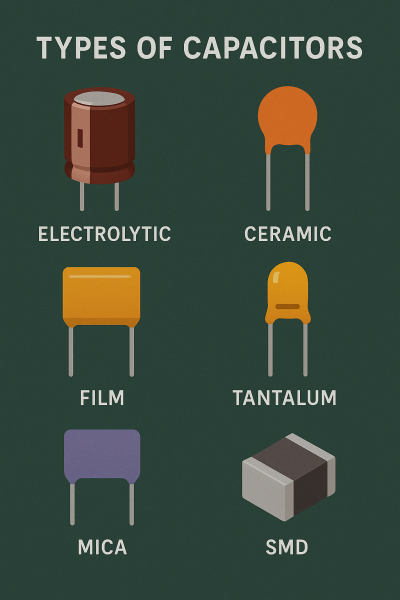
Electrolytic and Tantalum capacitors are polarized capacitors. They must be connected correctly, positive to a higher potential and negative to ground. Applying reverse voltage leads to an explosion. Electrolytic caps are more prone to this because of their higher charge-holding capabilities.
2. Non-Polarized Capacitors:
Polyester film and ceramic capacitors are two main types of caps under this category. They can be directly used in AC circuits since they don’t depend on polarity.
Types of Capacitors and Their Voltage Ratings
Each capacitor type has unique characteristics when it comes to voltage handling.
| Capacitor Type | Typical Voltage Range |
|---|---|
| Ceramic Capacitors | 6.3 V – 5 kV |
| Electrolytic Capacitors | 6.3 V – 450 V |
| Tantalum Capacitors | 2.5 V – 50 V |
| Film Capacitors | 50 V – several kV |
Practical Examples of Capacitor Voltage Ratings
Example 1: 100 µF, 25 V Electrolytic Capacitor
- Common in low-voltage power supplies.
- Works safely with rails up to ~15–20 V.
- At 30 V, it risks overheating and failure.
- Engineers usually use it on 12 V or 15 V supplies with a margin.
Example 2: 100 nF, 50 V Ceramic Capacitor
- Ubiquitous in decoupling digital ICs (3.3 V, 5 V, 12 V lines).
- 50 V rating ensures reliability across common supply voltages.
- Not suitable for mains AC circuits, where special safety-rated capacitors are needed.
These examples show that selecting the right voltage rating depends on both operating voltage and safety margin.
Capacitor Voltage Selection Guidelines for PCB Design
The following are some practical capacitor voltage rating rules for engineers
- Choose a capacitor rated at 1.5–2× the circuit’s operating voltage. For example, for a 12 V rail use at least a 25 V capacitor.
- In switching circuits, spikes can exceed DC levels, so by choosing a sufficiently high value, we always have some remaining headroom for voltage spikes.
- In power supply filters, ripple current can heat capacitors. Ensure the voltage rating and ripple rating are both adequate.
- High temperature reduces the capacitor's lifespan. Follow IPC and IEC standards for capacitor selection in critical systems.
Conclusion
The voltage rating of a capacitor is more than a number printed on its body. As we have seen in detail, it depends on dielectric strength, size, and construction, and it must always be respected in design.
Exceeding the voltage rating can lead to short circuits, heating, or even explosions, especially in polarized capacitors. Different capacitor types (ceramic, electrolytic, film, and tantalum) have different ranges, and engineers must carefully match them to their applications.
The golden rule says, always choose a capacitor with at least 1.5–2× the required voltage. That margin ensures reliability, safety, and long-term performance in any electronic system.
Popular Articles
• PCB Silkscreen: All You Need to Know
• The Comprehensive Guide to Circuit Symbols: Key to Understanding Electrical and Electronic Diagrams
• Design Guidelines for PCB Using FR4 Substrates
• Choosing the Best PCB Color-Enhancing Aesthetics and Functionality
• PCB Board Design: A Step-by-Step Guide for Beginners
Keep Learning
ESP32 Power Consumption Explained: Current Draw, Sleep Modes, and Battery Life
Key Takeaways Power consumption by mode: The ESP32 draws around 240 mA during Wi-Fi transmission, 0.8 mA in light sleep, and just 10 µA in deep sleep, based on Espressif's typical datasheet figures. Deep sleep current: The ESP32 can draw 10 µA in deep sleep, with only the RTC timer and memory remaining powered. Keeping the ULP coprocessor running increases current consumption to around 100–150 µA. Development board power consumption: A typical ESP32 development board can draw around 6.5 mA even in dee......
ESP32 Pinout Reference: Which GPIO Pins Are Safe to Use and Avoid?
Key Takeaways GPIO count: The ESP32 chip has 34 GPIOs, and the ESP32-WROOM-32E module exposes 26 of them. General-purpose pins: Fifteen module GPIOs carry no boot, flash, or input-only restrictions: GPIO4, GPIO13, GPIO14, GPIO16 to GPIO19, GPIO21 to GPIO23, GPIO25 to GPIO27, GPIO32, and GPIO33. Strapping pins: GPIO0, GPIO2, GPIO5, GPIO12, and GPIO15 are sampled at reset, so any circuit connected to them must maintain the level required by the boot mode. Input-only pins: GPIO34, GPIO35, GPIO36, and GPI......
PCB Silkscreen: All You Need to Know
Key Takeaways The PCB Silkscreen Guide demonstrates that a properly designed legend layer is essential to prevent assembly failures and ensure long-term hardware reliability. By mastering modern manufacturing methodologies like Direct Legend Printing (DLP) and aligning layouts with JLCPCB's strict DFM design rules—including the absolute 0.8 mm character height limit and the automated 0.15 mm silkscreen clipping protocol driven by solder mask precedence—engineers can seamlessly eliminate cold joints an......
A Beginner's Guide to Basic Electronic Components: Functions, Symbols & Uses
Every circuit, from a simple LED flashlight to a microcontroller board, is built from the same handful of common electronic components. This guide breaks down the ten basic electronic components you will encounter most often: What each component does How it works Key specifications Where engineers use it By the end, you will be able to recognize these electronic circuit components on a schematic, a PCB, or a parts bin, and know exactly why each one is there. These electronic components are the buildin......
How to Read and Create PCB Schematics
Key Takeaways Read Schematics: Understand symbols, net labels, and component values. Design in EasyEDA: Place components and create circuit connections. Run Design Checks: Use ERC and DRC to identify potential issues. Verify Components: Check pin assignments and PCB footprints. Prepare for Manufacturing: Validate PCB layouts and manufacturing files. Printed circuit board (PCB) design begins with a clear understanding of how the electronic circuit should function. A schematic diagram represents the cir......
Maximizing Circuit Reliability with PCB Test Points and Smart DFT
Key Takeaways Early Fault Catching: Test points drastically reduce diagnosis time and prevent costly field failures. Standard Pad Sizing: Use 1.0 mm flat copper pads with 2.54 mm spacing for optimal fixture contact. Protect High-Speed Signals: Keep branch traces short to prevent capacitive loading and resonance. Single-Sided Access: Place all test pads on the bottom layer to cut fixture costs. Right Test for Volume: Use flying probe for prototypes and bed-of-nails ICT for mass production. A PCB test p......