
How to export PCB to gerber files in ALtium24
Last updated on Apr 18, 2026
Design Rule Setup
Downloadable Files
Our Kind customer has provided loadable DRC rule and Stackup files for our multilayer services.
How to load Stackup files
JLCPCB-4-Layer-Stackup.zip JLCPCB-6-Layer-Stackup.zip
Note, these files are not exhaustively validated or guaranteed by JLCPCB. Use your judgment and always verify your designs meet our capabilities to prevent design defects that could affect your boards. If you have corrections or find errors, please email support@jlcpcb.com.
Generating Gerber file
1. Open your PCB design files on Altium designer software
Select File -> Fabrication Outputs -> Gerber Files.
2. General Setting
In the General Setting are as follows:
Layers Setting
Please make sure you have the clear outline in mechanical layer.
If your board are 2-layer, there will be no inner layer(G1,G2,G3....)
Include the layers that you want to export by marking these, select “Select Used” in Plot Layers.
Usually,the export files include Copper Layer,Solder Mask Layer,Silkscreen,Paste Layers,Mechanical Layer(the board shape layer),Drill drawing,Drill guide.
The following settings can be left as default. Then click Apply.
Generating NC Drill File
1. Generate the Drilling layer in Excellon format.
File -> Fabrication Outputs -> NC Drill Files
2. Set the precision to 2:4. Then click OK.
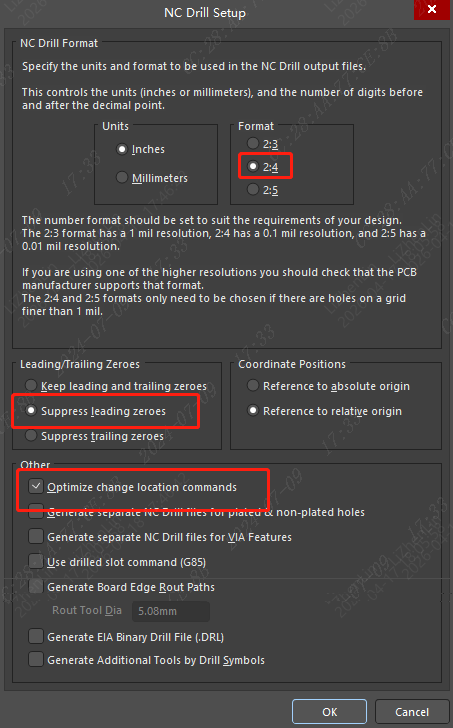
If there are multiple drilled holes, a pop-up box will appear, just click to OK.
Then you get all files. Please put them into a single zip/rar file.
Altium has published a guide on producing those files here:
http://wiki.altium.com/display/ADOH/NC+Drill+Output+Options
If everything looks OK, upload the zip file to JLCPCB order page.