How to generate Bill of Materials and Centroid File from Altium
Last updated on Apr 24, 2025
In this tutorial, we will tell you about the steps to generate BOM(Bill of Materials) and CPL(component placement list, as known as a Centroid file/Pick and place file) in Altium Designer.
BOM File
The BOM or Bill of Materials file tells the manufacturer which components is installed at which position. For example, PCBs have positions like C1,R1,T1 etc. printed on it. But the manufacturer should know what value capacitor or resistor is placed at that location. This information is present in the BOM file and is very important for assembly work. BOM file is a simple text file in comma separated form (csv) but you can also make it in MS Excel or other spreadsheet programs.

As you can see in the above BOM file, we have first column Comment where we should describe the parts in as much detail as possible, the most important being the value of part say 0.1uF but you should also include tolerance, maximum voltage and other information so that the production staffs can pick the best possible parts for your project. Next column is the Designator, that means on which position this part should be placed and soldered. The next one that is the Footprint or package is also very important because SMD parts come in various sizes(packages) so the assembly staffs should know which package would fit in your PCB. You should be aware of common SMT sizes like 1206,0805,0603 etc. The last column is LCSC part number, now this can really help you speed things up and get accurate results. JLCPCB has a large stock of parts (more than 30,000) and each part has a part number. You can use this part number to accurately identify the part you need. Simply download this file, it has the list of all parts available with them and their details. Just choose the part you need and copy/paste its part number.
To save time in your future projects, you can add this parameter to your parts in your CAD software. So the next time you export your BOM file, you can choose this parameter and your BOM file would have this column populated automatically.
We will show you how to do this in Altium but you can do same in other EDA software. First we have opened the Integrated Library Project that contains our basic parts (resistor/capacitors etc.) we have named this file XBASIC. This project contains two parts, one for schematic symbol and another for PCB footprints. Open the file which has schematic symbols and this file has an extension (.SchLib), then go to the schematic library tab.

On that tab we are presented with the list of available parts in that library, for example, I have selected an SMD ceramic capacitor of size 0603 and double click it to open its properties ...

In the parameters area, click the Add button to add a new parameter to this part.

Now add a new parameter named LCSC Part # to our part and then put the part number in its value.

We can get the value of LCSC part number form JLCPCB Assembly website or their part list file which has information about all 30,000 parts.

In the same way, we can add LCSC Part Number in all our parts to ease the assembly process of our future projects.
Generating Bill of Materials
Generation of output files like Gerber files, drill files or BOM files are managed through output job file in Altium. So first you need an output job file in your project.

Now a job file is added to your project and using it you can generate various output files, right now we are focusing on BOM file generation and it is generated using the report output section of job.
Click Add New Report --> Bill of Materials --> [Project]

Now file generating the BOM file we have the option to add this parameter as a column.

Generating Pick and Place files
Using the same output job file we can add a pick and place file generation to our list of output files. See image below ...

Pick and Place File Setup:
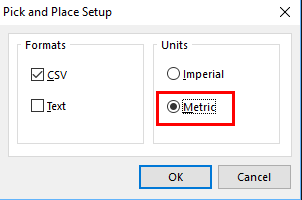

After clicking Generate Content go to your project folder to find the Pick and Place CSV file.

